...
Introduction to the product page
To create a new product, from the "Catalog" page, click on "New product": it will open what is called the product page, where you can create new products or edit existing ones.
Tabs
In PrestaShop 1.7, the product page is organized in tabs:
...
| Tip |
|---|
You cannot create combinations if you do not already have product attributes properly set in PrestaShop. Attributes creation is done in the "Attributes & Features" page from the "Catalog" menu, and is explained in details in this dedicated chapter of the documentation. |
To find out about Combinations, read the dedicated section at the end of this chapter.
Quantity
Indicate how many products are available for sale.
...
For more information on product combinations, read the dedicated section at the end of the page.
| Info |
|---|
| Packs and virtual product have different stock settings, you will find all you need at the end of this chapter. |
...
- Label when in-stock. Enables you to display a message to your visitors when your product is in stock, for example "Item available". It reassures them that your shop can immediately send them the product.
- Label when out of stock and back-order active. Enables you to display a message to your visitors when your product is out of stock but they can still order it (as set using the "When out of stock" selector), for example "Pre-order now!". It reassures them that your shop will send them the product immediately once it is in stock.
- Availability date. Indicate when the product will be back in stock.
You can also configure the general settings applied to all of your products: the default option is to deny orders, but this can be modified under the "Products Settings" in the "Shop Parameters section" ("Allow ordering of out-of-stock products" option), which is fully explained in the "Understanding the Preferences" chapter of this guide.
...
| Info |
|---|
There are many more product-related options in the "Product settings" page from the "Shop parameters" menu:
You should really check that these global settings are set as you wish. |
Anchor Combinations Combinations
Creating a product with combinations
Blabla
To enable product combinations, you must first choose the "Product with combinations" option from the "Basic Settings" tab. You will see the "Quantities" tab change to "Combinations", and this is where you will be able to manage your product combinations.
| Tip |
|---|
You cannot create combinations if you do not already have product attributes properly set in PrestaShop. Attributes creation is done in the "Product Attributes" page from the "Catalog" menu, and is explained in details in the chapter of the same name of this guide. |
How your product attributes are combined into combinations is up to you, and PrestaShop gives you two methods to achieve this.
Adding combinations
Manual method
Faire screencast
This method helps you create combinations one after the other. Therefore, it is to be reserved to either products with few combinations, or products with very specific combinations that can't be created reliably using the automatic method (see next section).
Adding a new variation to your product takes just a few steps.
- In the combination bar, enter the combination of attributes you need to create, with their corresponding values.
For example, if you need to create a combination for a t-shirt, size M and color red, you should enter "size m color red". As you type in, you will see suggestions appearing below the bar, simply select the attributes and values you need.
You can add as many attribute-value pairs as necessary to one combination.
You can only add one pair per attribute to one combination: it is impossible to have both "Color: Blue" and "Color: Red" in your pairs; if this is necessary, you will have to create new attributes, for instance "Primary color" and "Secondary color".
You can delete an attribute-value pair by clicking on the cross in its grey box.
2. When you have all the needed attributes, click on "Generate" on the right.
3. The combination will appear in a table below.
Automatic method
Faire screencast
If you have too many different products versions or varieties, you can use the "Product Combinations Generator." This tool allows you to automatically generate all of the combinations and possibilities.
Instead of typing each combination you want, you can use the selector on the right side of the page. It lists all the attributes and their corresponding values.
Here's how you should do:
- For each attributes, tick the values you want to add as combinations. You can select several values for each attributes to save some time.
- It will automatically add the corresponding combinations in the bar on the left.
- If you're happy with you selection, click on "Generate": it will automatically create your combination, with all the possible combinations.
For a single combination, you can edit its quantity directly in the table, edit it (by clicking on the pencil icon) or delete it (with the trash icon).
Managing combinations
Default combination
When you have several combinations available, you should choose which combinations will be the default combination. It will be the combination your customers see when they arrive on the product sheet. If they want to purchase another combination, they will have to select it themselves (by either changing the color, size or any attribute you may have).
Editing a combination
Each combination can be further managed by clicking on the edit icon. It will open a small window when you can change the details for this specific combination.
- Combination details
- Set as default combination. You can tick this option to make the combination the default one.
- Quantity. Enter the quantity available for sale for this combination
- Available date. If out-of-stock, when will the combination back in stock?
- Minimum quantity for sale. You might prefer this product to be sold in bulk. Use this field to set the number of items to be sold in bulk. It means customer will be able to purchase this product only when they reach this minimum quantity.
- Reference and Specific references (ISBN, EAN-13 & UPC). If necessary, indicate the combination's reference, ISBN EAN-13 and/or UPC numbers into each field, as if you were creating a brand new product in PrestaShop. These numbers may be used by your warehouse or your carrier, so make sure to fill these fields, they are often essential to your business.
- Wholesale price. This field is useful if the original price of the product changes simply because this is a combination.
- Impact on price/weight/unit price. If the combination is supposed to have an impact on the product's original price/weight/unit price, choose the appropriate dropdown menu, select "Increase" or "Reduction" depending on the context, and fill the field that appears with the value of that impact.
- Ecotax. The specific ecotax for this combination (if the ecotax option is enabled).
- Minimum quantity. You might prefer this combination to only be sold in bulk. Use this field to set the number of items to be sold in bulk.
- Available date. If this product is out of stock, you can indicate when the product will be available again.
- Image. The images that are linked to the original product (as uploaded using the form in the "Images" tab on the left) are displayed. Check the box for the images that best represent this combination.
- Default. Check this box if you want the combination you are creating to actually be the main one for this product.
Bulk actions
Click on the "New Combination" button at the bottom of the page, next to the "Save" buttons. A form appears:
- Attribute-value pair.
- From the drop-down menu, choose a group of attributes, such as "Color" for example. The content of the "Value" dropdown list updates accordingly.
- Choose the attribute value that you would like to include, for example "Blue".
- Click on the "Add" button and it will appear in the selector.
You can add as many attribute-value pairs as necessary to one combination.
You can only add one pair per attribute to one combination: it is impossible to have both "Color: Blue" and "Color: Red" in your pairs; if this is necessary, you will have to create new attributes, for instance "Primary color" and "Secondary color".
You can delete an attribute-value pair by selecting it and clicking on the "Delete" button.
When you have set all of the combination's details, save your product changes using the "Save and stay" button. Your combination will appear in the attributes list at the bottom of the screen.
Creating a virtual product
Your shop may feature (partly or exclusively) virtual products – that is, products that are not shipped, but rather downloaded: entertainment tickets, e-books/PDF files, real-life services...
PrestaShop makes it easy for you to create a virtual product.
The process to do this is similar to the one for creating a simple product:
- Go to the "Products" page, under the "Catalog" menu.
- Click the "Add New" button.
- Next to the product name, change the product type to "Virtual Product".
The page organization will change:
- The "Quantities" tab becomes "Virtual Product".
- The "Shipping" tab disappears.
The "Virtual Product" tab only features one option at first: it asks if the virtual product you are creating has a file attached (i.e., if your customer will pay to download something).
- If not, leave it at that: you are selling a service, and nothing needs to be downloaded.
- If yes, click the "Yes" option.
When you click "Yes", PrestaShop opens a new form within the tab, from which you can upload the file you intend to sell:
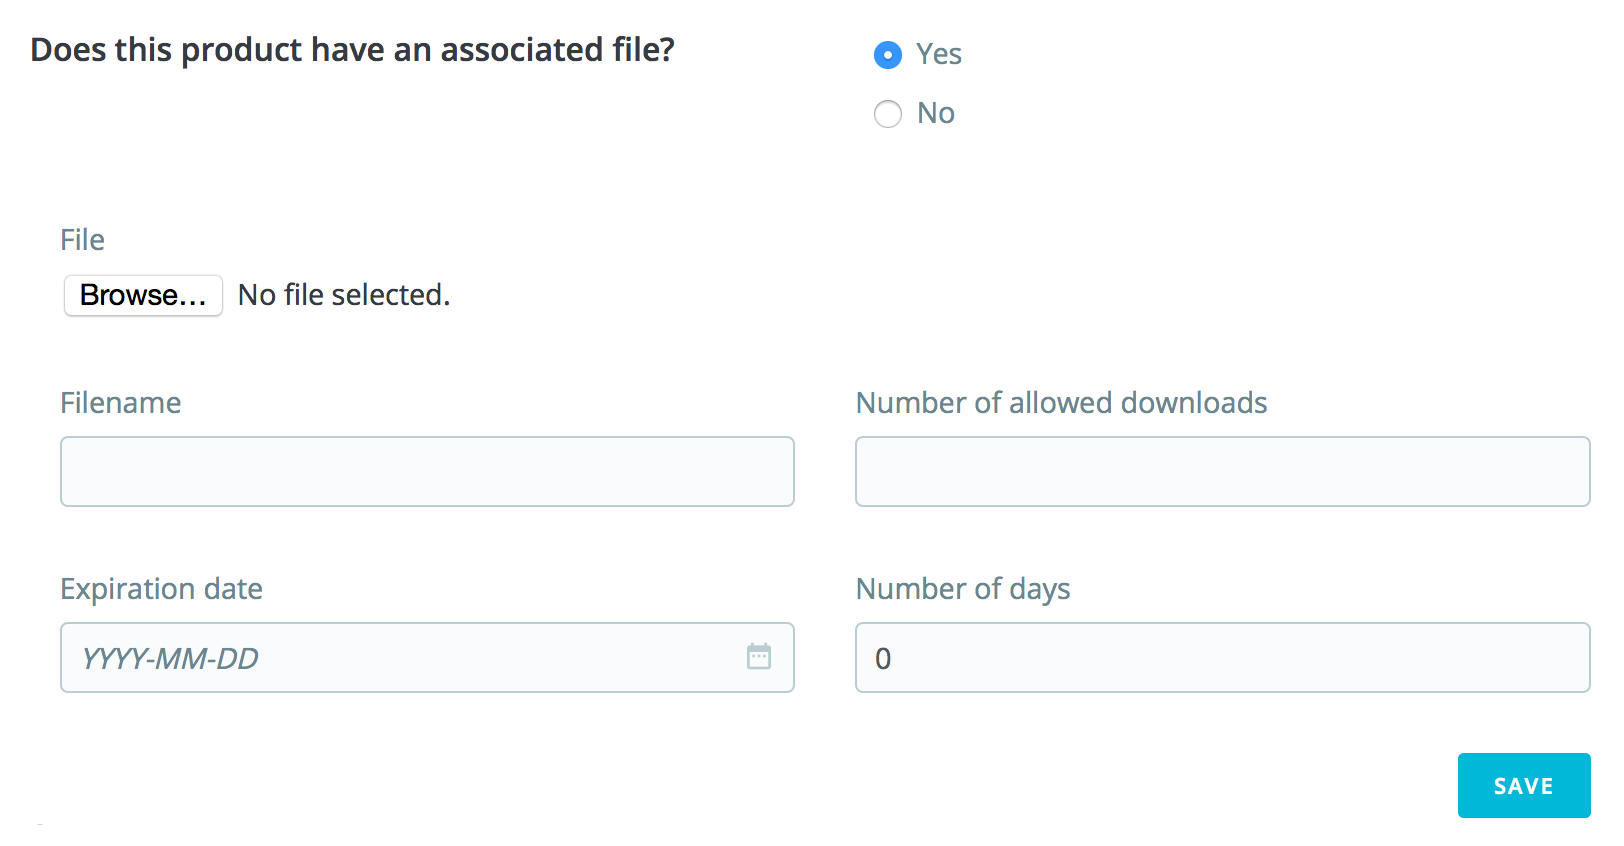
File. Click the "Browse" button to find the file on your hard drive. As soon as you have selected a file, the upload begins.
Info The maximum file-upload size setting depends on your server's settings, and cannot be increased from PrestaShop.
If you have access to your server's
php.inifile, these are the values you should change:upload_max_filesize = 20Mpost_max_size = 20M
If you do not have access to the
php.inifile, contact your web host about this.- Filename. The name of the file. This field is automatically filled after the file has been uploaded. It is not recommended to change it to another value.
Note You should compress your file in zip format, in order to avoid the browser misinterpreting
.exeor.jpgfile formats. Browsers automatically download zip files for the customer, no question asked.If you are selling a high resolution image, uploading it using this form does not prevent you from uploading its thumbnail in the "Images" tab on the left.
- Number of allowed downloads. You can set the number of time the file can be downloaded once the customer has bought it. You might prefer to limit this to 1, or 5. If you want to keep it unlimited, set the text field to 0.
- Expiration date. Virtual files can be of promotional nature, or lose their selling value after a certain date. If so, you can set the expiry date after which the product will not be available on your shop anymore. Leave it blank if there is no expiry date.
- Number of days. You can set the number of days after which the download link becomes non-functioning. If there is no limit, set the text field to 0.
Once you are done with the "Virtual Product" tab, you can edit all the other available tabs as if you would for a regular product.
...