Managing Products
You can manage the products in your shop using the "Products" page, in the "Catalog" menu.
...
Gestione dei prodotti
Puoi gestire i tuoi prodotti nel negozio utilizzando la pagina "Prodotti", nel menu "Catalogo".
Selezioni in questo capitolo:
| Table of Contents | ||||
|---|---|---|---|---|
|
The Product List
...
Lista prodotti
Cliccando sull'opzione "Prodotti" nel menu "Catalogo" entri nella lista dei tuoi prodotti, mostrati con i dettagli principali: ID, immagine, nome, riferimento, categoria, etc.
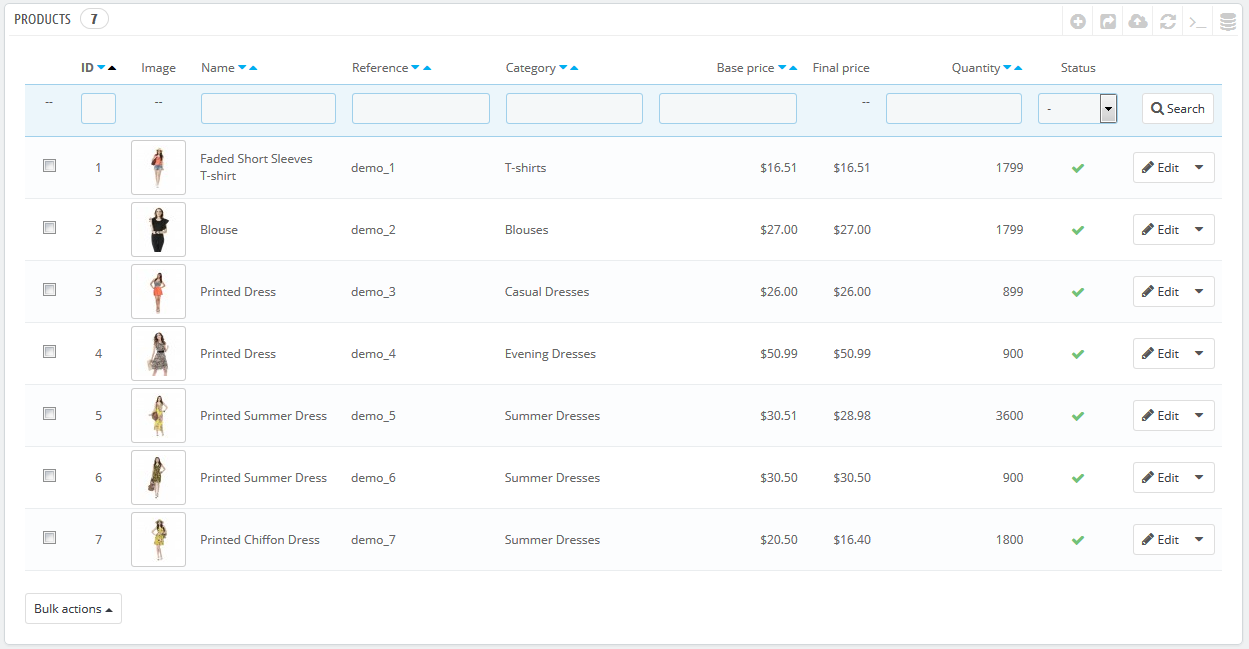
Beside the product list, this page presents you with four statistics from your store:
- Percentage of in-stock items,
- Percentage of average gross margin,
- Percentage of sales during the last 30 days,
- Number of disabled products.
The "Filter by category" option enables you to only display products pertaining to you current search, as well as reorganizing the position of products within a categoryOltre alla lista prodotti, questa pagina ti offre anche 4 statistiche per il tuo negozio:
- percentuale degli articoli in magazzino,
- percentuale del margine di guadagno medio,
- percentuale delle vendite durante gli ultimi 30 giorni,
- numero dei prodotti disattivati.
L'opzione "filtro per categoria" dà la possibilità di mostrare i prodotti che si riferiscono solo alla tua ricerca in corso, e di riorganizzare la posizione dei prodotti all'interno di quella categoria.
| Info | ||
|---|---|---|
| ||
You cannot reorganize the whole list of products. The products are displayed as is in your store (by increasing ID number), and the customer can choose the product's order using the available sorting algorithms: lowest price first, highest price first, product name A to Z, product name Z to A, in-stock first, lowest reference first, highest reference firstNon puoi riorganizzare tutta una lista prodotti completa. I prodotti vengono presentati come nel tuo negozio (aumentando il numero ID), ed il cliente può scegliere l'ordine dei prodotti utilizzando gli algoritmi disponibili: prima quelli con il prezzo più basso, prima quelli con il prezzo più alto, i prodotti dalla A alla Z, i prodotti dalla Z alla A, prima quelli in magazzino, prima i meno consultati, prima i più consultati. You can organize products on a per-category basis by clicking on the "Filter by category" checkbox. This opens a small interface listing all your categories and sub-categories. Selecting one category automatically filters the list of products to only display products from the selected category. It also adds a "Position" column to the table, with which you can order the product on the category page. This is done either by moving the rows up and down, or by clicking the arrows. Your product order can then be overridden by the user's sorting choice. Note that when you change the display order in the product list in the back office (by clicking on column name's arrow in order to sort products according to that column), the "Position" column does not display arrows nor can you use it to move rows around anymore. Instead, it displays the position number of the product. In order to be able to position products again, click on the "Reset" button. |
...
You can add new products by clicking on "Add new". A form appears, with several tabs in the left column and two buttons at the top: "Back to list" and "Help".
The Product Creation Page Global Buttons
By default, the product creation page has two buttons that you will find on most the administration pages: "Recommended modules and Services" and "Help".
...
- Preview. Displays the front office page of your product. This is very handy, as it works even if the product is disabled ("Information" tab).
Duplicate. Creates an exact copy of the current product. This is very useful when you'd rather use the current product's data as a template for another new product, and not have to create every data of the new product by hand. For instance, two products might be very different, but could share the same associations, carriers or supplier settings.
Note title Don't over-duplicate! If you need to create different versions of the same product, because of its variety of colors, capacity, size, etc., then you should create product combination for the current product rather than duplicating it X times. See the "Combinations" tab on the left, which is explained in the "Adding Product Combinations" section of this chapter.
- Product sales. Redirects you to the "Product detail" page of the statistics dashboard ("Stats" menu), which gives you a graphic of both the visits to this product's page, and also its sales.
- Delete this product. Removes all the data for the current product, including its images, combinations, features, etc.
- Recommended modules. Opens a modal window suggesting you to install some popular modules from PrestaShop's Addons marketplace.

Filling out the Product Information
The first tab contains the basic information about the product.
...
Once you have filled out all this information, save your work, after which you will be sent to your list of products. If you save by clicking on "Save and Stay", you will be able to continue working on your product's presentation.
Setting the Price of a Product
This is all done in the "Prices" tab on the left. The pricing section can be quite intimidating, with fields influencing each other and taxes to take into account – but it is in fact quite simple.
...
At this point, you are done with the essential information for a basic product page. You can save it and have it immediately available for sale on your shop!
But keep reading, as there are many more details you can add to your product to make it more attractive to customers.
Specific prices: Managing Quantity Discounts
You can changes the total price of the product depending on the quantity of products your customer buys, the user group, the country, etc. This is done with the "Specific prices" section of the "Prices" tab. Click on the "Add a new specific price" button to reveal the creation form.
...
If you want to build more complex discounts, go read about the "Price rules" menu in the "Creating Price Rules and Vouchers" chapter of this guide.
Managing Price Priority
A customer might fit into multiple prices or discount rules, even when you have set detailed prices and quantity discounts, with custom groups and shops (if in a multistore context). PrestaShop therefore uses a set of priorities in order to apply a single price rule to such customers. You might want the user group to be more important than the currency, for instance.
...
A checkbox at the bottom enables you to update the settings for all products. If the checkbox remains unchecked, then your changes only apply to the current product.
Optimizing your product's search engine position (SEO)
To improve your product listing as well as increase your store's visibility we suggest that you carefully fill out the various SEO fields: meta titles, meta descriptions, and keywords and friendly URLs.
...
| Warning |
|---|
Friendly URLs will only work if URL rewriting is enabled. You can do this in "SEO & URLs" preference page, in its "Set up URLs" section. You will find more information on the "SEO & URLs" preference page in the "Understanding the Preferences" chapter of this guide. |
Managing the Product's Associations
Creating associations for your product means pairing it with other content in your database:
- Product categories.
- Other products (accessories).
- Manufacturer.
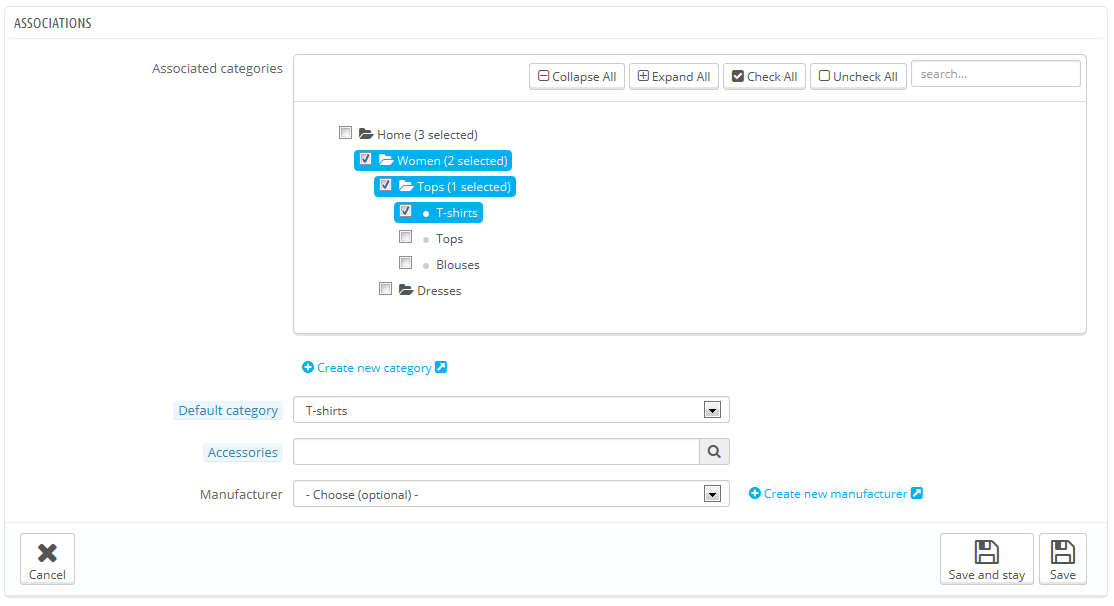
Product categories
The "Associated categories" section enables you to select in which category the product should appear. You can select more than one, but keep in mind that it is better for the customer if the category only contains equivalent and comparable products. Therefore, you should prevent from selecting root categories, and prefer child categories.
For instance, the "telephone" category can feature sub-categories of "brands" (Apple, Samsung, Nokia, etc.) and as well as "characteristics" (smart-phone, flip-phone, etc.). It is up to you to indicate the category most useful to your customers.
If you feel you need to add a category, save the current state of your product before clicking the "Create new category" button. Category creation is explained in another section of this guide.
...
| Tip | ||
|---|---|---|
| ||
Checking the "Home" box enables you to highlight the product on your shop's homepage, provided your theme supports it. To remove a product from the Featured list, simply uncheck the "Home" box. |
Accessories
The "Accessories" field gives you the option of choosing relevant products to associate with this product, to suggest them to your customers when the visit the product's page (if the theme supports it). Type in the first letters of product and select it. The product is then added at the bottom of the field.
...
| Tip |
|---|
Accessories addition/removal is not automatically saved! Do not forget to click on the "Save" button. |
Manufacturer
A product can only be associated with one manufacturer. Choose one in the dropdown menu, or create a new manufacturer if it is needed (but do save your current product before clicking the "Create a new manufacturer" link).
Evaluating Shipping Cost: Size, Weight, Carrier
Shipping costs are not be neglected: they can easily double the final cost of an order, and you should be very upfront about them – customers hate bad surprises.
...
Package width, height, depth & weight. You should strive to fill each field, because knowing the exact size and weight of a package is not only useful to you, but PrestaShop can also direct specific sizes/weights to specific carriers automatically, based on these settings. The order's final price will appear to the customer once PrestaShop (or the customer) has selected a carrier.
Note These values use the default weight, volume, distance and dimension units, as set in the "Localization" page of the "Localization" menu.
These values do not have to be integers. If your products weight less than 1 lbs, you can simply use a period (.) to indicate the fractions:
- 123 lbs
- 1.23 lbs
- 0.23 lbs (equals 3.68 oz)
- etc.
- Additional shipping fees. This can prove very useful to you for specific products that are particularly tricky to package, or really heavy.
- Carriers. You can choose to have the current product only be shipped by a selection of carriers. If no carrier is selected then all the carriers will be available for customer orders.
Adding Product Combinations
You will often sell the same product under different versions: they share the same overall name, but they might differ by their color, their capacity, their screen size, and other attributes. Most of the time, these attributes come together: you could have the red version of the product available with either 1 Gb capacity or 2 Gb, or with 12'' screen or a 15'' screen. This is why PrestaShop calls these versions "combinations": your stock of products can be made of several variations of a single product, which in effect are simply its attributes combined in specific ways.
...
How your product attributes are combined into combinations is up to you, and PrestaShop gives you two methods to achieve this.
Manual method
This method helps you create combinations one after the other. Therefore, it is to be reserved to either products with few combinations, or products with very specific combinations that can't be created reliably using the automatic method (see next section).
...
| Info | ||
|---|---|---|
| ||
In PrestaShop 1.4, there used to be a "Color picker" form at the bottom of the list of combinations, where you could choose to display a color picker or not on the product page. Since PrestaShop 1.5, this option has been moved and improved. When creating a new attribute (in the "Catalog" menu, "Attributes & Values" page), you can use the "Attribute type" drop-down list to choose whether the front-page should display it as a drop-down list, a radio button list, or a color picker. |
Automatic method
If you have too many different products versions or varieties, you can use the "Product Combinations Generator." This tool allows you to automatically generate all of the combinations and possibilities.
...
As you can see, the combination generator helps you save a lot of time when you have numerous attributes to assemble, such as sizes and materials. It automatically creates all of the possible combinations, which will then appear under the product's public page, in the "Combinations" tab (if the theme supports it).
If you do not want to keep all generated combinations or if they are in fact not all exactly the same (different references, prices, available dates...), you can delete them (trashcan icon) or modify them (file icon) from the product's combination list. The star icon turns the selected combination into the default one – in which case it is highlighted in blue.
Managing Product Quantities
Product quantities are managed in a single tab. The way it works is quite easy: the page presents you with a table of all the combinations for the current product (if there are no combinations, the table simply has a single row). It is up to you to set the initial stock for all the combinations. PrestaShop will use this to determine when a product is soon out-of-stock or unavailable anymore.
Stock Management Options
The quantities tab supports the advanced stock management feature, if activated. This means that if the current product's combinations are distributed among several storage locations, PrestaShop is able to handle the exact location of each combination, even within a given warehouse.
...
To use advanced stock management for the current product, checking the box for "I want to use the advanced stock management system for this product". Once this is done, an option becomes available: "Available quantities for current product and its combinations are based on warehouse stock". Click it, and you cannot edit the current product's quantities from the "Quantities" page anymore: it has new become dependent of your stock management.
When out of stock
The "When out of stock" option enables you to set PrestaShop behavior when the product is out of stock: deny orders (the product is not available for sale anymore) or allow order (in essence, you are doing pre-sales). The third and default option simple uses the global default setting ("Preferences" menu, "Products" page, "Product Stock" section, "Allow ordering of out-of-stock products" option).
Availability Settings
At the bottom of the page, you can set the exact behavior of PrestaShop depending on the availability of the current product.
...
You can also configure the general settings applied to all of your products: the default option is to deny orders, but this can be modified under the "Products" preference ("Allow ordering of out-of-stock products" option), which is fully explained in the "Understanding the Preferences" chapter of this guide.
Configuring the Product's Images
The "Images" tab on the left is for including photos on your product page. You should upload all the images for this product, including all of its combinations (color, size, shape, etc.).
...
Once you have uploaded all your product images, you can modify the image order by drag-and-dropping each table row when the mouse cursor changes to a "movable" cursor.
Configuring Product Features
The "Features" tab is where you specify your products' features (i.e. weight, material, country of origin, etc.).
...
Be aware that contrary to the combinations, these values do not change, and are valid for the general product (meaning: all your combinations will share these same features).
Creating a feature
Before adding a feature to a product, you must create it for general use in your shop. You either go to the "Features" page of the "Catalog" menu, or directly click on the "Add a new feature" button. A warning will appear, "You will lose all unsaved modifications. Are you sure that you'd like to proceed?" – make sure all your changes are saved before validating.
Feature and feature value creation are explained in details in the dedicated section of the guide.
Assigning a value and feature to a product
We will assume here that you have already set all your features and feature values.
...
Remember: If a feature does not have any value assigned to it, it will not be taken into account for this product, and will not be visible on your shop.
Managing Customization
PrestaShop makes it possible for your customers to customize the product that they will buy.
...
Once all the label fields have been filled, do not forget to save your changes.
On the customer's side
Once a product has customizable properties set, its front-end product page has a new tab, next to the "More info" tab: "Product customization".
...
The rest of the purchase process is the same as usual.
On the merchant's side
Once the order has been validated by the customer, the merchant gets a notification of the order in the back office.
...
The rest of the order and delivery process is the same as usual.
Managing Attachments
PrestaShop enables you to make some files available to your customers before their purchase. This is done in the "Attachments" tab on the left.
...
You can view all of your store's attached files, add some more and remove some, by going to the "Attachments" page under the "Catalog" menu. This also makes it possible to use the attachments that you already uploaded for other files: if you need to apply the associated one file with many products, you will thus only have to upload it once.
Setting the Product's Supplier
Indicating the product's supplier is not really important to your customers (very much less so than its manufacturer in any case), but it may turn out to be an essential part of your own internal management, not the least when managing your stock: you simply need to know who you bought the product from. The supplier of the current product is to be set from the "Suppliers" tab on the left.
...
If the product is associated with more than one supplier, you can choose which one should be the default one using the radio button on the right.
Note: the "Default" radio buttons are unavailable by default. In order to select them, you must first click the "Save and stay" button" in order to select another supplier as default.
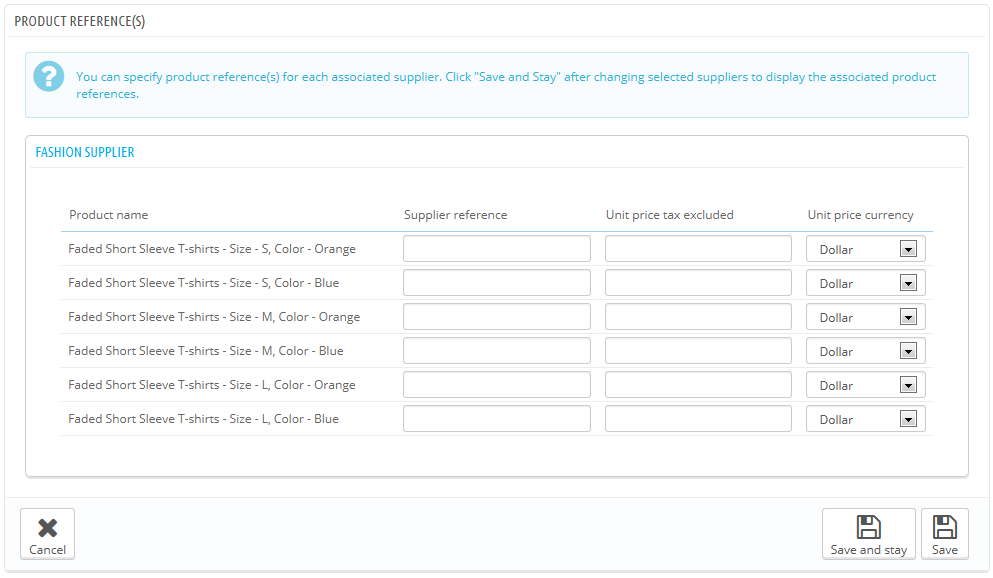
Product reference(s)
The product's supplier page also features a table that enables you to set the precise reference and unit price/currency for each product combination. If the product has more than one supplier, the table only opens the combination tied to the first supplier, the others being closed by default. Click on a supplier's name in order to open its references table, and close the others.
Managing Warehouses (advanced)
Once you have enabled the advanced stock management option (in the "Products" preference page), this new tab gets available for all products, and enables you to indicate in which warehouse the current product is stored.
...
For each warehouse, you can set which combination of the current product is stored, and a text field enables you to indicate precisely where it is stored in that warehouse. You can write anything in that field: "Aisle 5", "Next to the Radiohead albums", "A07 E08 H14", or anything that helps you or your packaging team to find the product as quickly as possible.
Creating a Pack of Products
You may wish to sell a pack of products made of several items. I.e.: a computer start-up pack composed of the computer itself, a monitor, and a printer. PrestaShop makes it easy for you to create a "pack" product and add other products from your catalog to this pack.
...
Once you are done with the "Pack" tab, you can edit the content of all the other available tabs as if you would for a regular product.
Creating a Virtual Product
Your shop may feature (partly or exclusively) virtual products – that is, products that are not shipped, but rather downloaded: entertainment tickets, e-books/PDF files, real-life services...
PrestaShop makes it easy for you to create a virtual product
...