Table of contentsTabla de contenidos
| Table of Contents | ||
|---|---|---|
|
Catálogo de Módulos y Temas
PrestaShop comes bundled with more than 100 modules, but even that number might seem limiting, or you could want to explore other directions.
There are many more modules available on the PrestaShop Addons website viene acompañado con más de 100 módulos, Sin embargo, puedes añadir más módulos si encuentras alguna limitación que no puedes resolver con ninguno de los módulos incluidos, o si deseas explorar e incluir otras posibilidades.
Hay un gran número de módulos disponibles en el sitio web PrestaShop Addons (http://addons.prestashop.com/). Some are free, others are for-pay, and you are sure to find something that suits your needs! Once you are a seasoned module developer/theme designer, you can even submit your own creations, and sell them on Addons!
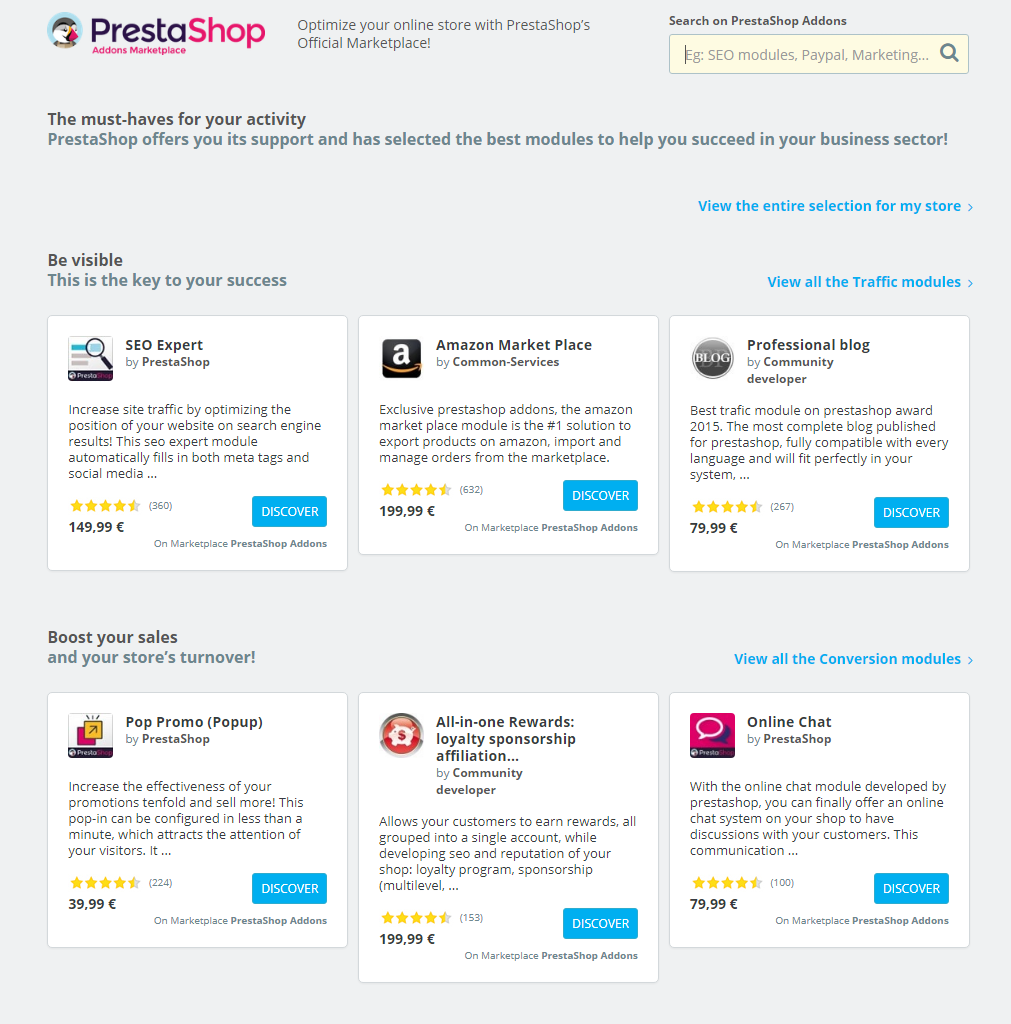
The "Modules & Themes Catalog" page gives you a quick and easy access to the online Addons database of modules and themes. Its interface is pretty straightforward:
- A search field, with which you can search the whole content of the Addons website.
- A list of 8 modules that you can buy directly.
- A list of 12 themes that you can buy directly.
A search query will send you to the Addons website, where more options are available.
Clicking on an item will open its Addons page in a new browser tab.
| Info |
|---|
Addons is the official marketplace for PrestaShop Modules and Themes. This is where shop owners can get all the necessary items to customize their shop, and where authors can share their creations with the community. Modules and themes can either be free or for-sale: the price is set by the author. Take the time to browse the available modules and themes, because expensive does not always mean better. You must be logged-in before you can download or rate anything. Creating an account is free. |
Installing a module
Once you have downloaded a module from the Addons online shop to your computer, it is up to you have it installed on your PrestaShop site.
There are two ways to install a module: either using the dedicated form, or using your FTP client.
Installing using the dedicated form
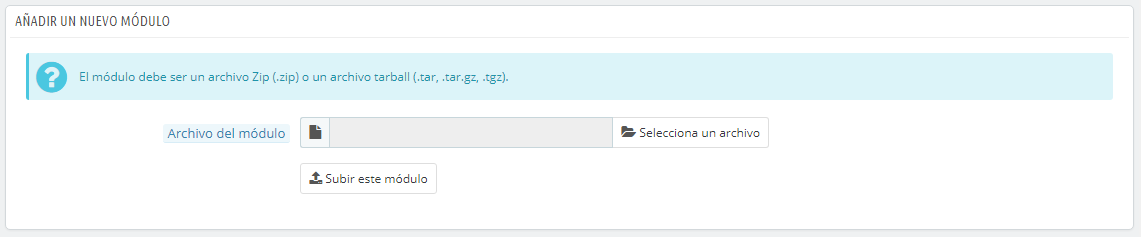
To install a new PrestaShop module automatically, click on the "Add new module" link at the top of the list of modules, in the "Modules" page. A new section will slide open.
The form in this section enables you to upload the archive file of the module, as downloaded from Addons. You can either upload a zip file, or a tar.gz one (tarball). The form is straightforward: simply browse to the module's file that you downloaded, and click the "Upload this module" button. Do not point to the module's uncompressed folder or any of its unpacked files: only the archive file!
Once you have clicked the button, PrestaShop will upload the module from your computer to its server, unpack it, place the files in the correct location, and update the page, all this in a handful of seconds. PrestaShop will then display "Module downloaded successfully".
Modules are not installed by default: you still have to click the module's "Install" button, and then possibly configure its settings.
Once configuration is complete, be sure to test the module immediately to confirm that it works as planned.
Installing using a FTP client
To install a new PrestaShop module manually:
- Unzip (decompress) the module archive file (
.ziportar.gz). This should result in a new folder. - Using your FTP client, connect to PrestaShop web server, and place the unpacked module folder in PrestaShop's
/modulesfolder.
Pay attention NOT to upload that folder in another module's folder (which can happen when drag-and-dropping items). Upload both the folder and the files it contains, not just the files. - Go to your back-office, in the "Modules" menu.
- Locate the new module in the modules list. You might have to scroll down; you can also use the list's search engine, which should give you a dynamically updated list of matching module names.
- In the row for the new module, click the "Install" button.
- Your module is now installed and should be activated too. If necessary, click on the module's "Configure" link. Also, pay attention to any warning message that might be displayed by PrestaShop.
Once configuration is complete, be sure to test the module immediately to confirm that it works as planned.
| Warning |
|---|
Modules can come from many sources, and not all of them are reliable. This is why PrestaShop 1.6.0.7 introduced a warning window for "Untrusted" modules – that is, modules that have not been verified by PrestaShop through its Addons marketplace. This screen window lets you choose whether to proceed with the installation with no further notification, or to stop the installation process. Installing a native module or a module obtained through Addons will not trigger the display of this window. |
Updating a module
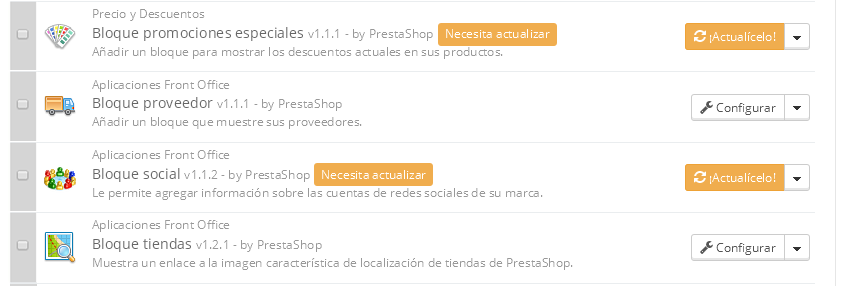
Your PrestaShop installation regularly checks with the Addons server if there is any update for your modules. If so, PrestaShop displays a "Update it!" link for the affected modules. Simply click it, and PrestaShop will take care of downloading and updating the module.
Uninstalling a module
| Warning |
|---|
Do not ever delete a module by directly trashing its folder using your FTP client! You must let PrestaShop take charge of it. |
When you need to temporarily stop using a module, but still wish to keep its configuration, you can simply disable it: just click on the "Disable" link. The actions will turn into "Enable" and "Delete", but the "Uninstall" button can still be seen.
If you do not care about the module's configuration, click on the "Uninstall" button: your module's folder will still be in the /modules folder, but the module will not have any impact on your shop anymore.
If you wish to entirely remove the module from your server, click the "Delete" link: PrestaShop will get rid of its folder and all its files.
| Tip |
|---|
Make sure that the disabling or removal of the module does not break the theme. |
Installing a theme
Once you have downloaded a theme from the Addons online store, it's up to you have it installed on your PrestaShop site.
Installing using PrestaShop's theme installer
This is the recommended method, as it preserves all the blocks' positions on their respective hooks.
PrestaShop has a native theme importer, which you can reach from the "Themes" page, under the "Preferences" menu. Click the "Add new theme" button at the top of the screen (not the "Add new" button above the list of themes, which is used to create a new theme). This screen presents you with 3 methods to install (or "import") a new module: from your computer, from a public website, or from your own FTP server. It also gives you a method to create a new theme from scratch.
Importing a theme
Whatever the method, the process remains the same: indicate the location of the theme's Zip archive, then click "Next".
| Tip |
|---|
Import from your computer: using the file explorer to find the archive. |
A quick summary is displayed in the next page, indicating what that importer is about to do.
Click "Next" again to validate your choice. The theme is now installed, and PrestaShop asks you if you wish to install modules that were imported along with the theme, what you would rather do with the current modules configuration, and how you would like the images configuration to be taken into account.
Click "Next" one last time. A final confirmation page presents you with all the changes applied to your PrestaShop site. Click "Finish" to end the process.
Installing using a FTP client
This method is not recommended, but is still available. Use with caution: your blocks might not have the expected position on their respective hooks.
To install a new PrestaShop theme via FTP:
- Unzip (decompress) the theme archive file (
.zip). This should result in at least one new local folder,/themes, containing your theme's folder(s). - Using your FTP client, place the theme's folder (as found in the local
/themesfolder) online in your PrestaShop/themesfolder. Pay attention NOT to upload that folder in another theme's folder (which can happen when drag-and-dropping items). Upload the whole folder, not just the files it contains. - (optional) If the theme's archive contains a second
/modulesfolder, it means your new theme comes bundled with modules that are specific to it, or necessary for it to run properly. Using your FTP client, place the folder(s) found in the local/modulesfolder online in your PrestaShop/modulesfolder. If your online PrestaShop install already has a module of the same name, try to only keep the most recent version of the two (the one with the most recent files). If unsure, keep the version bundled with the theme, as it is the most likely to work best with it. - Go to your back-office, in the "Themes" page under the "Preferences" menu.
- Select the new theme in place of the current theme, by clicking on the radio button then clicking "Save".
- Your theme is now in place.
- (optional) If the theme came with modules, activate them on the back-office's "Modules" page, then configure them if need be.
Many themes come with an accompanying Install.txt file, which gives you instructions. Make sure to follow them in order to not forget anything.
Once configuration is complete, be sure to test the theme immediately, every page of it, to confirm that it works as planned. Do try to make a full order, from A to Z – you wouldn't want to miss orders just because you didn't notice the theme was incomplete!
Exporting a theme
Exporting a theme is very useful when you want either to back the theme up for safety, and create an archive of the theme for a friend or in order to make it available on the Addons marketplace Algunos son gratuitos, otros de pago, pero ¡seguro que encuentras alguno que se adapte a tus necesidades!. Si eres un experto desarrollador de módulos o diseñador de temas, ¡puedes incluso publicar tus propias creaciones, y venderlas en PrestaShop Addons!.
La página "Catálogo de Módulos y Temas" te ofrece un rápido y sencillo acceso a la base de datos de módulos y temas de PrestaShop Addons. Su interfaz incluye:
- Un campo de búsqueda, desde el que puedes buscar lo que necesites en todo el contenido de PrestaShop Addons.
- Una lista de 8 módulos que puedes comprar directamente.
- Una lista de 12 temas que puedes comprar directamente.
Al realizar una búsqueda en el campo de búsqueda, serás redireccionado al sitio web Prestashop Addons, donde puedes buscar lo que necesites en el contenido completo de módulos y temas.
Al hacer clic sobre un elemento se abrirá su página de información disponible en Addons, en una nueva pestaña del navegador.
| Info |
|---|
Addons es el marketplace oficial de Módulos y Temas de PrestaShop. Aquí es donde los propietarios de tiendas pueden obtener todos los complementos necesarios para personalizar su tienda, y donde los autores pueden compartir sus creaciones con la comunidad. Los módulos y temas pueden ser gratuitos o de pago: el precio es establecido por el autor. Tómate el tiempo necesario para estudiar con detalle los módulos y temas disponibles, ya que porque algo sea más caro, no significa que tenga que ser mejor. Debes estar logueado para poder descargar o calificar un complemento. Crear una cuenta es gratis. |
Instalar un módulo
Una vez que hayas descargado un módulo desde el sitio web PrestaShop Addons, te corresponde a ti instalarlo en tu tienda PrestaShop.
Hay dos formas de instalar un módulo: mediante el formulario específico, o utilizando un cliente FTP.
Instalación mediante el formulario específico
Para instalar un nuevo módulo de PrestaShop automáticamente, haz clic sobre el botón "Añadir nuevo módulo" situado en la parte superior del listado de módulos, en la página "Módulos y Servicios". Una nueva sección aparecerá:
El formulario de esta sección te permite subir el archivo del módulo, descargado desde Addons. Puedes subir un archivo zip, o tar.gz (tarball) mediante este formulario, para ello simplemente busca el archivo del módulo que has descargado, y haz clic en el botón "Subir este módulo". ¡No selecciones como ubicación la carpeta donde tengas descomprimido el módulo o alguno de tus archivos!.
Una vez que hayas hecho clic en el botón, PrestaShop subirá el módulo desde tu ordenador a tu servidor, lo descomprimirá, colocará los archivos en la ubicación correcta, y actualizará la página, todo esto en pocos segundos. PrestaShop mostrará entonces el mensaje "El Módulo ha sido subido correctamente".
Los módulos no se instalan por defecto: así que tendrás que hacer clic en el botón "Instalar" del módulo, y posiblemente configurar algunos de sus ajustes.
Una vez finalizada la configuración, asegúrate de probar el módulo inmediatamente para confirmar que funciona según lo previsto.
Instalación mediante un cliente FTP
Para instalar un nuevo módulo de PrestaShop manualmente:
- Descomprime el archivo del módulo (
.zipotar.gz). Tras este proceso deberás obtener una nueva carpeta. - Utilizando un cliente FTP, transfiere la carpeta del módulo descomprimido, dentro de la carpeta
/modulesde PrestaShop.
Presta atención y NO subas esa carpeta, en la carpeta de otro módulo (cosa que puede ocurrir si arrastras y sueltas archivos utilizando el ratón). Sube tanto la carpeta como los archivos que ésta contiene, no solamente los archivos. - Dirígete en el back-office, al menú "Módulos".
- Busca el nuevo módulo en el listado de módulos. Es posible que tengas que desplazar la página hacía abajo; aunque también puedes utilizar el buscador, que te ofrecerá una lista actualizada dinámicamente de los módulos cuyos nombres coincidan con lo que vayas escribiendo en el campo de búsqueda.
- En la fila correspondiente al nuevo módulo, haz clic en el botón "Instalar".
- Tu módulo estará ahora instalado, pero deberás activarlo si así lo deseas. Si es necesario, haz clic en el enlace de "Configuración" del módulo. También, presta atención a cualquier mensaje de advertencia que pueda presentarte PrestaShop en pantalla.
Una vez finalizada la configuración, asegúrate de probar el módulo inmediatamente para confirmar que funciona según lo previsto.
| Warning |
|---|
Los módulos pueden provenir de muchas fuentes, y no todos ellos son confiables. Esta es la razón por la que PrestaShop 1.6.0.7 introdujo una ventana de advertencia para los módulos "no verificados" – estos son módulos que no han sido verificadas por PrestaShop a través del marketplace Addons. Esta ventana te permite elegir si deseas continuar con la instalación sin recibir más notificaciones, o detener el proceso de instalación.
La instalación de un módulo nativo o un módulo obtenido a través de Prestashop Addons no producirá la aparición de esta ventana de advertencia. |

Actualizar un módulo
PrestaShop comprueba periódicamente si hay alguna actualización disponible para tus módulos, en el servidor de PrestaShop Addons. Si es así, PrestaShop mostrará un enlace "¡Actualízalo!" en los módulos correspondientes. Simplemente haz clic en dicho botón, y PrestaShop se encargará de descargar y actualizar el módulo.
Desinstalar un módulo
| Warning |
|---|
¡Nunca elimines un módulo eliminando su carpeta directamente desde tu cliente FTP! Deja a PrestaShop hacerse cargo de esto. |
Si quieres dejar de utilizar un módulo, pero deseas conservar su configuración, puedes simplemente desactivarlo: haciendo clic en el enlace: "Desactivar". Tras realizar esto, las acciones disponibles para el módulo se convertirán en "Activar" y "Eliminar", además el botón "Desinstalar" continuará estando disponible.
Si no te preocupa perder la configuración del módulo, haz clic en el botón "Desinstalar": la carpeta de tu módulo continuará existiendo en la carpeta /modules de Prestashop, pero el módulo no tendrá ningún impacto en tu tienda.
Si deseas eliminar por completo el módulo de tu servidor, haz clic en el enlace "Eliminar": PrestaShop eliminará la carpeta y todos los archivos que lo componen.
| Tip |
|---|
Asegúrate que tras desactivar o eliminar el módulo, el tema de tu tienda continúa mostrándose correctamente. |
Instalar un tema
Una vez que hayas descargado un tema desde el sitio web PrestaShop Addons, te corresponde a ti instalarlo en tu tienda PrestaShop.
Instalación mediante el módulo de importación/exportación de temas
Este es el método recomendado, ya que preserva todas las posiciones de los bloques en sus respectivos ganchos (hooks).
PrestaShop tiene un importador nativo de temas, al que puedes acceder desde la página "Temas", bajo el menú "Preferencias". Haz clic en el botón "Añadir nuevo tema", situado en la parte superior de la pantalla. Esta pantalla presenta 3 métodos para instalar (o "importar") un nuevo tema: desde tu ordenador, desde un sitio web público, o desde tu propio servidor FTP. También dispones de un método para crear un tema nuevo desde cero.
Importar un tema
Sea cual sea el método que elijas, el proceso es siempre el mismo: indicar la ubicación del archivo Zip del tema, y a continuación, hacer clic en el botón "Siguiente".
| Tip |
|---|
Importar desde tu ordenador: utiliza el explorador de archivos para encontrar el archivo. |
La siguiente página mostrará un resumen rápido de lo que el importador está a punto de hacer.
Haz clic de nuevo en "Siguiente" para validar tu elección. Una vez instalado el tema, PrestaShop te preguntará si deseas instalar los módulos que fueron importados junto con el tema, qué prefieres hacer con la configuración actual de los módulos, y si deseas que la configuración de las imágenes sea tomada en cuenta.
Haz clic en "Siguiente" por última vez. Una página final de confirmación te presenta todos los cambios aplicados a tu sitio PrestaShop. Haz clic en "Finalizar" para terminar el proceso.
Instalación mediante un cliente FTP
Este método no se recomienda utilizarlo, aunque continúe disponible. Utilízalo con precaución: tus bloques podrían perder la posición que ocupan actualmente en los respectivos ganchos (hooks).
Para instalar un nuevo tema PrestaShop vía FTP:
- Descomprime el archivo del módulo (
.zip). Tras este proceso deberás obtener una nueva carpeta,/themes, cuyo interior contiene la carpeta(s) de tu tema. - Utilizando un cliente FTP, transfiere la carpeta del tema descomprimido, dentro de la carpeta
/themesde PrestaShop. Presta atención y NO subas esa carpeta, en la carpeta de otro tema (cosa que puede ocurrir si arrastras y sueltas los archivos utilizando el ratón). Sube tanto la carpeta como los archivos que ésta contiene, no solamente los archivos. - (opcional) Si el tema del archivo contiene una segunda carpeta
/modules, significará que este tema se acompaña de una serie de módulos que son necesarios para que el tema funcione correctamente. Utilizando tu cliente FTP, transfiere la carpeta(s) local(es)/modulesincluida(s) en el tema que deseas instalar, en la carpeta/modulesde PrestaShop. Si el cliente FTP te advierte que ya cuentas con un módulo que tiene el mismo nombre, trata de mantener tan sólo la versión más reciente. Si no conoces cuál es la versión más reciente de los módulos, mantén la versión incluida con el tema, ya que es probable que funcione mejor y no te dé problemas de compatibilidad. - Dirígete en el back-office de tu tienda, a la página "Temas" bajo el menú "Preferencias".
- Selecciona el nuevo tema en lugar del tema actual, haciendo clic en el botón de radio y luego haz clic en "Guardar".
- Tu tema estará ahora instalado.
- (opcional) Si el tema viene con módulos, actívalos en la página "Módulos y Servicios" del back-office, a continuación, configúralos si es necesario.
Algunos temas vienen con un archivo adjunto llamado Install.txt, que te ofrece instrucciones sobre cómo instalar y configurar el tema. Asegúrate de seguir los pasos detallados de ese archivo.
Una vez finalizada la configuración, asegúrate de probar el tema inmediatamente para confirmar que funciona según lo previsto. Prueba a realizar una compra, desde A a Z – para asegurarte que los clientes pueden completar sus compras, y comprobar que el tema instalado no está incompleto.
Exportar un tema
La exportación de un tema puede ser útil cuando quieras realizar una copia de seguridad del mismo, cuando quieras compartir el tema con un amigo, o para vender el tema en el sitio web PrestaShop Addons (http://addons.prestashop.com/). Not only does it generate a complete Zip archive of your theme, but it also adds many information in an XML files, which is very useful both when uploading to Addons, and when importing to another PrestaShop site.
Just as for theme importation, there are two ways to export a theme: using PrestaShop's own exporter, or using the one from the Theme Installator module:
- PrestaShop's exporter: click on the "Export theme" button at the top of the "Themes" page (in the "Preferences" menu).
- Theme Installator's exporter: open the module's configuration page, then go to the "Export a theme" section.
Select a theme and click on "Export this theme". A configuration form appears where you can set the exported themes parameters: author, theme name, compatibility version, attached modules (if any), etc.
Once all the parameters are correctly set, click on "Generate the archive now". You will quickly get a file to download from your browser. Save it on your hard-drive, then give the save file a proper name. From there on, you can easily share this theme, and if it is your own creation, you can start selling it on PrestaShop's Addons website at El exportador no sólo genera un archivo zip del tema, sino que también añade una gran cantidad de información en archivos XML, lo que te resultará muy útil cuando lo subas al sitio web PrestaShop Addons, y cuando lo importes en otra tienda PrestaShop.
Al igual que para importar un tema, hay dos maneras de poder exportar un tema: utilizando el propio exportador de PrestaShop, o utilizando el módulo Template Installer:
- Para hacerlo con el exportador de Prestashop: haz clic en el botón "Exportar tema" situado en la parte superior del menú "Temas" (en el menú "Preferencias").
- Para hacerlo con el módulo Template Installer: abre la página de configuración del módulo, y a continuación, dirígete a la sección "Exportar un tema".
Selecciona un tema y haz clic en "Exportar este tema". Un formulario de configuración aparecerá en pantalla, donde puedes configurar los parámetros del tema a exportar: autor, nombre del tema, versión de compatibilidad, módulos adjuntos (si tuviese), etc.
Una vez que todos los parámetros hayan sido establecidos correctamente, haz clic sobre "Generar el archivo". Tras unos segundos, obtendrás un archivo para descargar desde el navegador. Guárdalo en el disco duro de tu equipo, a continuación, proporciona al archivo un nombre apropiado para guardarlo. A partir de este instante, podrás compartir fácilmente este tema y si tu eres su creador, podrías venderlo en el marketplace oficial de PrestaShop: http://addons.prestashop.com/.
PrestaShop's mobile template
The mobile template enables any PrestaShop merchant to have his or her shop be accessible to mobile devices: from the home page to the payment process, along with product pages and conversion funnel.
Installing the mobile template for your shop
Installing PrestaShop's mobile template is easy:
- Connect to you PrestaShop's administration.
- Go to the "Themes" page under the "Preferences" menu.
- In the "Appearance" section, go to the "Enable mobile theme" part and choose one of the three options other than "I want to disable it".
By default, the mobile template is only used for mobiles phones, tablet receiving the same theme as regular devices. With this option, you can choose to have the mobile template be used for tablets ("Both" option"), or even choose to only have it used for tablets (mobile phones receiving the regular theme).
Customizing the mobile template
The mobile template's files are located in the /mobile subfolder of the current theme's folder. This way, if you current theme is the default PrestaShop theme, the mobile template's files are in the /themes/default/mobile of your PrestaShop installation.
The template is made of HTML, CSS and JavaScript files: its structure is therefore the same as for the default theme, but its design is radically different, as it was built for the smaller screens of mobile devices.
Therefore, if you wish to change the colors or layout of the mobile template's pages, you must edit the CSS and/or HTML files in order to adapt them to your likings. You must have a good knowledge of web programming languages, or ask for help from a web developer.
Using the mobile template with another theme
The mobile template is only available if the current theme has a /mobile subfolder in its own folder. Hence, numerous PrestaShop themes do not have a proper mobile theme, and these themes' users cannot automatically offer a mobile version of their shop to their visitors
While the theme you are using is being updated with its own mobile template, you can use the default mobile template, thanks to a quick file manipulation: you just have to copy the /mobile subfolder from the /themes/default folder, and paste this subfolder (and all of its files) in your current theme's folder.
...
Plantilla móvil de PrestaShop
La plantilla móvil permite a cualquier comerciante PrestaShop que su tienda sea accesible desde dispositivos móviles: desde la página inicial a la del proceso de pago, pasando por las páginas de productos y la del embudo de conversión.
Instalar una plantilla móvil para tu tienda
Instalar una plantilla móvil en PrestaShop es fácil:
- Conéctate al panel de administración de tu tienda.
- Dirígete a la página "Temas" bajo el menú "Preferencias".
- En la sección "Dispositivos Móviles", dirígete a la opción "Activar el tema móvil" y elige una opción de las tres disponibles que no sea "Quiero desactivarlo.
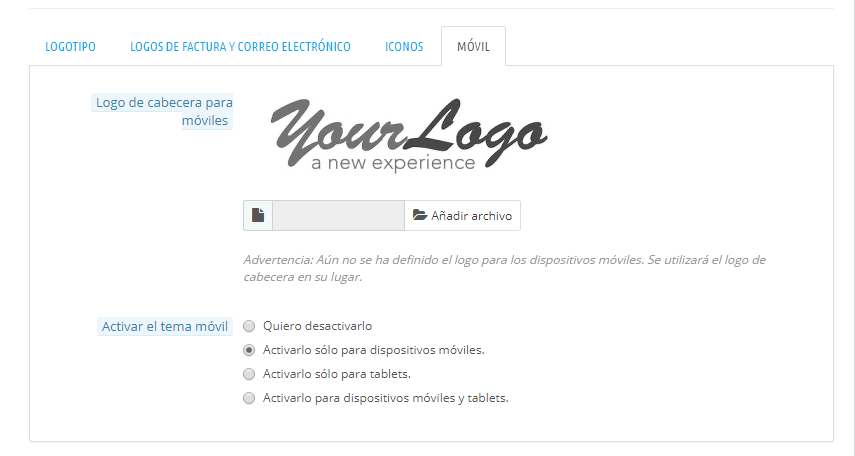
De manera predeterminada, la plantilla móvil es sólo utilizada por teléfonos móviles, las tabletas recibirán el mismo tema que los dispositivos convencionales. Con esta opción, puedes elegir que la plantilla móvil sea utilizada por las tabletas (opción "Activarlo para dispositivos móviles y tablets"), o incluso elegir que sólo se utilice para las tabletas (los teléfonos móviles recibirán el mismo tema que los dispositivos convencionales).
Personalizar la plantilla móvil
Los archivos de la plantilla móvil se encuentran en la subcarpeta /mobile de la carpeta del tema actual. De esta manera, si el tema actual es el tema predeterminado de PrestaShop, los archivos de la plantilla móvil estarán en la carpeta /themes/default/mobile de PrestaShop.
El tema está realizado con archivos HTML, CSS y JavaScript: por lo tanto, su estructura es la misma que la de cualquier tema por defecto, pero su diseño es radicalmente diferente, ya que ésta fue creada para adaptarse a las pequeñas pantallas de los dispositivos móviles.
Por lo tanto, si quieres cambiar los colores o el diseño de las páginas de la plantilla móvil, debes editar los archivos CSS y/o HTML con el fin de adaptarlos a tus gustos. Deberás tener un buen conocimiento de lenguajes de programación web, o pedir ayuda a un desarrollador web.
Utilizar la plantilla móvil con otro tema
La plantilla móvil sólo está disponible si el tema actual tiene una subcarpeta /mobile en su propia carpeta. De ahí que numerosos temas de PrestaShop no tienen un tema móvil adecuado, y los propietarios de las tiendas que utilizan estos temas, no pueden ofrecer de forma automática una versión móvil a sus visitantes.
Mientras que el tema que estés utilizando no sea actualizado con un tema móvil, puedes utilizar la plantilla predeterminada, gracias a una rápida manipulación de archivos: sólo tiene que copiar la subcarpeta /mobile de la carpeta /themes/default y pegar esta subcarpeta (y todos sus archivos) en la carpeta de tu tema actual.
Al realizar esta acción, tu tienda utilizará la plantilla predeterminada para la versión móvil, en lugar de una plantilla acorde con tu tema principal, pero nada te impide que puedas editar los archivos HTML, CSS y JavaScript de la plantilla móvil para obtener un resultado más parecido al diseño de tu propio tema.