...
Smarty is the name of the template language used by PrestaShop's themes. You can learn more about it at http://www.smarty.net/.
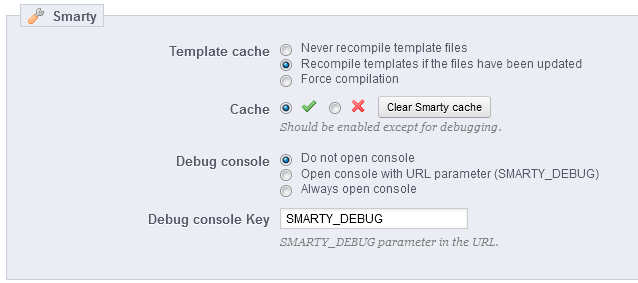
There are three options:
- Template cache. For better front-end performance, PrestaShop caches your HTML pages.
- Never compile cache. Only enable this if you are making edits theme, and need to see your changes every time you reload your page.
- Compile cache if templates are updated. PrestaShop is able to see when a theme file has changed, but this might not always work as expected.
- Force Compile. The normal behavior: HTML pages are compiled and cached, even if the theme has changed.
- Cache. This option makes it possible for you to disable all file caches, and not just the one pertaining to template files. Only disable this if you debugging a theme or a module for PrestaShop. Otherwise, you should leave it enabled.
The "Clear Smarty cache" appeared in PrestaShop 1.5.5.0, and makes it possible to click the cache in a single click instead of having to go delete files on your FTP server. - Debug console. New in 1.5. PrestaShop enables you to display the Smarty Debug Console, which gives you valuable information on a template page. Read more about it at http://www.smarty.net/docsv2/en/chapter.debugging.console.tpl. Note that the console opens in a pop-up window: make sure to make your browser allow them for your shop's domain name.
- Do not open console. The default setting. No one sees the console, not even you.
- Open console with URL parameter (SMARTY_DEBUG). The console is only displayed if you add
?SMARTY_DEBUGat the end of the URL (or the key of your choice, see below). This is great, but once your tests are done, do revert to the default setting, as this "trick" is known and some hackers could make use of it. - Always open console. The "full on" setting. Everyone who has access to your shop can see the console. Therefore, keep it for maintenance sessions.
- Debug console Key. You can change the key in order to be the only one to know what key to enter in order to display the debug console.
| Note |
|---|
Because the debugging console might display private information, make sure to only enable it when in maintenance mode. Do not keep it enable on a production store. |
...
- Your CSV file. You can import more than one file at a time, but make sure that they all have the same type of data.
There is a "Click to view our sample import csv files" link right below the "Upload" button. Click it to display more links: you can download sample files for each type of data, which helps you make sure that the files you are about to import are indeed ready to be imported to PrestaShop. These files are actually in the/docs/csv_importfolder of your installation of PrestaShop. - What kind of Entity would you like to import?. Entities are the types of data that you can import. PrestaShop enables you to import seven these types of data:
- categories,
- products,
- combinations (which was called "versions" in versions of PrestaShop prior to 1.5),
- customers,
- addresses,
- manufacturers,
- suppliers.
- supply order (if Advanced Stock Management is enabled).
- supply order details (if Advanced Stock Management is enabled).
- Language of the file. Data can only be imported for a single language at a time. If your data exists in more than one language, you should split it into as many files.
- ISO-8859-1 encoded file?. By default, the import files should use UTF-8 encoding. But if your files use ISO-8859-1 and you would rather not convert them, you can check this box.
- Field separator. Not all CSV file use commas to separate their values: some use tabulations, others semicolons, etc. You can indicate what your files use in this field.
- Multiple value separator. When an attribute can support more than one value, these values need to be separated with a specific separator. After reviewing your files, indicate your separator here.
- Delete all xxx before import?. This option will erase all previously existing entries of the type of data you are importing. Thus you will start with a clean slate.
- Force all ID's during import. You can either keep the import IDs, or let the importer auto-increment them.
- Use product reference as key?. Product import only. You can choose to have the product key be determined by PrestaShop, or instead use the product's reference as the ID. In this case, make sure the file does contain references for all your importer products.
...