...
| Table of Contents | ||
|---|---|---|
|
Installing PrestaShop
| Note |
|---|
| Note |
This chapter is targeted at those who want to install PrestaShop on an online hosting space. |
Installing PrestaShop
PrestaShop is very easy to install. Once all the files are on your web server, you should be able to start configuring your shop in no less than 5 minutes in most cases: the installation process is very simple, as the installer takes care of everything for you. Less experienced users might need between 10 and 20 minutes to complete the whole process.
Before you get started, make sure you have all the requirements available: server space at a hosting provided, domain name, FTP client, text editor. Makes sure to follow the instructions in the "What you need to get started" page first: http://doc.prestashop.com/display/PS15/What+you+need+to+get+started.
| Tip |
|---|
Some web-hosts offer a 1-click install in order to save you time and get you started even faster. Those web-hosts mostly use the following script libraries:
Using these can drastically reduce the installation time for inexperienced users. Some even support 1-click update, which is invaluable. Other hosts have their own scripts. Check with your own host for more information. Finally, PrestaShop has its own hosting solution: by registering on PrestaBox, you offload all the technical hurdles of hosting to our own team, and can focus on your shop, clients and sales. Visit https://www.prestabox.com/ for more information. |
Quick instructions
This small section is aimed at those who are already familiar with installing PHP-/MySQL web applications on a web server. Should you not feel comfortable with their lack of details, you will find detailed instructions in the section sections following this one.
- Download the PrestaShop archive and unzip it on your computer.
- Create a database for PrestaShop on your server.
- Upload Using an FTP client, upload all the files from the unzipped archive to your web server, in the desired location:
- If you want to integrate PrestaShop into the root of your domain (e.g. http://myownshop.com/), upload all contents into the root directory of your web server.
- If you want to have PrestaShop in its own subdirectory on your web site (e.g. http://mywebsite.com/shop/ or
http://shop.mywebsite.com/), create the shop directory/sub-domain on your server and upload all contents to that directory.
- Open the files' location in your browser; you should be redirected to the
/install/folder. - Using your MySQL access codes, follow the instructions from the installer's screens.
- Once installed, delete the
/install/folder and rename the/admin/folder to into something unique to you (for instance,/4dm1n/). - Check that everything works:
- Visit your website
- Connect to your back-office (the admin folder that your renamed), using the access codes you set during the installation process.
You're done! Start adding product, changing theme, downloading modules...
Detailed instructions
Downloading and unzipping the PrestaShop archive
You can download the latest version of PrestaShop at http://www.prestashop.com/en/downloads. This page presents you with an informal form, which helps the PrestaShop team to better know its users. Whether you fill the form or not, click the "Download" button to display the download page.
...
| Info |
|---|
If you need to download any of the previous versionversions, go to this address: http://www.prestashop.com/en/developers-versions. Note that it is never recommended to use any other version than the current stable one. |
Click on the download "Download now" button, and save the archive on your computer (such as on your Desktop). You should get a file named "prestashop_1.5.23.zip" (or an equivalent, depending on the version numbers).
| Tip |
|---|
The downloaded file is an a Zip archive, meaning one file containing all of PrestaShop's files in compressed form. In order to continue with the process, you must uncompress the archive. If your operating system does not natively support Zip files, you can download and install a dedicated tool, such as:
|
Using a Zip tool, extract the content of the archive to a known location on your hard-drive (such as on the Desktop again). Do not upload the Zip file to your server.
Uploading PrestaShop
You should now have a hosting space at your disposal (if not, read the "What you need to get started" chapter of this guide), and a folder on your hard-drive with the uncompressed PrestaShop archive.
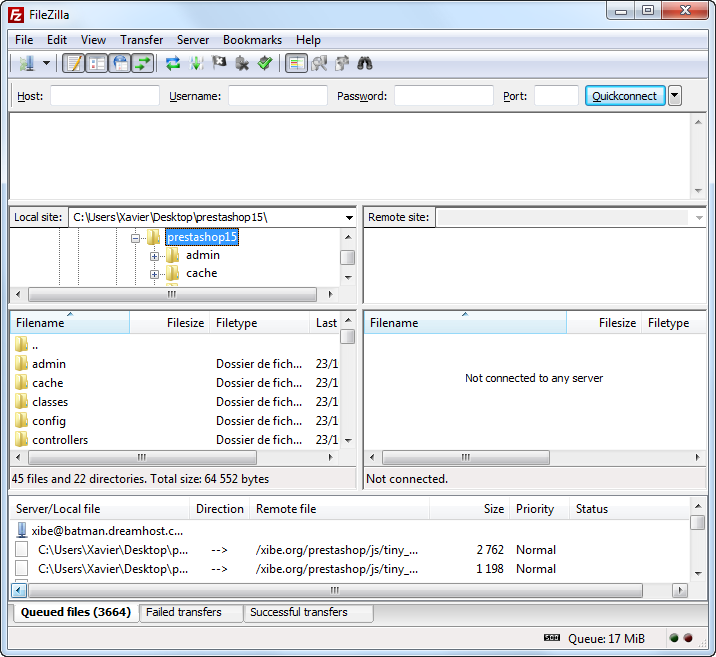
This step makes you upload the PrestaShop files on your hosting space. This is done by connecting your computer to your server using a tool known as a "FTP client", which you should have installed while reading the previous chapter of this guide, "What you need to get started" chapter. We will be using the free FileZilla (http://filezilla-project.org/).
Connect to your hosting space using your FTP client, by using the connection details provided by your web host (if not, contact your host). Once connected, it is time to transfer the PrestaShop files from your computer to your server.
In FileZilla (or any other FTP client), browse your local folders until you find the one that contains the PrestaShop files. Keep it open in the "Local site" section on the left.
In the "Remote site" section (on the right), browse to the location where you want PrestaShop to be publicly available (root of the domain, sub-folder, sub-domain...). This can change a lot, depending on both your host and your needs:
...
On FileZilla's left side, you should now have the local folder where you keep the uncompressed the PrestaShop files, and on the right side, the destination location. If you haven't done it yet, uploading is simple: select all files and folders from the local folder (use Ctrl-A), and either drag & drop them to the remote folder, or right-click on the selection and choose "Upload" in the context menu.
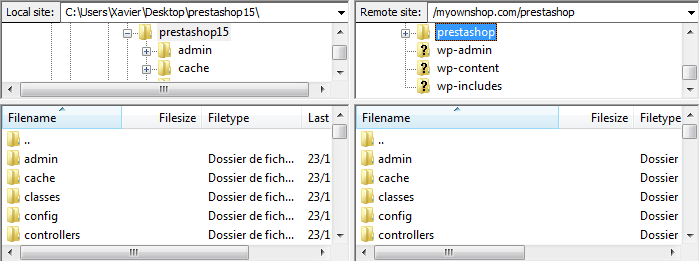
After a short while (this can take several minutes, as PrestaShop uses more than 7500 files and almost 1000 folders), all of PrestaShop's files and folders should be online. Great!
Creating a database for your shop
Before you can actually install PrestaShop, you need to make sure your MySQL server has a database ready for PrestaShop's data, and if . If not, you must create one. This
Creating a database can be done using any database administration tool. We will be using the free phpMyAdmin tool (http://www.phpmyadmin.net/), which should come pre-installed on your web server most of the time (read you host's documentation). Connect to it most web hosting.
| Info |
|---|
Some hosts prefer to have customers use a graphic control panel, such as cPanel, Plesk or a custom-made one. Make sure you read your host's support documentation about handling MySQL databases, and create a database for your shop by following their specific explanations. |
Connect to phpMyAdmin using your account credentials, which your host provided you with. It should be accessible through a standard URL, tied to your domain name, or that of your host.
...
In the left column, you can see the current databases currently available on your MySQL server. Some of them should be left alone, because they are either used by phpMyAdmin or by the host: phpmyadmin, mysql, information_schema, performance_schema and others. Read your host's documentation to know if one of these can be used as a default database.
Either way, you can create a brand new database by going in the "Database" tab and using the central form named "Create new database" in the "Databases" tab. Simply enter a unique name, and click "Create". The name of the database will be added to the list on the left. You can now use it to store PrestaShop's data.
| Info |
|---|
Some hosts prefer to have customers use a graphic control panel, such as cPanel, Plesk or a custom-made one. Make sure you read your host's support documentation about handling MySQL databases, and create a database for your shop by following their specific explanations. |
Launching the auto-installer
Now comes the part where it all comes together: installing PrestaShop.
The installation process is quite easy, as it is streamlined by PrestaShop's auto-installer. To launch itYou should be able to browser through it in handful of minutes. Do read thoroughly each page so as to not miss any information.
To launch the installer, simply browse to PrestaShop's location on your hosting: the script will automatically detect that it is not yet installed, and will take you to the auto-installer. From there on, you just have to read and click.
Step 1: Welcome page
This page is a quick intro into the installation process.
...
- Select the language in which you wish the installer to be.
- Read the PrestaShop's license (the Open Software License 3.0, see http://www.opensource.org/licenses/OSL-3.0), and agree to it.
...
| Info |
|---|
If you want to help the development team improve PrestaShop with anonymous usage data, please check the "I agree to participate in improving the solution by sending anonymous information about my configuration" box too. |
Step 2 & 3: System compatibility & system configuration
The second page makes a quick check of all the server parameters on your host, and if nothing wrong is found, takes you directly to the third page, "System configuration".
If something does go wrong during the server check, the installer displays the "System compatibility" page, where you can see all the checks performed, the failed one being marked in red.
System compatibility
This page checks that everything is OK with your server configuration: PHP settings, permissions on files and folders, third-party tools.
...
While changing the PHP configuration can only be done on a case-by-case basis depending on your level of access to your server, and therefore cannot be explained here, updating the file permissions is easier to explain. Permission is the way a filesystem grants access rights to specific users or user groups, controlling their ability to view or make changes to files and folders. The installer needs to make several changes to the files that you uploaded, and if the filesystem does not allow for these changes through proper permissions, then the installer cannot complete its process.
Hence, if the installer shows that some files or folders do not have proper permission, you have to changer these manually. This will require you to access your remote files on your web server, and therefore use your FTP client (such as FileZilla).
...
| Warning |
|---|
Some hosts might require you to use CHMOD 777, although it is not recommended for anything more than a one-time need. |
In any case, thanks Thanks to FileZilla (and most FTP clients), you can do not have to use any Unix command, as it makes it possible to change permissions easily and graphically: once you have found a file or folder that needs such a change, right-click on it from your FTP client, and in the context menu choose "File permissions...". It will open a small window.
...
Depending on your server configuration (which you don't always have a hand at), you 'll will need to check both the "Read" and "Execute" columns of boxes checked, and at least the "Owner" and "Group" rows for the "Write" column. Some host hosts might require you to have the public "Write" box checked, but be careful with that: it is rarely a good thing to have anyone on your server be able to edit the content of your folder is rarely a good thingPrestaShop installation.
For folders that the installer is needing a recursive permission change on, you can Some folders might need to have all their files and sub-folders change permissions too. In that case, check the "Recurse in into subdirectories" box.
Regularly While changing permissions in your FTP client, you should regularly check that you have made the correct check changes by relaunching running the installer's compatibility checks again: click the installer's "Refresh these settings" button as often as necessary.
Once all indicators are green, you can click "Next". If you cannot have them all green, at least make sure the installer displays the "Your configuration is valid, click next to continue!" message at the top of the page.
System configuration
This page contains a form that enables you to tell PrestaShop where the database server is, and which database it should use, along with a few other details. All this information should have been provided to you by your web host.
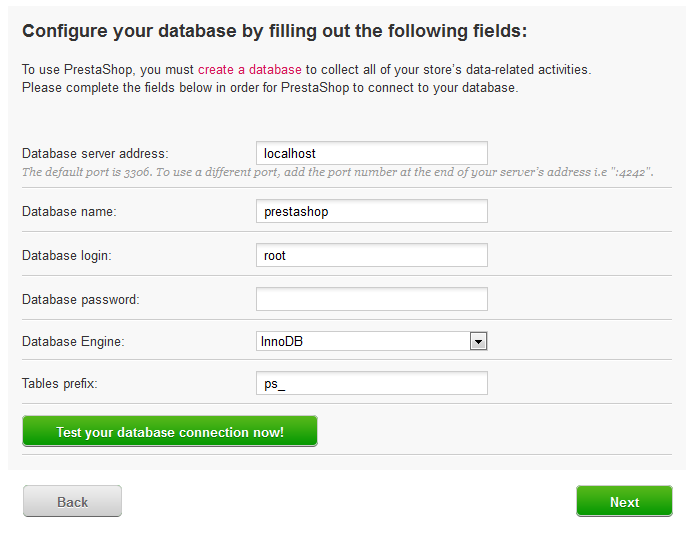
Database configuration
Fill all the fields with the database connection information provided by your web-host, along with the name of the database you chose/created for PrestaShop, then click the "Verify now!" button in order to check that everything is fine. If so, the installer will display the following message: "Database is connected".Choose the prefix for your :
- Database server address. The hostname of your MySQL server. It can be tied to your domain name (i.e. http://sql.mydomainname.com), tied to your web host (i.e. http://mysql2.alwaysdata.com), or simply be an IP address (i.e. 46.105.78.185).
- Database name. The name of the database where you want PrestaShop to store its data. This is either an existing database on your MySQL server, or the one that you created using phpMyAdmin (or any other SQL tool) in the "Creating a database for your shop" section of this guide.
- Database login. The name of the MySQL user that has access to your database.
- Database password. The password of the MySQL user.
- Database engine. The database engine is the core of your database server. InnoDB is the default one and you should use it, but the more technical among you might want to choose another engine. Generally, there is no need to change the default setting.
- Tables prefix. The prefix for your database tables. "
ps_" is the default, resulting in the PrestaShop SQL
...
- tables having names such as "
ps_cart" or "ps_wishlist"; but if you need to install more than one
...
- instance of PrestaShop on the same database, then you must use a
...
- different prefix for each
...
- installation. However, we do recommend that you create one database per installation of PrestaShop, if your web host allows it. Better yet: make one installation of PrestaShop, and enable the multistore feature in order to manage many stores from the same PrestaShop back-end.
- Drop existing tables. This is only available in "Dev mode". When re-installing PrestaShop, you can choose to drop the existing PrestaShop database table in order to start on a clean slate.
Click the "Verify now!" button in order to check that you did use the correct server information.
Finally, there is the "E-mail delivery set-up
...
" section. PrestaShop relies heavily on e-mail for notifications, both for the shop owner and its customers. This form enables you to test whether the current server configuration lets you send e-mail using PHP's mail() function. If this is not the case, then you should check the "Configure SMTP manually" box in order to configure your own mail server. Note that this is reserved to advanced users.
...
Step 3: Shop configuration
This is where you can already start customizing your shop: give it a name and a logo, indicate its main activity, and indicate the personal information for the shop owner (which has legal binding in most countries)...
...
As for the logo, you should note that it will appear:
- On all of the pages of your store 's pages(depending on your theme).
- In your back-office.
- In all of the e-mails sent to your customers.
- In all of your contract contractual documents (bills, return authorizations, etc.)
...
- .
Therefore, do not keep the default PrestaShop logo, for obvious reasons.
Click "Next", and the installer will start filling the database with tables and data, and updating the configuration files. This might take a few minutes in a slow server.
...
Once it is done, your shop is onlineready to configure!
Completing the installation
As you can read about right on the final page of the installation process, there are a couple of last actions to perform before you can call it a successleave the installer.
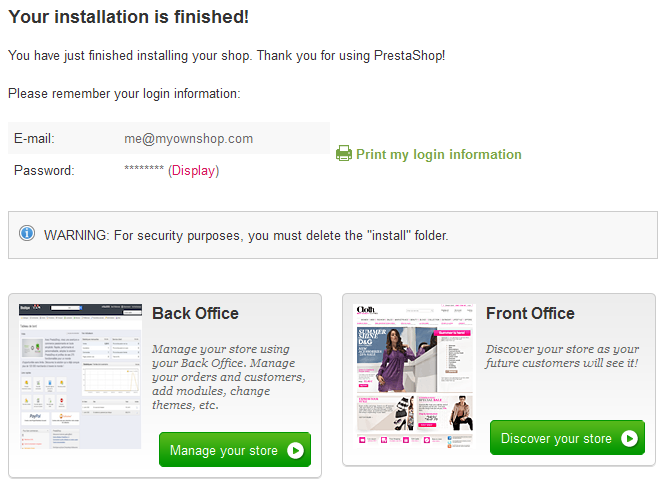
An easy way to improve your installation's security is to delete or rename some key files and folders. This is done using your FTP client, directly on the server.
Items to delete:
- The "install" folder (imperative).
- The "readme_*" files (the all 5 of them).
- The "CHANGELOG" file.
Item to rename:
- The "admin" folder: you This is the folder to open in order to reach PrestaShop's administration pages. You should give it a unique name, so that no attacker can access your admin files. For instance, "admin42", "secretFolder" or "xyz123" – anything unique.
Write down the new name for your admin folder, as you will from now on access your administration pages using this address.
Congratulations! Installation is now complete.
Log in to the PrestaShop back-office and start filling out your products catalog and configuring the many settings to suit your tastes and needs.
Finally, in order to close all potential potentially malicious doors, use your FTP client to update the files and folders permissions to 664, or 666 if your host requires it. If it turns out low access rights prevent some modules to work, you should set permissions back to 755.
...
Congratulations! Installation is now complete.
Log in to the PrestaShop back-office by going to your newly-renamed admin folder, and start filling out your product catalog, adding carriers and shipping costs, adding manufacturers and suppliers, changing the theme, and generally configuring the many settings to suit your tastes and needs.
| Tip |
|---|
You should regularly back up your database and files, ideally on different computers, in case of problems related to hardware or security. |