Table contents
| Table of Contents | ||
|---|---|---|
|
Exploring PrestaShop's Tools
PrestaShop's "Tools" tab provides access to various tools that enhance your PrestaShop experience, and that of your customers. Many of these tools are not simply helpers, but do provide an important service to your shop, which you should not overlook. Take the time to learn all the possibilities they offer, as you will certainly find that PrestaShop can do much more than what you first thought it did.
CSV Import
The import function enables you to easily fill your product catalog when you have a very large amount of products. When clicking the "Import" tab, the page below appears.
PrestaShop enables you to quickly import seven types of data:
- categories,
- products,
- versions,
- customers,
- addresses,
- manufacturers,
- suppliers.
Have a good look at the example displayed on the page. You will have to create a relationship between the content of your columns, and the location of the data in the PrestaShop catalog.
Data format
Imported data file must be in text-file, using a CSV-based format (Coma Separated Value), and the accompanying .cvs file extension. We recommend using a semicolon ";" as a separator.
You can create such a file using any text editor (we recommend Notepad++), but we do advise you to use a spreadsheet program, such as the commercial Microsoft Excel or the free software OpenOffice.org Calc, then save your work in the CSV format. Using a spreadsheet program enables you to have an easier and more visual grasp of your data, in comparison to the plain text file.
Here is a sample import file, for a list of products:
| Code Block | ||||
|---|---|---|---|---|
| ||||
"Enabled";"Name";"Categories";"Price";"Tax rule ID";"Buying price";"On sale";"Reference";"Weight";"Quantity";"Short desc.";"Long desc";"Images URL" 1;"Test";"1,2,3";130;1;75;0;"PROD-TEST";"0.500";10;"'Tis a short desc.";"This is a long description.";"http://www.myprestashop/images/product1.gif" 0;"Test 02";"1,5";110;1;65;0;"PROD-TEST2";"0.500";10;"'Tis also a short desc.";"This is a long description too.";"http://www.myprestashop/images/product2.gif" 1;"Test 03";"4,5";150;1;85;0;"PROD-TEST3";"0.500";10;"'Tis a short desc. again";"This is also a long description.";"http://www.myprestashop/images/product3.gif" |
The first row should be a descriptive name for the data column (you will be able to skip it during the import process). There must be the same number of columns on each row.
You will note that:
- The price column will use your store's default currency.
- Categories are to be specified using their existing IDs (so you should have imported them first), and separated with a comma.
- The URL of the image must be specified in full. In other words, the link that may
be used in a web browser to display the image. Example: http://www.myprestashop/images/productXXX.gif - File encoding should be UTF-8, or ISO-8859-1 at worst.
Uploading the file
Once you have all your data in CSV format, you can upload them to your store's database using the form in the "Import" sub-tab of the "Tools" tab. Load your file from your computer by clicking "Browse", confirm by clicking "Upload".
The page is updated, and a form appears:
The name of your file will appear in the drop-down menu named "Select your .CSV file". Then:
- Select the type of data contained in your file, using the drop-down menu named "Select which entity to import". In our case, we are importing products. Once you have selected the type of data, a list of the available fields will appear on the right, which could help you refine your CSV file – at least for the order of the columns, which will soon prove handy.
- Select the language of the imported content. If the target language is not available, you must install it first, in Tools > Languages.
- Select the file encoding. Simply indicate if the file is iso-8859-1 or not. If not, then it is assumed the files used UTF-8.
- Select the field separators. We suggest that you leave the default values ("field separator" with a semicolon ";", "multiple value separators" with a comma ","). But obviously, if your CSV file is built differently, you should change these values accordingly.
- If you want to remove all the products in your catalog before importing, select the appropriate option.
- Once all your choices have been made, click "Next step".
Note that all import files are uploaded directly in the admin folder's /import sub-folder. If the CSV File drop-down menu gets too crowded, you can delete old imports directly using your FTP client.
The next steps will be worked out on the screen that then loads.
Presented in this table are the rows from your CSV file, placed under arbitrary columns matched to PrestaShop's database needs. It is up to you to make sure that all the columns from your CSV file are matched with the correct column header, using each header's drop-down menu, so as to import your content correctly.
For instance, in the above screen capture:
- First column. We marked it as "Enabled", PrestaShop presents "ID" as a header. Click on the header's drop-down menu, and select "Active (0/1)".
- Second column. Marked "Name", header indicates "Active (0/1)". Let's change the header for "Name *".
- Third column. You get the idea...
The screen cannot contain all of your data's columns, so click the ">>" and "<<" buttons to move around the columns, and match them all correctly.
In our example, we used the first row for columns indicators. Since we don't we these imported, enter "1" in the "Skip X lines" text-field.
Once you are done match your columns, click the "Import CSV data" button, and you're done!
Matching configurations
The matching process can be a tedious task if you cannot customize your CSV file's columns order according to that used by the PrestaShop importer, and even more so if you have to do that repeatedly or frequently. That is why PrestaShop includes a small tool to save the current matching order that you have set up using all the headers drop-down menus:
- Saving. Enter a descriptive name in the field, and click "Save".
- Loading. Select a matching configuration in the drop-down menu, and click "Load".
- Deleting. Select a matching configuration in the drop-down menu, and click "Delete".
Languages
PrestaShop comes multilingual out of the box: there are 5 default languages (English, French, Spanish, Deutsch and Italian), and many more are available to download.
The "Language" tab manages the languages you'll see in your back office and your shop. When you click on this tab the page below is displayed.
This screen displays the languages already installed on your shop. You can enable or disable a language by clicking on the icon in the "Enables" column.
In the "Language options" section, you can select which language will be displayed by default, both in the back office and the front office.
If you want to add a language to your store, click the “Add New” to reach the form below.

In order to add a new language:
- Enter the Name.
- Enter the two-letter ISO 639-1 code.
- Enter the full language code.
- Enter the short date format.
- Enter the full date format.
- Enter an image of the flag of the language you want to add: upload a very small sized picture that does not exceed the resolution of 16*11 pixels.)
- Upload an image that will appear when an image is missing from your store, in the new language. In French, this image contains the words "Aucune image", for example.
- Indicate if the language is read from left to right, or right to left.
- Keep it activated.
- Click "Save".
Then you need to upload the language pack:
- Go to the "Translations" sub-tab to finalize the installation of the new language.
- In that sub-tab's "Import a language pack" section, click on "Browse" to select the language pack that was already
downloaded to your computer. - Select it, and click on "Import". The "Translations added" notification then tells you that the import was successful.
You can click on the flags at the top of your shop (front-office) to verify this operation. Similarly, visitors to your shop can now select an additional language by using the icons at the top of the page.
Translations
PrestaShop provides you with full translation tool for your shop. This helps you add and edit the current translations. This way, you are the master of your shop, and can handle your translated strings without having to wait for translators to publish their corrections.
Even if you do not want to correct the translators' work, you might want to change the wording they chose to use (less formal, less wordy, etc.), and customize the various available text, thus tailoring your website to your audience (for instance, a hip-hop clothing shop might be better off using expressions different from that of a luxury watches shop).
"Translation exchange" section
The "Translation" sub-tab provides a few tools for your translation needs.
Add / Update a language
Many languages are available for you to download and install, directly from the PrestaShop servers. Your PrestaShop install will take care of downloading the language pack, unpacking it and create the correct sub-folder in your installation's /translation folder.
You can also update the currently installed languages, likewise directly from the PrestaShop servers. But be reminded that any change that you might have made to a language pack will be lost if you update it.
Import a language pack manually
In the case where you do not want to use an official PrestaShop translation pack, but rather a custom one (either provided by someone you know, or one that you exported from another PrestaShop install), then this form is for you. Select the Zip file, click the "Import" button, and it will install the pack in the /translation+ folder. Warning: if there already exists a language folder with the same ISO 639-1 code, it will be replaced by the files from the archive you are importing.
Export a language
Either as a way of making a backup of your customizations, or of sharing them with other PrestaShop installs, you can create your own language pack using this form.
Note that the pack will contain the theme that your translation is supposed to support.
Copy
You can copy the content of one language to another. This is especially useful when you wish to replace a theme language with the same language from another theme.
Modifying a Translation
The most important tool of the "Translation" sub-tab is in the "Modify translations" section. This is where you can choose to edit a translation, and completely customize each and every sentence if you wish.
Select the part of the current translation that you wish to edit:
- Front Office translations. Text visible to your customers about your shop.
- Back Office translations. The texts accessible from your store's admin panel
- Error message translations. The error message translations that may appear.
- Fields Names translations. The name of the fields in the front office or back office.
- Module translations. The terms used by the installed and activated modules.
- PDF translations. The terms used in the generated PDF files.
- E-mail template Translations. The terms used in default e-mail templates.
Once done, click the flag of the language that you wish to edit that translation in.
A long form then appears. It contains, split in tens of section, the hundreds of available strings.
Click on a section title to open or close it, edit at will, and click on the "Update Translation" button at the top of the page when you are done.
At the right of each text field is an icon:
- Hover the mouse cursor over it to display the Google Translate suggestion.
- Click it to apply the suggestion.
Generators
This sub-tab contains two tools that generate complex server files, so that you don't have to create them by hand – and risk breaking your shop.
.htaccess file generation
A .htaccess file (short for "hypertext access") is a server configuration file, mostly found on the Apache line of servers, and few others. It is commonly used to control folder authorization, URL rewriting, blocking, directory listing and cache control. Contrary to global configuration files, such as Apache's httpd.conf file, it can act locally, as its rules apply to the directory it is in, and its sub-directories.
Warning: since a .htaccess file only works with servers that support it (Apache, iPlanet, Zeus), DO NOT use this tool if your shop runs on any other server (Microsoft IIS, nginx, lighttpd...).
This tool is mostly useful when you choose to use friendly URLs: it will generate the correct rules. It also adds a few optimization rules.

All fields are optional.
- Check the optimization box.
- Check the friendly URL box.
- Check the "Disable apache multiviews" if you have issues with friendly URLs.
- Put your specific rules in the adequate text field.
- Click the "Generate .htaccess file" button
Warning: your current .htaccess will be delete and replaced by the one generated by PrestaShop! Be sure to copy/paste your specific configuration rules in the text-field!
Robots file generation
A robots.txt file enables you to block specific automated bots and web spiders, which crawls the web in order to find more web pages to add to their company's servers. Some bots you want to have full access to your website, such as Google's or Yahoo's, and some others you'd rather not, such as spam bots, content stealers, e-mail collectors, etc. Note that the worst of bots do not respect this files directive, as it is purely advisory.
PrestaShop's robots.txt generation tools simply create a file with exclusion directives for files and directories that are not meant to be public, and should not be indexed.
These rules apply to all bots (note the "User-agent: *" string).
If you want to add your own rules, do it after PrestaShop has generated this file, as it will delete any existing version of it.
Subdomains
Authentication on PrestaShop is partly based on HTTP cookies, which are very small files stored by your browser to remember crucial parts of your login credentials, or of your navigation state. By design, cookies are limited to a single domain (or sub-domain): a cookie created on www.myprestashop.com will not work for www.myprestashop2.com or www2.myprestashop.com.
A solution to this is to have PrestaShop cater for all of your shop's sub-domains, in order to create coherent cookies on each. That is exactly what you can do with this sub-tab.
Add a new sub-domain is trivial.
CMS - Creating a Text Page
PrestaShop enables you create content pages just like you create product pages, using its CMS tool (Content Management System). The pages will appear to customers in the "Information" block on your homepage.
The "CMS" sub-tab presents you all the content pages that were previously created on your shop, for the currently selected category (by default, the home page).
Do not forget to create one version of each page for each of your supported languages! Click on the flag for each field in order to change language.
Creating a New CMS Page
Clicking the "Add a New Page" link takes you to a form.
Here we find the usual fields:
- CMS Category. You must have first created at least one category, otherwise you will be limited to the home-page.
- Meta title. The name of the link to access the page.
- Meta description. Used to describe the content of this page for search engines.
- Meta Keywords. Used by search engines to understand what types of information the page is composed of.
- Friendly URL. Appears in the browser; also, make it easier for search engines.
- Page content. Must be entered to submit your information.
- Enable. You can choose to have you page public only once you are done proofreading it, in which case you page is saved as draft.
Once all the fields are filled out, click on "Save." If activated, you can then view the result directly on your online
store.
Creating a New CMS Category
Click the usual link to create a CMS category – actually, a sub-category of the root category, "Home". You can create as many categories as needed.
- Name. The category title.
- Displayed. Whether the category (and its page) is available to the public, or hidden.
- Parent CMS category. The category under which this category is placed. By default, "Home". You can have an unlimited number of levels of categories.
- Description. Describes the category content.
- Meta title. The name of the link to access its pages.
- *Meta description *. Used to describe the content of this page for search engines.
- Meta keywords. Used by search engines to understand what types of information the category is composed of.
- Friendly URL. Appears in the browser; also, make it easier for search engines. This field is automatically filled as you enter the category name.
Click "Save and back to parents CMS category" to keep on configuring your CMS content.
Stores
PrestaShop provides a complete store-locating tool for your customers.
They can reach form by clicking on the box on the front-office.
You can choose how these stores are displayed in the front-office.
All your stores are listed in a handy list.
As usual, click "Add New" to reach the creation form.
Fill-in as many of the fields as possible, as it will be displayed to your customers within the map.
Webservice
A Web service is a method of communication between two electronic devices over a network. It relies on a known set of methods, formats and access rights, so as be able to use the webservice's content on any other authorized tool, and build upon the original content.
You can enable your PrestaShop install's webservice, so that third-party tools can access your data. This potentially makes it possible for interesting tools to help you or your customers make better use your shop (such as mobile applications).
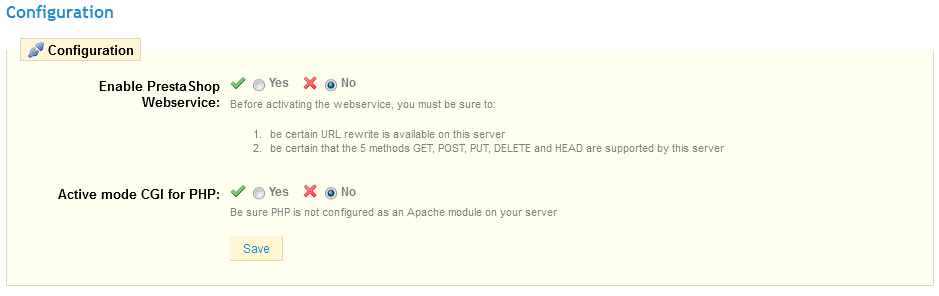
The configuration has two options:
- If you don't want anyone to access your shop through third-party tools and apps, just keep it disabled.
- If PHP is not configured as an Apache module on your serveur, indicate that you use PHP as a CGI.
| Note |
|---|
The configuration form will only appear if your |
Warning: For security reasons, make sure your shop supports secure SSL connection!
Not any app can access your store through the PrestaShop webservice: you decide which can, and what they can do. Every app has a unique connection key, with specific access rights.
You can add more apps with the usual "Add New" link and form:
- Key. A unique key. You can either create your own, or choose to use a generated one.
- Key description. A reminder of who that key is for, and what it gives access to
- Status. You can disable a key anytime.
- Permissions. You can choose among a wide array of permissions, either by section or by type of access. Some apps you'll want to only be able to view a handful of items, some others (for instance, ones that you would use to manage the shop remotely) to be able to edit and delete just about everything. Choose wisely.
| Note |
|---|
Developers: here is the link to the tutorial for PrestaShop's webservice. |
DB backup
You must perform regular backups of your shop, so that in case of a crash, you can reboot your shop quickly and in the best conditions. The database contains all the information in your shop. To create database backups of your shop, you have several solutions. You can use tools such as phpMyAdmin (reserved for advanced users) or use the tool integrated into PrestaShop, such as the one available on the "DB Backup" tab displayed below.
The table above lists all backups that have already been made, specifying the date of creation, age, file name and size.
To create a new backup of the database, click on "Create a new backup". The process starts, and you then receive a notification.
You are then prompted to click on the link "download the backup file" to save your database in the SQL format (and .sql file extension), archived in BZip2 format (.bz2). Put your backup in a safe place, for you might need it at any given time. Furthermore, you can find these backups directly on your server, in the /backup folder, under the custom-named /admin folder.
Logs
Errors happen. Most of the time, you are not aware of them because the system handles them silently. But you might want to know about them, in order to be able to correct the most regular ones, and insure a better stability for your shop.
The "Logs" sub-tab is where you can have a look at the PHP errors that happen. They are logged in the sub-tab's central table, and are presented in 4 types (here with original explanations from PHP.net):
- Informative only. Run-time notices. Indicate that the script encountered something that could indicate an error, but could also happen in the normal course of running a script.
- Warning. Run-time warnings (non-fatal errors). Execution of the script is not halted.
- Error.
- Major issue (crash). Fatal run-time errors. These indicate errors that cannot be recovered from, such as a memory allocation problem. The execution of the script is halted.
You can also receive a notification about the latest error. Notifications are sent to the shop owner's e-mail address, and you can configure the degree of importance at which you should start receiving such e-mails: use "3" if you only want to know about major issues, "1" if you want to know about everything, even the smallest notice. The default is "5", meaning that no notification is sent.
Choose the level, and click "Save".
Configuration Information
This sub-tab serves as a handy reminder of your PrestaShop configuration: version, server info, PHP version, MySQL version. All these prove really useful when you need to report an issue to the PrestaShop developers, or simply your webmaster.
Upgrade
This sub-tab features a tool introduced with version 1.4.4 of PrestaShop, and which is still considered experimental: the One-Click Upgrade, which makes it incredibly easier to upgrade your PrestaShop installation to the latest version... provided you already have at least version 1.4.4 of PrestaShop installed.
| Info |
|---|
PrestaShop versions below 1.4.4 still need to be upgraded manually. Refer to our Updating PrestaShop guide. The One-Click Upgrade feature is natively available in versions 1.4.4 and 1.4.4.1, and through a module for all others versions of PrestaShop, starting with PrestaShop 1.3. You can download the module for free on Addons: http://addons.prestashop.com/fr/outils-administration-modules-prestashop/5496-1-click-upgrade-autoupgrade.html |
If you already have the latest version of PrestaShop, the upgrade tool will simply display "You currently don't need to use this feature."
| Warning |
|---|
You should never update your online shop right away. The automatic upgrade tool can fail in some situations, and you might not be able to revert to the previous version. The safest way is to have an exact copy of your shop available, either on your local computer or in another folder of your web server. It should contain all your products, categories, themes, modules, translations, settings, etc. Make a trial upgrade on that copy of your shop. Once the upgrade is done, browse your front- and back-office thoroughly to make sure that everything is as expected. If not, then the upgrade tool has an issue with your configuration, and you should use the manual upgrade method, which is now deprecated and takes longer, but which may help in your situation. |
Downloading and installing the 1-Click Upgrade module
| Tip |
|---|
Make sure you are using the latest version of the 1-Click upgrade module:
|
Simply follow the normal path to installing a module on PrestaShop:
- Download the 1-Click Upgrade module from PrestaShop Addons: http://addons.prestashop.com/en/administration-tools/5496-autoupgrade.html. Save the Zip file to your desktop.
- In your PrestaShop administration panel, go to the "Modules" tab.
Click on the "Add a module from my computer" link, located at the top left.
- In the form that opens, click on the "Browse..." button, then find and select the module's Zip file that you just downloaded.
- Click the "Upload this Module" button. PrestaShop will put the module on your server, unzip it, and place the files in the
/modulesfolder.
The module is now available in your list of modules, but you still have to install it:
- In the "Modules" tab, find the 1-Click Upgrade module: type "1-click upgrade" or "autoupgrade" in the module search box (not the global search at the top). A direct link to the module should appear as you type. Click it.
- PrestaShop then displays the module in the main module list.
- Click the module's "Install" button.
The module is now ready to configure and use.
The configuration screen
The module's configuration screen is available from the "Modules" list, by clicking on the module's "Configure" link.
It is also available from under the "Tools" tab, in the "1-Click Upgrade" sub-tab.
The configuration screen presents you with a series of sections, providing information, tools and settings.
Welcome
This small section serves as a reminder that an upgrade is never 100% safe, and therefore that you should make sure you have made a complete backup of your files and data. This way, should the upgrade fail, you will be able to return to the initial state of your shop – albeit with a bit of work putting your files and data back into place.

Note that the 1-Click Upgrade module performs its own set of backup in order to allow for reverting of the whole upgrade. Nevertheless, you should rely on your own backups.
The pre-Upgrade checklist
The "The pre-Upgrade checklist" section gives you useful information on your current PrestaShop installation, and how it might interact with the automatic upgrade.

You must make sure that all the checks are validated before you can launch the upgrade.
- The 1-click upgrade module is up-to-date (your current version is x.x). Indicates whether you need to update the update module itself. If you have just installed it, there is little chance you will need to update it.
If you do not have the latest version of the module, a button appears below this field, marked "Install the latest by clicking 'Add from my computer'". Clicking it takes you to the "Modules" page. From there, click on the "Add a module from my computer" link to reveal the pre-filled form. Click the "Download this module" button to start updating the module. Finally, go back to the 1-Click Upgrade configuration page to continue performing pre-upgrade checks. - Your store root directory is writeable (appropriate CHMOD permissions). Indicates if the read/write permissions are correctly set. If not, you will have to change them, using your FTP client, such as FileZilla.
See the Getting Started guide's "System compatibility & system configuration" section for a quick explanation of how to perform a CHMOD. - The PHP "Safe mode" option is turned off.
- You put your store under maintenance. Indicates if your shop is active or in maintenance mode. You must put your shop in maintenance mode during the whole process (file backup, database backup, automatic upgrade, verification), so as to prevent customers from losing orders... and prevents you from losing clients. The module can disable your shop for you: Simply click on the "Click here to put your shop under maintenance" button. You can also choose to disable the shop yourself, using the shop's preference page: enable/disable the shop in the main "Preferences" tab.
- You de-activated or are not using the Caching features of PrestaShop. Indicates whether your shop's cache is enabled or disabled. You must disable it during the whole process. The module will not do it for you. Enable/disable the cache in the "Performances" page, under the "Preferences" tab.
- The PHP time limit is high or disabled (Current value: xxx). The automatic upgrade can be a lengthy process, as it needs to download the archive from prestashop.com, unzip it on the server, replace the currently installed files, then trigger the update itself. Hence, the PHP settings might be too low, and break the upgrade altogether, mid-process at worse. In this field, PrestaShop gives you an indication of the current PHP settings. Ideally, it should indicate "disabled".
All these indicators must be green for the upgrade to work. Otherwise, the upgrade button will not appear.
Start your Upgrade
This section compares your version of PrestaShop with the latest stable one. You can quickly see whether you need to update or not. If you know that there is a newer version available than the one presented, you can trigger a version check by clicking the "Check if new version available" button.
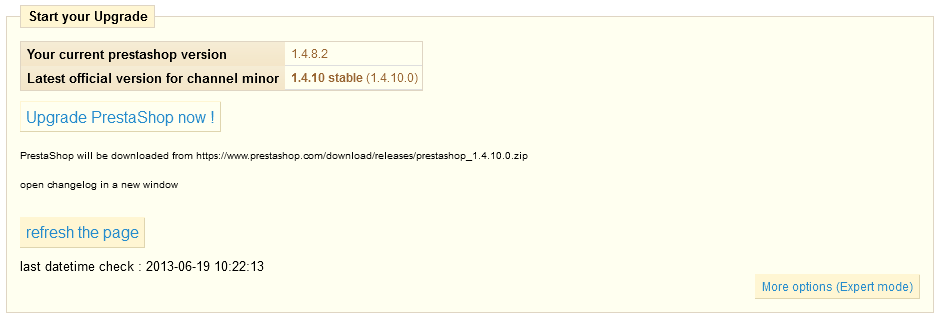
By default, the update tool is set to update your store to the next minor version. This means that if you use a version from the 1.4.x branch, it will not suggest the latest 1.5.x version, but rather the latest 1.4.x version. Therefore, if you want to update from a 1.4.x version to the latest 1.5.x version, you must click on the "More options (Expert mode)" button. This will open a new section, named "More options (expert mode)", where you can choose the distribution channel to which you want to update.
This is also very useful if you want to check for a version other than a stable one (for instance, beta, RC or any other unstable version).
Before launching the upgrade, you must make sure that you understand its settings. The "Backup options" and "Upgrade options" sections are available at the bottom of the page (and are described later in this chapter). Make sure you understand them all.
Expert mode
This section enables you to pinpoint exactly to which version you want to upgrade your current PrestaShop installation.

The options are:
- Channel. Choose the distribution channel that you want to use. The recommended selection is "Minor releases", which means "any stable release above the current one". The other options are:
- Major releases. The next stable releases from the latest branch: since the current branch is 1.5.x, the update tool would use the latest 1.5 version (as of this writing, v1.5.2).
- Minor releases. This is the default setting. Uses only the next stable release within the current branch: if you have PrestaShop 1.4.8, it will update your shop to v1.4.11, even if v1.5.4 is available.
- Release candidates. RC versions are deemed stable enough to be tested by the majority, but not stable enough to be the real release. Use at your own risks.
- Beta releases, alpha releases. These are development versions. Use at your own risks.
- Private release. Sometimes, the PrestaShop developers upload a private test version. If you have the right URL and hash key, you can update to this version easily using this channel. If you check the "Allow major upgrade" box, you indicate that are only interested in major releases.
- Local archive. To be used if you have downloaded the version you want to upgrade to in the correct local folder,
/admin/autoupgrade/download. Once you have selected archive in the drop-down selector, indicate the version number in the text field (be very exact!). - Local directory. To be used if you have downloaded and uncompressed the version you want to upgrade to in the
/admin/autoupgrade/latest/prestashopfolder. That/prestashopfolder must come directly from the archive that you downloaded.
- branch. Indicates if anything is available in the chosen channel.
- name. The name of the latest version in the chosen channel.
- url. The URL to the latest version in the chosen channel.
- md5. The hash check for the latest version in the chosen channel.
Version comparison
For the curious, the numbered differences between your current version and the latest version in the chosen channel.

In case you have make changes directly to the core files instead of using the overriding possibilities of PrestaShop, these lists can help you know if your changes are safe or not.
Nevertheless, you can improve the lifespan of your custom code by turning it into overriding files. See the developer documentation for more information.
Rollback
This section only appears when at least one upgrade has been performed.
See below for more information.
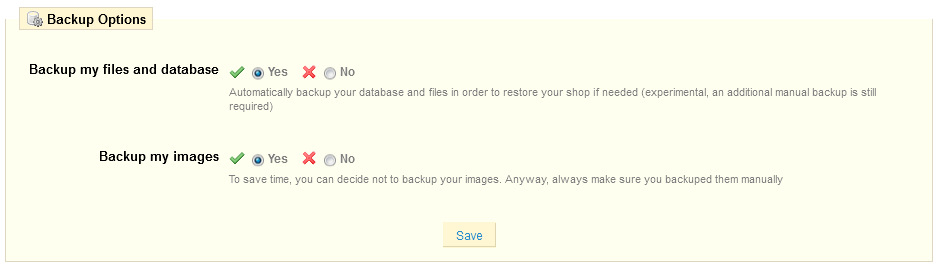
Backup options
These options enable you to have some control on the backup process:
- Backup my files and database. You must have your files backed-up, and the module will take care of this for you. You should never disable this setting, unless told to.
- Backup my images. You should let the module take care of your images too, in order to be able to do a clean re-install again by re-uploading your files.
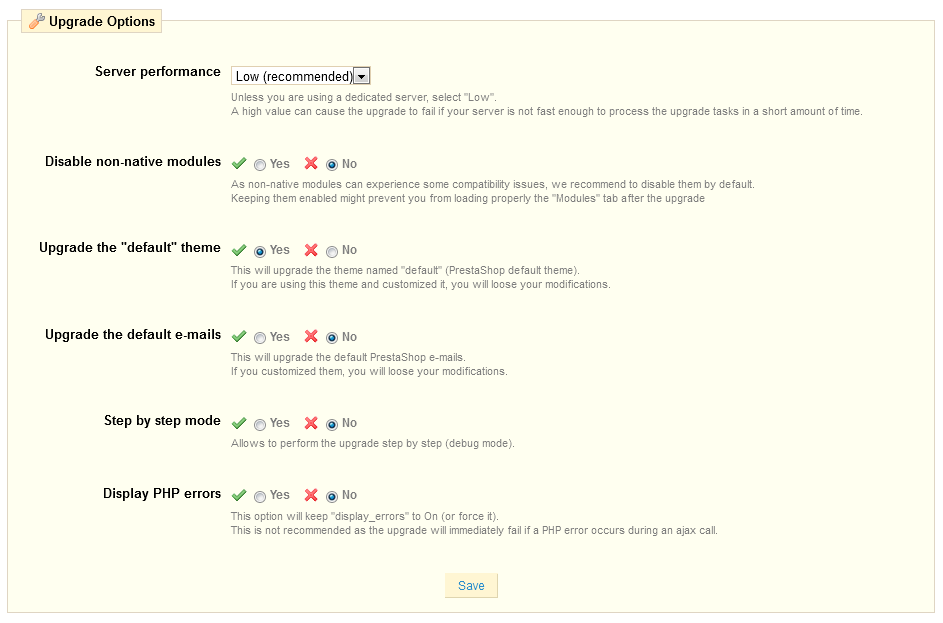
Upgrade Options
These options enable you to have some control on the upgrade process:
- Server performance. Some shared hosted offer poor performance, which might hinder the performance of the upgrade process, or even make it fail. "Low" is thus selected by default, but if you know you have a powerful server, you can choose "Medium" or even "High".
- Disable non-native modules. It is recommended to choose "Yes" for this option, as some module might prove a hindrance when upgrading PrestaShop.
- Upgrade the "default" theme. The upgrade process overwrites the default theme with its latest incarnation. If you have made changes to the theme directly, you can protect these changes by choosing "Yes". As a reminder, it is NOT recommended to edit the default theme! You should make a copy of the theme, and make changes to that copy.
- Upgrade the default e-mails. An update might bring new default e-mail templates. By default, the upgrade will replace the existing ones with the ones from the newer archive, and add the new templates. If you have customized your templates, it is recommended you keep them. You would then have to customize the new templates in order to fit the general style of your shop.
- Step-by-step mode. Dev mode only. If enabled, the module will stop at each step to ask you for confirmation.
- Display PHP errors. Dev mode only. If enabled, the module will displays PHP errors, which could help you discover server issues that would otherwise stay hidden from view.
The Upgrade process
Once all the indicators in the "pre-Upgrade checklist" section are green, the update button appears in the "Start your Upgrade" section, along with the URL from which the new version will be downloaded.
Clicking the "Upgrade PrestaShop now !" button triggers the whole process.
Once the upgrade process is launched, the whole configuration page is replaced by two sections: "Activity Log" and "Rollback".
The activity log gives you a detailed journal of what the updater is doing, in a screen you can scroll through:
- Removed files: only the sample files are removed, such as empty override classes and controllers.
- Name of the backup archive: the name follows the
auto-backupfiles_V1.5.2_20130127-120310-798d3a69.zipform. - Files added to the backup archive: all the remaining files of your current installation are put into the Zip archive.
- Database tables added to the backup archive: your files are important, but your whole catalog is stored in your database, and is therefore saved in the same archive.
- Removed files: mostly modules, controllers, classes, CSS and JavaScript files. Now that all the files have been saved in the backup archive, they can be safely removed.
- Files copied from the new archive: all the existing files are replaced by their new version.
- Merged translation files.
- Created, deleted, altered and updated database tables.
- Emptied temporary folders: if possible, the upgrader will try and delete the content of the cache folders.
A lot of files are mentioned during the whole process. You do not need to read all the notifications, it's only there for you to peruse in case of error.
You'll know the upgrade is over when the following message "upgrade complete. Please check your front-office theme is functional (try to make an order, check theme)" appears in green, along with the following final log entry: "End of process".
The upgrader also indicates that you should re-enable your shop, but before you do that, you should first check that everything is working in your back-office: no errors, all products and categories are in place with their images and attached files, etc. Until you have checked that everything is okay in your shop, it is better to keep it from the public eye.
| Tip |
|---|
On first load, pages might look wonky: because your web browser caches files, it is probably using the old CSS files instead of the new ones. Do not hesitate to reload the page several times, or even empty your browser's cache, in order to get the correct interface. |
| Info |
|---|
When you upgrade from version 1.4 to version 1.5, your menus will not be arranged the way they would be if you made a fresh installation of version 1.5. That is because PrestaShop 1.4 tabs got reorganized into 1.5 menus, and a lot of pages were moved around in order to create consistent menus. Additionally, the upgrader assumes that your 1.4 tabs may have been customized or moved around, either by a module or by your own action. Therefore, rather than breaking the existing settings, the upgrader takes the tabs as-is, and does not re-arrange them into the default 1.5 menu order. If you want to change the position of pages within a menu once you have updated to version 1.5, go the to "Menus" page under the "Administration" menu, and start fiddling with positions. |
Once you have made sure your PrestaShop installation is up and running, you can re-enable your shop using the option in the "Maintenance" page of the "Preferences" menu, then make tests on your front-office: browse products, sort them, try to order one, etc. In short, go through the entire buying process in order to make sure that you won't miss a sale.
Is everything working fine? Congratulations, you know have successfully upgraded your PrestaShop installation!
Going back to the previous version: rollbacks
Sadly, not all upgrades are successful – which is the very reason why you should always back-up all your files and data, and why PrestaShop performs an additional backup of said files and data by itself, which you should not always count on. Make your own backup first. See the "Making and restoring your own backup" chapter of this guide for more information.
PrestaShop's own backup files are saved on your server, and if it turns out your update has gone badly, you can find them in the "Rollback" section of the configuration page for the 1-Click Upgrade module.
Backup files are created as soon as the upgrade process is started, and are available immediately in the "Choose your backup" drop-down list.
Choose the most recent one. The date and hour of the creation of the backup file are right within the name: Vversion-date-hour-random, for instance "V1.4.9.0_20120907-114024-f85f41a" for a backup of a previous PrestaShop 1.4.9 installation, made September 7th 2012, at 11:40:24 AM.
The "Rollback" button triggers two actions:
- Takes the files from the latest backup, and re-installs them in place of those from the current installed version.
- Takes the data from the latest backup, and re-installs it in place of that from the current database.
Select the backup archive to which you want to roll back to, and click the "Rollback" button. As with the upgrade process, the whole interface disappears to only leave the "Activity Log" section and the "Rollback" section. You can follow the rollback process in the scrolling journal, and once it is finished, reload the page in order to check that everything is indeed back in place.
Going back to the previous version: restoring your own backup
This is explained in details in the "Making and restoring your own backup" of this guide: http://doc.prestashop.com/display/PS15/Making+and+restoring+your+own+backup.