Table contentcontents
| Table of Contents | ||
|---|---|---|
|
...
Managing Modules
PrestaShop 1.4 comes bundled with over 110 modules that can be installed/uninstalled and configured as desired, so as to customize and complete your shop. The range of actions is virtually unlimited: the extensibility of PrestaShop makes it possible to turn your shop into exactly what you intend it to do, instead of you having to comply with constraints that you didn't choose – provided you can find the module that does exactly what you need.
The "Modules" tabs gives you access to the list of modules. On this page you can install, uninstall, and configure each module.
...
Smart Shopping
This section contains only one module.three modules.
Export Shopping Feed
Export your products to Shopping Feed.
Shopping Feed
Sell your Prestashop products on hundreds Marketplaces and Comparison Shopping
Twenga API
Twenga is an online open shopping platform , that aims to bring together "all online products and stores in one place". This module helps you put your product on the Twenga platform: it exports your list of products on their service, and helps you track your sales through them.
...
Billing & Invoicing
This section contains only one module.two modules.
Avalara - AvaTax
Sales Tax is complicated. AvaTax makes it easy.
European VAT Number
This module enables you customer to fill in their VAT number in their details. The VAT can be fetched through a web service, based on your country.
...
Market Place
This section contains only one moduletwo modules.
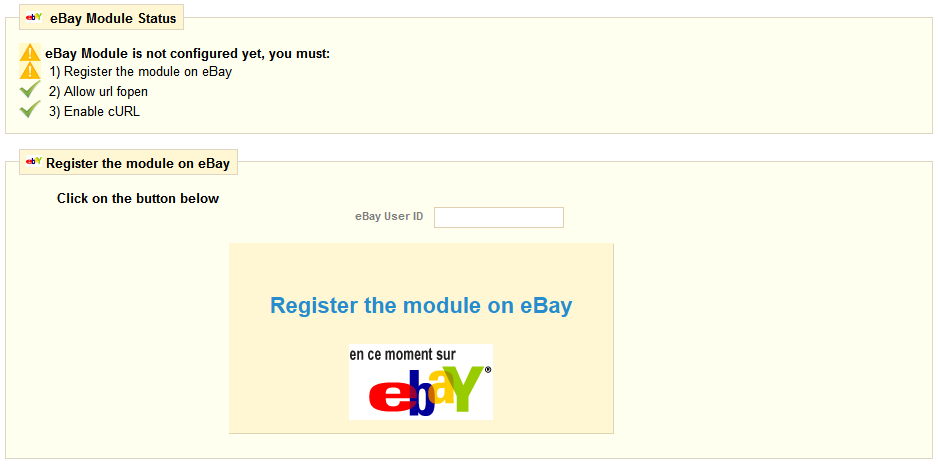
eBay
This module enables you to easily bring your your product catalog on eBay. This is an excellent way of widening your shop's audience.
Install the module, click on the "Configure" link, and follow the module's instructions. For instance, you will have to register your module/shop on eBay first in order for it to work.
Neteven
Sell on all marketplaces thanks to Neteven.
Migration Tools
This section contains two modules.
...
A generic module to import your stock of products stock from another e-commerce system to your PrestaShop shop. By default it doesn't provide anything, it needs platform-specific modules in order to work. Once at least one such module is activated, this module's configuration page gives access to a drop-down menu. Choose the platform of the source system, and enter the required authentication details. Click next "Next Step" and follow the module's instructions.
...
Pricing & Promotion
This section contains three four modules.
Birthday Present
This module can create and send discount vouchers to your clients on their birthdays. Install it and then click "Configure" to include this feature. Several options will appear:
...
Install it, and see how simple the configuration is:
Fid'Bag
Provide a loyalty program to your customers.
Customer loyalty and rewards
...
Payment Security
This section contains 4 3 modules.
FIA-NET -
...
Certissim
FIA-NET is a French third-party e-commerce trust partner: it protects both customers and online shops against against credit card frauds and other malevolent activities. You have to already have a FIA-NET account in order to use the module. Ask for one here. Once you have an account, configure the module with your details.
...
Fill it in with your credentials and choices from your shop, and save.
Secuvad module
Secuvad is a solution fighting against online fraud.
You must have an account in order to use this module. You can contact Secuvad using their online form: http://www.secuvad.com/contact.php
Once you have an account, fill in the form with your details, and click "Register".
Trusted Shops Customer Rating
...
Advertising & Marketing
This section contains 6 5 modules.
Block Advertising
It will display on the front office of your store an image of your choice. Clicking on "Configure" you can load the image of your choice, or indicate the image URL. Validate and the image will appear as follows.
Criteo
Criteo is "the world leader pay per click solution in retargeting. Criteo's personalized banners have proven to drive 4 times the click-through-rate (CTR) compared to other re-targeted banners".
You must have a Criteo account in order to use this product. You can contact them using the form on their homepage.
Once you have an account, you can fill the module's fields with your details.
eKomi
eKomi "helps companies through their web-based social SaaS technology with authentic and valuable reviews from customers and helps increasing the customer satisfaction and sales". This module ads an eKomi block to your front-office.
You must have an eKomi account in order to use this module. You can create one on their website.
Once you have an account, you can fill the module's fields with your details.
Customer follow-up
...
Enable it, then click "Configure". You may choose among four kinds of e-mails.
...
AdWords
Google AdSense AdWords "offers a contextual advertising solution to web publishers. Delivers text-based Google AdWords ads that are relevant to site content pages."
This module enables you to easily integrate Google AdSense AdWords script into your shop. You need to have a Google AdSense AdWords account in order to use this module.
Once you have one, all you have to do is to add your AdSense AdWords script code into the textfield.
...
When your customers register and want to view the benefits they will reap, they must go to the "Referral" section of their account. They will see the screenshot below A new screen will appear.
Your customer can then enter the name and email address of the person he wishes to refer to your site. After he clicks "Confirm," the persons he entered will receive an email.
...
Administration
This section contains 10 12 modules.
1-click Upgrade
Provides an automated method to upgrade your shop to the latest PrestaShop version
CloudCache
Supercharge your Shop with the CloudCache.com Content Delivery Network (CDN).
Artichow
This module enables a graphic library , that can be used in order to create stats graphs.
...
This module enables a graphic library , that can be used in order to create stats graphs.
...
This module enables a graphic library , that can be used in order to create stats graphs.
...
This module enables a graphic library , that can be used in order to create stats graphs.
...
Mail alerts can be sent to multiple addresses at the same time. To do so, list each e-mail address that will receive the notification (one e-mail address per line. To move to the line, press the Enter key on your keyboard). Once the setup is complete, click "Save."
Mobile template
Provides a mobile template compatible with iPhone, Android, etc.
Newsletter
Your customers can give you their e-mail address either by entering it in the Newsletter block located on the homepage or by checking the "Yes" box to subscribe to the newsletter when they register. You need these e-mail addresses in order to do some marketing. Install it and click "Configure" in order to bring the needed page.
Upon registration, your customers have two choices related to the newsletter: The first asks users to subscribe to the newsletter, the second to receive offers from partners (Opt-In).
The first section allows enables you to collect all the email addresses recorded by the newsletter block on your homepage, by clicking the button "Export .CSV file". A notification will appear, asking you to click on a link to download the file containing the addresses.
...
- The first "All customers" allows enables you to select all the e-mail addresses of your customers who open an account on your store. That is to say, those who do want to receive information from your part, as well as those who don't. Be careful what you did with it, then.
- The second, "Subscribers", allows enables you to select only those customers who do want to receive a newsletter from you.
- The third "Non-subscribers" allows enables you to select only those customers who do not want receive a newsletter from you.
...
- The first "All customers" allows enables you to select all the e-mail addresses of your customers who open an account on your store. That is to say, those who want and do not wish to receive information from your part.
- The second, "Subscribers", allows enables you to select only those customers who do want to receive a newsletter from your partners.
- The third "Non-subscribers" allows enables you to select only those customers who do not want receive a newsletter from your partners.
...
| Tip |
|---|
Import from your computer: using the the file explorer to find the archive. |
...
Select a theme and click on "Export this theme". A configuration form appears , where you can set the exported themes parameters: author, modules, theme name, compatibility version, etc.
...
Once all the parameters are correctly set, click on "Generate the archive now". You will quickly get a file to download from your browser. Save it on your hard-drive, then give the save file a proper name. From there on, you can easily share this theme, and if it's your own creation, you can start selling it on PrestaShop's Addons website!
SMS Tm4b
Tm4b (Text-Messaging for Business) is "an SMS Gateway that provides text-messaging solutions for the business community".
PrestaShop enables you to receive texts with important information concerning your store, such as a new order, a change of stock, or a daily activity report. Install it then click "Configure", and configuration page appears.
All information that you must enter into the various fields will be provided when you register on the Tm4b site.
Choose what information you want to receive by text/SMS. In order to receive the report, set a CRON job in your shop by adding your URL, such as www.myprestashop.com/modules/tm4b/cron.php, in your server's crontab.
Watermark
This module enables you to add a watermark to images from your store. This limits their diffusion on the Internet.
...
Then select the Y alignment (vertical alignment) and choose from the these options:
- Top
- Middle
- Bottom
Combine the two axis axes to choose where to place your watermark. Then select what type of image it is being applied to. Once you have configured the module to your convenience, click on "Save." At this stage the configuration is completed but the watermarks are not yet implemented. Go to the "Preferences" tab, then under the "Images". Click "regenerate thumbnails".
...
This section contains 10 modules.
Shipping
...
Estimate
This module enables the customer to compare carrier possibilities before going under the checkout process. Just install it to display this on your frontofficefront-office.
Note that all your carriers must have their fees properly set. This is done at the bottom "Shipping" page, in the "Fees by carrier, geographical zone, and ranges".
...
You need to set delivery rules for each carrier. Click "Add Now" to find that form.
!_Images^173-modules-deliveryDateAddNew.png |border=1!
You should create as many delivery rules as necessary.
Set the remaining module options, and finally click "Save".
Dejala.com : Courier delivery
Once you sign up with Dejala, the module allows you to add supplementary delivery services. When your clients purchase a product, they will see the shipping options available with a detailed time slots. They will order the product and ask for it to be delivered during the time slot that works best for them.
You must have a Dejala account in order to use it. you can create one right from the module's configuration page. Once you have your account, sign in using the second form in the module's configuration page, and follow the instructions.
This service is only available in certain towns. Please see the site http://www.dejala.fr for more information. As of this writing, they have staff in France's Ile-de-France region, and in Madrid, Spain.
Envoimoinscher
This module allows you to compare carrier offers and online ordering services' negotiated delivery rates.
You need an Envoimoinscher account in order to use this module. You can create one on their website.
!_Images^174-modules-envoimoinscher.png|border=1]
Once you have an account, fill in the module's various form fields, and click "Save".
Connect to FedEx
FedEx is "the fastest courier services around the world daily. FedEx Express is your 24 hours solution for the best courier service".
With this modulesmodule, you can add FedEx as a carrier, and offer your customers different delivery methods through their service.
...
Once you have your account set up, fill in the various fields from the module's configuration form, and validate. Once your PrestaShop is tied to the FedEx webservice, you can use the two other tabs, named "Categories Settings" and "Products Settings". The last tab gives you some help.
Kiala Comprehensive datafile integration – Kiala contract holders only
Offer delivery choice and savings to your customers. Activate the Kiala collection Point delivery option.
Kiala Light webservice integration
Offer delivery choice and savings to your customers. Activate the Kiala collection Point delivery option.
Mondial Relay
This module enables you to display rates for delivering in Mondial Relay points. This service is available in France, Luxembourg, Spain and Belgium.
...
Once you have your authentication details, use them for fill the module's form, then click "Save".
TNT Express
Offer your customers, different delivery methods with TNT
Tracking - Front office
Enable your affiliates to access their own statistics.
Connect to UPS
...
UPS is a well-know known worldwide parcel carrier
With this modulesmodule, you can add UPS to your list of carriers, and offer your customers different delivery methods through their service.
...
Once you have your account set up, fill in the various fields from the module's configuration form, and validate. Once your PrestaShop is tied to the UPS webservice, you can use the two other tabs, named "Categories Settings" and "Products Settings". The last tab gives you some help.
Connect to USPS
...
This modules module enables you to add the United States Postal Service to your list of carriers.
...
Payments & Gateways
This section contains 12 14 modules
They are all explained in detail in the "Managing Payments Methods" section chapter of this user-guide, in the "Setting up a payment module" section.
Analytics & Stats
This section contains 23 27 modules. Most of them create a new section in the "Stats" tab of your PrestaShop install. Many are installed by default. Therefore, if some of PrestaShop's functionalities are not useful to you, you can disable them here.
...
You must have a Google Analytics account to make this widget work. Once you have one, follow the Analytics instructions to create a profile for your shop. you You will receive a unique identifier. Use it in the module's "username" field and save it. Google Analytics will start gathering stats about your visitors.
Do read all the instructions provided by the module.
Analytics for ecommerce
The best analytics for ecommerce merchants. Deeply integrated into the Prestashop platform.
Best manufacturers
This module adds a "Best Manufacturers" link to the list of possible stats.
...
At first launch, you will have to update the location of many of the missing countries (mostly the lesser know known ones). This will help the module locate your visitors. Simply click on the country's name, and indicate where it is on the map.
Front Office Features
This section contains 34 31 modules.
Many of these are installed by default. Therefore, if some of PrestaShop's functionalities are not useful to you, you can disable them here.
...
Displays the products that your customers added to their basketcarts. They can then see their basket to change the amount of product they're ordering or delete or add a coupon. The block is presented as follows. By clicking on "Shopping Cart", they see the "Summary Order" of all products added to their basket and their quantity.
...
This feature allows your customers to choose which currency will appear in price displays, as well as how the customers will pay for their orders. The block appears in standard currency in the header (top part) of your store (see picture adjoined). To add or configure the currencies go to the "payment / currency" section.
Block customer data privacy
Adds a block to display a message about customer data privacy.
Language block
Choose the languages that you want your store to appear in with the "Language Block" model The languages will appear on your store in the following manner: . If you don't want them the languages to appear then uninstall this block.
...
Displays a block with layered navigation filters: it enables the customer to define cumulative criteria to filter category products, little by little providing more details in order to reduce the number of products displayed.
Before using this module for the first time, you have to initialize the cache. Use the module's tool.
This is a great tool for customers who know the details of what they want (color, condition, price range...), but are unsure how to find it.
When configuring the module, you are presented with 4 sections.
Indexes and caches
In order to work properly, layered navigation needs to be kept up-to-date with your latest products, product attributes and product prices – unless these never change. You should therefore regularly re-index the data, using the buttons provided here. They each have specific actions:
- Index all missing prices. Adds to the index only the prices that were not indexed before. Much faster than the next button.
- Rebuild entire price index. Adds to the index all the prices, whether they were already indexed before or not. Much slower than the previous button when you have many products.
- Build attribute index. Adds to the index all the product attributes.
- Build url index. Adds to the index all the product URLs.
You should update your indexes every time your products' data changes. As this can prove pretty painstaking or even boring, PrestaShop enables you to trigger the indexing automatically, using cron tasks. Add the provided URLs to your crontab, and you will not have to handle this yourself anymore. If you do not know about cron and crontab, ask your webhost about it.
Existing filters templates
Layered navigation is based on templates, or group of criteria. There is one by default, named "My template", which makes use of all the available filters. You should create templates more adapted to your content or needs.
You can have as many templates as needed. This section enables you to edit and delete them when necessary.
Build your own filters template
The template builder enables you to specify what kind of filters your customers should have access to.
Creating a new template requires only three easy steps:
- Select categories. You can either create filter for the whole site, or on a per-category basis.
You could for instance have the whole site display the price filter, while some categories can have additional filters.
When choosing "Specific categories", a small window opens where your can choose in which categories this filter should be available.
Note that filters do not automatically apply to sub-categories of the selected category: if there is no product on your "Home" category, then the layered navigation will not appear there. - Selected filters. The number of available filters depends on the content of your shop. Six default filters will appear here: price, weight, condition, manufacturer, available stock and sub-categories. Along with these are the attribute groups for all products in the selected categories (with the number of products). Check a filter's box to move if from the "Available" section to the "Selected" one. You can move the filters up and down with your mouse cursor, which will influence their display in the front-page.
Each filter has a two drop-down menu included:- Type of display. You can choose how the filter is displayed to the customer. The visualization depends on the type of the filter.
- Numerical (price & weight): check-box, radio button, drop-down list. Note that only the check-box setting allows for multiple selection.
- Alphabetical (all others): slider, inputs area, list of values.
- Limit. If some of your categories have too many choices for a given filters, you can limit the number of items using this selector.
- Type of display. You can choose how the filter is displayed to the customer. The visualization depends on the type of the filter.
- Name your template. Customers will not see the name, but it will prove very useful to you when you have to edit one template among the dozen or hundred you may create in the lifespan of your shop.
Note that saving the filter will not save the whole configuration: you have to save the filter first, then click on "Save configuration".
Configuration
Two options are available:
- Hide filter values with no product is matching. If disabled, you will still see filters, even if they are useless because of the lack of matching product (which can make the layered navigation over-crowded with options).
- Show the number of matching products. Displays the number after the name of the filter, between brackets. If there is no matching product, it will display "(0)".
- Show products from subcategories. The filter applies to more than just the current category.
- Category filter depth (0 for no limits, 1 by default). If the above option is enabled, you risk having too many products taken into account, and lose the interest of layered navigation. The depth is of 1 by default, but you can use even deeper sub-categories.
- Use tax to filter price.
- Allow indexing robots (google, yahoo, bing, ...) to use condition filter.
- Allow indexing robots (google, yahoo, bing, ...) to use availability filter.
- Allow indexing robots (google, yahoo, bing, ...) to use manufacturer filter.
These options apply to all templates and filters.
Link block
With this module you can add links to the sites you want, or to pages of your store. Click "Install" then "configure" to add links to this block. The page below, divided into three sections, will appear.
The first section, "Add a new link", " allows enables you to specify the link's name and URL.
Enter a link following the form http://www.myprestashop.com
Click , then click "Add this link".
The second section, "Block title," is where you add a site name as well as a URL to which visitors will be redirected.
Standard links block links ranked in order of update. If you want the oldest first, select the drop down menu "first link".
By default the links are ordered according by most recent update. If you want to change this setting, select instead “by oldest link” from the drop-down menu to place the oldest links first.
At the bottom of the page, you will find all of the link links that you have entered. If you would like to modify the links, click the Edit button, or to delete a link, click the red cross.
...
Each client must be able to view all of their account data. Here they will find a summary of previously made orders, package tracking, product returns, their addresses (if more than one), coupons etc. Once the client is connected he will see a panel shown in the manner displayed in the adjoining screenshotappear.
New products block
This block presents recently added products and quickly , in order to make them more visible. With this option you can create traffic for your new products. You can set the number of visible links by configuring this module.
...
The module's configuration page let's lets you choose where to display these logos.
...
Displays a block with a link to the store locationlocator.
Suppliers block
Adds a block displaying suppliers.
...
The home page image itself may also be modified. To do this, click on "Browse" to find the image you want on your computer.
...
Note: The homepage is the first image that your visitors experience when they access your store. Remember to make it pleasant and efficient and to update it regularly.
RSS products feed
Permits Enables you to generate an RSS Product Feed on your store, showing the latest products that you have put on line. Regular visitors as well as search engines are very fond of this module.
...
FIA-NET is a French third-party e-commerce trust partner: it protects both customers and online shops against against credit card frauds and other malevolent activities.
You have to already have a FIA-NET account in order to use the module. Ask for one here. Once you have an account, configure the module with your details.
...
Repeat for all of the products that you want to place on the home page by checking the box marked "Home".
iAdvize
Offer an interactive live chat to your customers.
LiveZilla
Live support chat.
Product Comments
This module gives visitors the possible to leave a message on your product page. They can write it by using a new tab that will add itself to your product page.
...
The "Products Category" module enables you to display on each product page suggestions of other products that are in the same category. This model is particularly useful for discovering what your store has to offer. See the example below.
Product tooltips
This model shows information on the behavior of the visitors on the page that you're currently looking at Click on "install" to install this module then on "configure" to set up all of the different possibilities offered. The screenshot below will then appear.
Validate the choices corresponding to the information that you would like to show to your clients. Once you are done click on "Update Settings" to save. This information will then be posted in the top right section of your browser.
ReversoForm
This module allows your customers to quickly and easily fill in their contact information. Your customers only need to fill in their phone numbers, and then their name, address, zip code, and city will be filled in automatically. This saves your customers time, thus removing the reluctance they may have to create an account. To enable this module just click on "Install" then "Configure". You are asked for your ReversoForm account number (you can get it from the site: http://www.reversoform.com/ and the address of your shop. Once completed click on "Update" to save the settings. Your customers will see a field appear asking for their phone number.
Send to a Friend module
You want to give your customers the opportunity to share your product knowledge. In order to do this install the "send to a friend module t , install this module at the bottom of your product pages: a link will appear with which you can share the product.
By clicking on the link, you are then redirected to a form where you can enter the name and email address of the person with whom you want to share your product. He will then receive the link of the product in question, inviting him to see it.
Treepodia
Cover your entire catalog with product videos in 24 hours.
Modules & Themes Catalog
PrestaShop comes bundled with a host of modules, but even that number might seem limiting, or you could want to explore other directions.
There are many more modules available on the PrestaShop Addons website. Some are free, other others are for-pay, and you're sure to find something that suits your needs! Once you are a seasoned module developer/theme designer, you can even submit your own creations, and sell them on Addons!
The "Modules & Themes Catalog" gives you a quick and easy access to the Addons database of modules and themes. A search query will return the 5 first results from Addons, with more available if you click on the "View all results on addons.prestashop.com" link.
Installing modules
Once you have downloaded a module from the Addons online store, it's up to you have it installed on your PrestaShop site.
There are two ways to install a module: either using the dedicated form, or using your FTP client.
Installing using the dedicated form
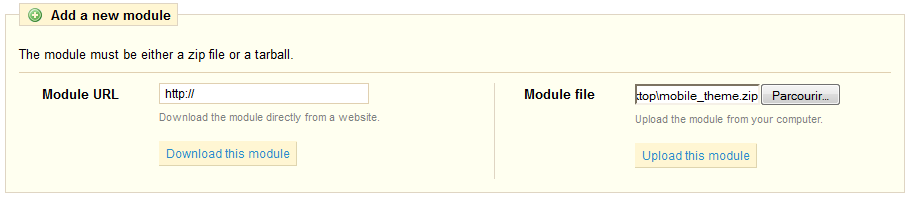
To install a new PrestaShop module "automatically", click on the "Add a module from my computer" link at the top of the list of modules. This will reveal a new section.
Two options are presented in the "Add a new module" section:
- Add a module from a web server: simply put the URL to its online zip file, and validate.
- Add a module from your computer: browse to the module's Zip file that you downloaded, and validate.
In both cases, you must point to the module's Zip archive, and not its folder or any of its unpacked files.
Once validated, PrestaShop will load the module (either from the Web or from your computer), unpack it, place the files in the correct location, and update the page, all this in a handful of seconds.
Installing using an FTP client
To install a new PrestaShop module manually:
- Unzip (decompress) the module archive file (
.zip). This should result in a new folder. - Using your FTP client, place the folder in your PrestaShop
/modulesfolder. Pay attention NOT to upload that folder in another module's folder (which can happen when drag-and-dropping items). Upload the whole folder, not just the files it contains. - Go to your back-office, in the "Modules" tab.
- Locate the new module in the modules list. You might have to scroll down; you can also use the list's search engine, which should give you a dynamically updated list of matching module names.
- In the row for the new module, click the "Install" button.
- Your module is now installed and should be activated too (green tick). If necessary, click on the module's "Configure" link. Pay also attention to any warning message that might be displayed by PrestaShop.
Once configuration is complete, be sure to test the module immediately to confirm that it works as planned.
Uninstalling a module
If you only need to temporarily not use the module, but still wish to keep its configuration, you can simply disable it: just click on the green tick, which should then turn into a red cross, meaning that the module is still installed, but disabled.
If you do not care about the module's configuration, click on the "Uninstall" button: your module's folder will still be in the /modules folder, but the module will not have any more impact on your shop.
If you changed your theme to take the module into account, make sure that the disabling or removal of the module does not break the theme.
My Account
PrestaShop also enables you to access your Addons account right from the back-office.
...
Finally, a section lists the latest themes from the Addons site, and you can click on any of them to reach their page, and possibly download them.
Installing using the Theme Installator module
This is the recommended method, as it preserves all the blocks' positions on their respective hooks.
The "Import/export a theme" module is a native module, and should be installed by default. This is a special module that enables you to import a theme and install it (and its attached modules), or to export a theme and its modules from your shop in order to share it with the world.
Find this module in the module list (in the "Modules" page), and open its configuration screen. This screen presents you with 3 methods to install a new module: from your computer, from a public website, or from your own FTP server. It also gives you a method to export your module in a correct format.
Importing a theme
Whatever the method, the process remains the same: indicate the location of the theme's Zip archive, then click "Next".
| Tip |
|---|
Import from your computer: using the file explorer to find the archive. |
A quick summary is displayed in the next page, indicating what that importer is about to do..
Click "Next" again to validate your choice. The theme is now installed, and PrestaShop asks you if you wish to install modules that were imported along with the theme, what you would rather do with the current modules configuration, and how you would like the images configuration to be taken into account.
Click "Next" one last time. A final confirmation page presents you with all the changes applied to your PrestaShop site. Click "Finish" to end the process.
Exporting a theme
This section is only available when there is at least one theme installed on your PrestaShop site.
Exporting a theme is very useful when you want either to back the theme up for safety, and create an archive of the theme for a friend or in order to make it available on the Addons marketplace (http://addons.prestashop.com/fr/). Not only does it generate a complete Zip archive of your theme, but it also adds many information in an XML files, which is very useful both when uploading to Addons, and when importing to another PrestaShop site.
Select a theme and click on "Export this theme". A configuration form appears where you can set the exported themes parameters: author, theme name, compatibility version, attached modules (if any), etc.
Once all the parameters are correctly set, click on "Generate the archive now". You will quickly get a file to download from your browser. Save it on your hard-drive, then give the save file a proper name. From there on, you can easily share this theme, and if it is your own creation, you can start selling it on PrestaShop's Addons website at http://addons.prestashop.com/.
Installing using a FTP client
This method is not recommended, but is still available. Use with caution: your blocks might not have the expected position on their respective hooks.
To install a new PrestaShop theme via FTP:
- Unzip (decompress) the theme archive file (
.zip). This should result in at least one new local folder,/themes, containing your theme's folder(s). - Using your FTP client, place the theme's folder (as found in the local
/themesfolder) online in your PrestaShop/themesfolder. Pay attention NOT to upload that folder in another theme's folder (which can happen when drag-and-dropping items). Upload the whole folder, not just the files it contains. - (optional) If the theme's archive contains a second
/modulesfolder, it means your new theme comes bundled with modules that are specific to it, or necessary for it to run properly. Using your FTP client, place the folder(s) found in the local/modulesfolder online in your PrestaShop/modulesfolder. If your online PrestaShop install already has a module of the same name, try to only keep the most recent version of the two (the one with the most recent files). If unsure, keep the version bundled with the theme, as it is the most likely to work best with it. - Go to your back-office, in the "Modules" tab then it "Themes" sub-tab.
- Select the new theme in place of the current theme, by clicking on the radio button then clicking "Save".
- Your theme is now in place.
- (optional) If the theme came with modules, activate them on the back-office's "Modules" page, then configure them if need be.
Many themes come with an accompanying Install.txt file, which gives you instructions. Make sure to follow them in order to not forget anything.
Once configuration is complete, be sure to test the theme immediately, every page of it, to confirm that it works as planned. Do try to make a full order, from A to Z – you wouldn't want to miss orders just because you didn't notice the theme was incomplete!
PrestaShop's mobile template
The mobile template enables any PrestaShop merchant to have his or her shop be accessible to mobile devices: from the home page to the payment process, along with product pages and conversion funnel.
Installing the mobile template for your shop
Installing PrestaShop's mobile template is easy:
- Make sure that you are using PrestaShop 1.4.x, and that you have the latest version of the PayPal module, which is optimized for mobile devices.
- Download the template on PrestaShop Addons: http://addons.prestashop.com/en/mobile-iphone/6165-prestashop-mobile-template.html:
- Connect to the Addons website. If you do not have an account yet, create one, it's free!
- Once you are connected, load the mobile template's Addons page (link above), and click on the "Download" button.

- Your browser will offer to download the
theme_mobile.ziparchive file. Save that file in your computer, for instance on the Desktop. Do not uncompress the archive file.
- Install the template as you would do for a module:
- Connect to the PrestaShop 1.4 administration,
- Go to the "Modules" tab,
- Click the "Add a module from my computer" link, and in the "Module file" form on the right, choose the template's
mobile_theme.zipfile which you have just downloaded from the Addons website. Click on the "Upload this module" button to put the file online.
- Once the module is online, find it in the list of modules (using the search engine, with the "mobile template" name), and install it by clicking on its "Install" button.

The module is now installed, which means the template is now active on your site, and your clients can already use it. All you have to do know is to customize it.
Configuring the mobile template
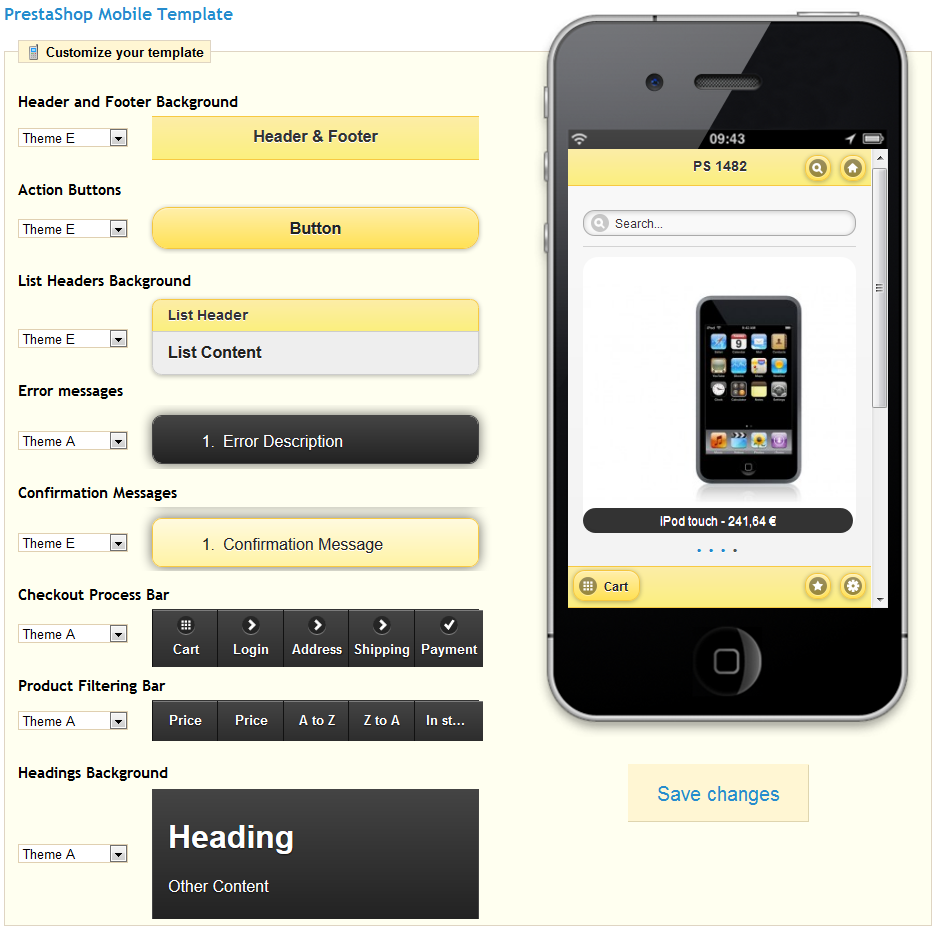
Once the module is installed, click on its "Configure" link in order to access all of the template's options (general graphic aspects, visibility on a given set of devices, etc.). To the right of the configuration screen, you will find a working preview of your site, as it will be displayed through the mobile theme. This way, you will be able to directly see how your changes impact the mobile display of your site.
The first section is called "Customize your template". Its 8 options enable you to choose a given theme for each part of the mobile interface. Five themes are available (from A to E), each with its own set of color. You can choose to combine the themes, or to keep a single uniform theme for all the parts of the interface. To see your changes applied to the live preview, click on "Save changes".
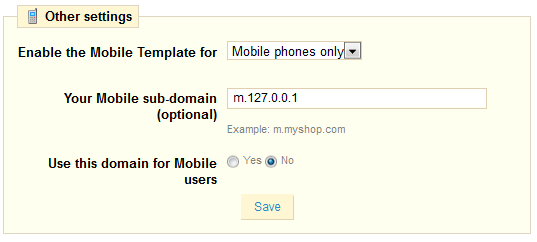
The second section is called "Other settings", and contains three options:
- Enable the Mobile Template for. By default, the mobile template is only displayed when accessing your shop from a mobile phone, tablets getting the same regular template as all other classic devices. This option enables you to choose to also use the mobile template for tablets ("Both" option), or even to only have tablets access the mobile template.
- Your Mobile sub-domain. When the "Use this domain for Mobile users" is enabled, mobile device users are redirected to the
m.your-shop.comsubdomain, thus clearly indicating that it is the mobile version of the main site. You can choose another subdomain. If you prefer your mobile visitors to remain on the main domain, disable the "Use this domain for Mobile users" option below. - Use this domain for Mobile users. When this option is enabled, mobile device users are automatically redirected to the domain listed in the "Your Mobile sub-domain" option above.
Positions
The order in which modules' front-office interface are displayed can be customized – because you might want one module to be place much higher (or lower) in the page that others. In PrestaShop's jargon, this is called "transplanting", and is done using the tool available under the "Positions" sub-tab for the "Modules" tab. In effect, this enables you to attach a module to one of the many available hooks in the current theme, without writing any code.
...
Each hook's table displays the hook's name, its technical name, its number of attached modules, and finally lists the attached modules themselves.
For each module, you have access to its position relative to this hook.
...
To customize the transplantation of a module on a hook, you must give it the PHP function for the hook. For example, the Currency block has this function exists:
| Code Block | ||
|---|---|---|
| html | html |
function hookTop($params)
  {
  ...
  }
|
In order for instance to transplant the Currency block into the right column, you need to create:
| Code Block | ||
|---|---|---|
| html | html |
function hookRightColumn($params)
  {
  ...
  }
|
...
Another way to move modules around on the shop's homepage is the Live Edit mode, which embeds said homepage into a tool that let's lets you graphically decide where to place your modules. You can access it from the "Position" sub-tab, by clicking the "Run LiveEdit" button.
...
At the bottom of the Live Edit mode, a row presents you with two buttons: "Save" and "Close Live Edit".
The first one is explicit, quite self-explanatory; the second one cancels all changes you might have made to your modules during this live-editing session. Note that once you have clicked after having removed a module, you'll have to go to the "Positions" sub-tab and use the "Transplant a module" form in order to bring it back.
...