Table of content
| Table of Contents | ||
|---|---|---|
|
Getting started with PrestaShop 1.4
Whether you are a computer expert or a novice, the PrestaShop™ e-Commerce solution lets enables you take any business online.
Because Since PrestaShop is can be accessed via from any computer with a standard Web browser, you can manage it from any computer anywhere in the world that has where there is Internet access. Update your homepage, add new products, check on order status -- - all you need is your PrestaShop username and password.
This Getting Started guide will show you how to:
- Verify that you can meet server meets all the system requirements.
- Install or update PrestaShop on your hosting server.
- Configure the PrestaShop Back Office:
- Create your own graphical theme and make changes to logos and other images.
- Build your product catalog : Import a product database, create categories and subcategories, register your products and their images, attributes, and features.
- Install and configure your payment module(s). (Contact us directly for information on purchasing payment modules for specific banks.)
- Configure other elements such as shipping costs, currencies, taxes, notification e-mails, and languages.
- Select which products to display on the homepage as New Products, Top Sellers, and Featured Products.
- Open your Web store!
- Update PrestaShop to the latest version.
- Uninstall PrestaShop.
| Tip |
|---|
You can download our step-by-step PowerPoint document: |
| Anchor | ||||
|---|---|---|---|---|
|
...
Technical requirements
Before downloading or installing anything, you need to provide a home for your PrestaShop online store. This means it needs its files need to reside on a Web server. You might have a Web server of your own, but it is more likely that you have or will have your shop hosted by an Internet hosting service, which provides you with an online home for a few dollars per month.
You may also want to buy a domain-name for your shop. Many web hosts offer a free domain with every new account, but you could also buy one at an independent domain name registrar.
| Tip |
|---|
PrestaShop can host your online business on its in-house Web servers; please consult our |
...
PrestaBox website for details on our low-priced, secure Website hosting service. This is highly recommended for businesses with little |
...
to no experience with the Internet or computers. Naturally, we install and update PrestaShop for you. |
Whichever hosting service you use must have the following components installed on your server space:
- Linux, System: Unix, Linux or Windows. Unix is highly recommended.
- Web server: Apache Web server 1.3 or later.
- PHP 5.2 or later. (You may have to activate PHP 5 on your hosting service, see below.)
- MySQL 5.0 or later
...
- .
- At least 32 Mb of RAM on your server (64 Mb is comfy, the more the better).
PrestaShop can work with PHP 5.1 or later, but that versions inferior to 5.2 have bugs that might prevent some functionalities to work well as expected (such as invalid date timezonetime zone).
Also, PrestaShop can also work with Microsoft's IIS Web server 6.0 or later, and nginx Nginx 1.0 or later.Anchor
Install PrestaShop
Now that you have made sure that the necessary components are installed on your hosting server, there are a few things to check before installing the PrestaShop e-Commerce software.
- Create a database for your store, or use the database designated by your hosting company.
- Make sure the GD Library is enalbled. On a default installation of PHP, the GD Library should be turned on, but if that's not the case for your install, here is the standard Windows instructions are:
- In the root directory of your PHP folder, open the php.ini file.
- Uncomment the line extension=php_gd2.dll (about half-way through the file, in the middle of a long list of extensions) by deleting the ;
- Restart the PHP services.
- Download the PrestaShop e-Commerce solution software.
- Unzip the PrestaShop ZIP archive anywhere on your hard drive.
- Upload the contents (not the folder itself) of the /prestashop folder to the root directory (e.g., http://www.mysite.com/) of your hosting server via FTP. You can also upload the files to a subdirectory you’ve created (e.g., http://www.mysite.com/prestashop/) if you wish to keep your root homepage separate.
- While you are connected to your Web hosting FTP server, make sure the following PrestaShop folders have "write" permissions (also known as "CHMOD 775", or "CHMOD 777" depending on your host – you can find an explanation of file permissions here) but do not apply these permissions recursively (ie., to their subfolders): /config, /upload, /download, /tools/smarty/compile. Then, make sure the following folders have "write" permissions: /img, /mails, /modules, /themes/prestashop/lang, /translations
- In a Web browser, launch the Installer by going to your shop's root address: you will be redirected to the install (e.g., http://www.mysite.com/prestashop/install).
- Upon completing the PrestaShop Installer wizard, use your FTP software to navigate to your /prestashop folder. There, delete the /install folder and rename the /admin folder (for example, /admin123 or, even better, /xyz789). This is for security reasons. If later you forget the name you gave the /admin folder, you can confirm its name via your FTP browser.
Congratulations! Installation is now complete.
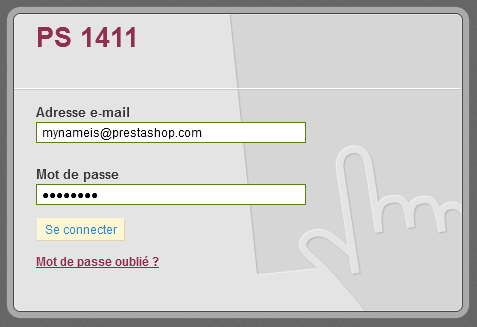
Log in to the PrestaShop back-office and start filling out your product catalog and configuring the many settings to suit your tastes and needs.
Note: Regularly back up your database, ideally on different computers, in case of problems related to hardware or security.
...
Keep a test version handy!
After you have completed setting up your shop to get it just the way you want it, but before officially opening it to the buying public, we strongly recommend that you install a local test version on your personal computer (using WAMP for Windows, MAMP for Mac, or LAMP) for Linux), or elsewhere on your hosting server.
This second version will be useful as a pre-production environment in which you can carry out all future changes to your PrestaShop online store without affecting the live version. This way, if an error should occur, your live store remains unchanged.
Note: This method is for modifying PrestaShop application files only. Do not use a test version of the SQL database.
After you have confirmed that your test version works as it should, copy the test version over the live version. (It is best to do this after peak usage hours, and with your store properly and temporarily disabled from within the PrestaShop back-office.)
...
Update PrestaShop
Done well, the whole update process described within these steps should not take more than half an hour. Do not try to skip a step in order to be done with it faster, as they all are crucial.
Our support team is at your disposition for all technical problems related to the upgrade of your PrestaShop store.
- Via email: [email protected]
Step 1: Save and Backup Your Current Shop
This step consists of backing up your database and your files. This step is not avoidable for success and should never ever be ignored or skipped. Do not proceed to step two without completing this step.
A. Backing Up Your Files
You must save all of the files related to your PrestaShop store.
There are two main ways of backing up your files:
- Ask your hosting company to back up your files.
Make sure that this backup is fully functional, recent, and more importantly that it reflects the content of your current store. - Or, copy all of your FTP files from your server to your local computer
This method is only possible if your hosting provider has provided you with an FTP access to your server. Create a “Backup” folder on your computer, then, using an FTP client (such as FileZilla), select all the PrestaShop files and folders on your server (use the Ctrl-A command) and copy them to your “Backup” folder.
B. Deactivating Your Store
Go to your store’s back-office, click on the “Preference” tab, then select “No” for the “Enable Shop” option.
In the “Maintenance IP” field, located just below the “Enable Shop” one, enter your own IP address, so that you can keep on using your store during the update. This will allow you to test the store, while still making sure visitors cannot access the website.
In order to find out your IP address, visit this page: http://www.myip.dk/
C. Backing Up Your Database
You must absolutely back up the whole database in conjunction to your PrestaShop store.
There are three different ways to back up your database:
- Ask you hosting provider to back up your database
Be sure that your database backup is functional, recent, and especially that it contains all of your data for your PrestaShop Store. - Or, download a copy of your database via phpMyAdmin
Be sure that your database backup is functional, recent, and especially that it contains all of your data for your PrestaShop Store. If your database is too big, you might receive an error. If that is the case, you will need to contact your hosting provider. - Or, download a Database Backup from your PrestaShop Back-Office
Visit the “Tools tab, then the “DB backup” sub-tab. This process will take between 1 and 20 minutes depending on the size of your database. Make sure this backup is functional, recent, and especially that it contains of all the data of your website. Open the zip file and make sure that there are absolutely NO ERRORS before proceeding to the next step.
D. Backing up Your Customized Translation
If you did not add any personalized translation at the root of your modules, please proceed to step 2.
Navigate to the “Tools” tab, then the “Translations” sub-tab of your back-office.
In the section “Export a Language” select the language to which you have made any modifications, then select your current theme, and click “Export”.
Save the downloaded file into a backup folder of your choice, on your local computer…
E. Before going to the next step
Verify your Backup folder, does it contain…
- …a complete copy of all of your files?
- …a complete and errorless copy of your database?
- …a copy of your customized translations (optional)?
You have checked the entire backup above, and made sure that they are all correct and that you would be able to return to your current version / restore all of your data.
If you answered yes to all of the questions above, then proceed to Step 2.
Step 2: Getting Ready for the New Version
This step consists of preparing the files that you will need to copy into the new version of PrestaShop.
A. Downloading and Unzipping of the Latest PrestaShop Version
Visit http://www.prestashop.com and download the latest version of PrestaShop (click the “Download” button on the homepage). You now should have a file: prestashop_1.x.x.zip (where “x” represents the version number).
Unzip the file to your computer. If you do not yet have an unzipping tool, you can download a free one here: http://www.7-zip.org/ .
Once unzipped, open the “prestashop” folder that it contained.
In that “prestashop” folder, select the “admin” folder and rename it to something unique to you (for instance, “admin436”. Your online store currently also has a unique “admin” folder, from its original installation; you can use that unique name if you wish. If you do not know the unique name of your online store’s “admin” folder, use whichever name you want.
B. Copy the files backed up during Step 1 to the “prestashop” folder
Some of the folders that you have backed up will need to be copied to your "prestashop" folder.
The following folders must be copied from your backup towards the recently unzipped “prestashop” folder:
- “mails” folder has all the mails that you have modified.
If you have never made any modification there, do not worry about this folder. - “img” folder contains your logo and all the pictures of your store (categories, products…)
- “modules” folder, only copy the modules that you have added.
- “themes/yourtheme” folder, only copy your current theme. If you use the default theme from PrestaShop, do not copy it, you must use the one from the new version.
- “download” and “upload” folders, which contain all the downloadable products, the attached files and the customizable products. If you do no use any of these functionalities, do not copy these folders.
- “classes” folder: in case you have added customized classes to this folder, copy them to the new “classes” folder. Then open each and every one of them, and rename their name, adding the “Core” suffix. For intance, “MyClasse” becomes “MyClasseCore”. Only change the name in the PHP class within file, not the name of the file itself.
- “config” folders, only copy the settings.inc.php file, then modify the following lines:
- The line that contains “PS_BASE_URI” must contain the name of the subfolder where you are going to do your update. For instance, “/prestashop/” instead of “/”, or of the name of current folder for your current store.
- If you modified your database credentials (you should not have had to do that normally), update all the lines that contain “DB_NAME”, “DB_USER” et “DB_PASSWD” too.
C. Moving the "prestashop" folder to your FTP server
The “prestashop” folder that you have unzipped, now contains all the modifications from your “Backup” folder (and therefore, from your currently live store). This next step will have you upload that folder on your FTP server.
If you renamed the “prestashop” folder, do not forget to update the config/settings.inc.php file accordingly, as explained in step 2-B.
Using your FTP client, upload the “prestashop” folder to your server.
D. Checking before going further
Let’s say your store is at the following URL: http://www.myshop.com
- To test the update, you first downloaded the latest version of PrestaShop.
- You unzipped this version, which contained a folder called “prestashop”
- You copied your customized files from your backup to this new “prestashop” folder.
- You modified the file config/settings.inc.php on line “PS_BASE_URI” so that it has the name of the folder on your server (should be “prestashop”)
For instance:define('_PS_BASE_URI_', '/');
...was replaced by...define('_PS_BASE_URI_', '/prestashop/');
- You uploaded your “prestashop” folder to your FTP server, and it can be accessed at: http://www.myshop.com/prestashop
E. Before going to the next step
Did you follow these 5 steps?
- Downloaded and extracted PrestaShop
- Unzipping the downloaded .zip file
- Manual copy of the folder of step 2.B
- Transfer the whole directory “prestashop” onto your FTP
- The line PS_BASE_URI of the files config/settings.inc.php should show the name of the transferred folder FTP (should be “prestashop”)
If you answered yes to all of the questions above, then proceed to Step 3.
Step 3: Starting the Update
This step consists of starting the upgrade script which will upgrade your database.
A. Launching the update script
Visit the following URL: http://www.myshop.com/prestashop/install
(Replace "myshop.com" with the actual URL of your store, and “prestashop” with the name of the folder that you have just transferred to your FTP)
- Select "Update"
- Read the license agreement, then select the option “I agree to the above terms and conditions”
- Click on the “Next” button
If you did follow the first step of this guide concerning back-ups, you can click “I certify that I backed up my database and application files. I assume all responsibility for any data loss or damage related to this upgrade.” If you did not do the required back-ups or if you did not have a chance to verify the data’s integrity and that these backups are functional and recent, please go back to step 1 of this guide.
B. Verification of all parameters before the update
The parameters of your hosting provider should show on the screen, as well as more details about the operation about to be launched.
- max_execution_time shows the maximum time in seconds authorized by your hosting provider for the update to take place. If this number is smaller than the estimated time of installation, we recommend that you notify your hosting provider so that he can increase this limit.
- memory_limit is the maximum memory that you’re hosting provider will set aside for you to complete the upgrade. If this value is smaller than “32M”, you should contact your hosting company to request an increase of this value.
If any of these two parameters does not meet the requirements, you are taking the risk of receiving an error message or a blank page after clicking the “Next”.
Otherwise, click the “Next” button at the bottom of the page.
If sufficient rights are assigned to your files and folders, a page displaying that all is well is shown.
If not, make sure that the folders are properly configured: change their permissions of the folders in red on your FTP server (CHMOD 777 or 775, depending on your hosting provider) then click the “Refresh these settings” button.
In order to perform a CHMOD, using your FTP client, find the folders that have the wrong permission settings, right-click on each of them in order to display their properties (or even better, their access rights), and tick the boxes that are not yet ticked, until a refresh of the “System and Permissions” page gives you only green folder.
Once you’re done, click “Next” at the bottom of the page, the update will start and probably last a few minutes.
C. Finishing the update
Once the update is finished, you should see the a screen saying "Your update is completed!"
On your FTP server, inside the “prestashop” folder, you should delete:
- The “install” folder (this subfolder contains the update tools)
- The README files (contain information about the installation)
- The CHANGELOG file (contains information about the latest changes in PrestaShop)
You can now access your store’s front-office at http://www.myshop.com/prestashop (change the URL accordingly).
D. Before going to the next step
Did you fellow these 3 steps?
- Launching the Update tool
- Verifying the parameters and started the update
- Finishing the installation and removing the unneeded folders and files.
If you answered yes to all of these questions, proceed to step 4.
Step 4: QA and Testing
This step consists of doing various checks to make sure that the store has been properly updated to the latest version.
A. Import your Translation that you saved in Step 1
If you did export your own translations during step 1 (Backups), import them back into your new store by going to the “Tools” tab, then the “Translations” sub-tab.
B. Verification of the main Domain Name and regeneration of your .htaccess
You should verify that the domain name assigned in the database is indeed the one that you are working with. To do so, visit the “Preferences” tab, then the “SEO & URLs” sub-tab.
You must check the following information:
- “PS directory”: this folder should be the one that you have transferred onto your FTP server; in this tutorial, it would be “/prestashop/”
- “Domain Name”: This should be the domain name to which you are currently connected. Otherwise, all your links will be invalid and will use an incorrect domain name.
C. Verifying your theme’s compatibility
You can verify your theme’s compatibility with the updated version by visiting the “theme validator” developed by Prestashop.
This tools is available at the following address: http://validator.prestashop.com/
If you use an unmodified copy of the default theme of PrestaShop, this step is not necessary.
D. Tests to be done on your new store.
To make sure that everything is working properly on your updated store, you should perform a few tests:
Testing To-Do List (this is not a complete list, you should do as much testing as possible):
- All pages load properly (Home, Categories, Products…)
- Create a customer account
- Place an order (add to cart and order)
- Verify that payments work properly (credit card, Paypal, etc.)
- In the Back Office , check that the order was properly placed and received
- Send an email from the contact page or “Forgot my password”
- Check the resulting invoice
- Check all the modules that you have activated
If every test is successful, congratulations! Proceed to step 5.
Step 5: Going Live with the New Website
This step will accompany you in going live with the latest update.
A. Swapping your updated store and your production store.
Congratulations, you have achieved all the essential steps to update your store!
You now need to swap your updated store with your production store.
You have two options to do so:
- On your FTP Server, select the entire content of the “prestashop” folder and drag’n’drop it to the folder of your production store. This option is fast. If your FTP client offers to do it, ask to have it overwrite all existing files
- Or, you can also download you whole updated store directory (“prestashop”) from the FTP server into your local computer, and then upload all the files back onto your production folder. This option will take a little bit longer, and you should again select the option to overwrite all the files.
At the end of the operation, edit the file config/settings.inc.php: look for the line containing _PS_BASE_URI_, and replace “/prestashop/” by “/”. If you don’t do that, your images and theme will not appear correctly.
> For more information, look at the end of the Paragraph D.4 step 2.
B. Activating your store
Visit the “Preference” tab in the back-office of your production store and click “Yes” for the option “Enable Shop”.
You're done! Enjoy your update shop!
In case of issues
In some rare cases, some modules are not compatible with new version of PrestaShop. You should contact the company / person that provided you with this module to request a few code changes to bring it up to date.
A. Rolling back your database. (Only proceed to this step if you have no other way out)
If your update went bad and you do not see any other fix than to roll back to the previous version of your database, there are two mains way of doing so:
...
More information is available for system administrators in the System Administrators Guide.
Setting up a local environment
This guide is mainly targeted at users wishing to install PrestaShop on a remote server/host.
You may wish to install on your local machine, either in order to test PrestaShop before investing money in a server and domain name, or to customize your shop locally before you push your modifications to the PrestaShop installation that would already you have online.
Installing any web-application locally requires that you first install the adequate environment, namely the Apache web server, the PHP language interpreter, the MySQL database server, and ideally the phpMyAdmin tool. This is called an AMP package: Apache+MySQL+PHP and the operating system, giving WAMP (Windows+Apache+MySQL+PHP), MAMP (Mac+...) and LAMP (Linux+...). Since all of the items packaged are open-source, these installers are most of the time free.
This would require you to be quite technical; luckily there exist many pre-built packages that you can install easily. It does not prevent you from having to get technical here and there, but they do provide a huge help. Here is a selection of free AMP installer:
- XAMPP (Windows, Mac, Linux, Solaris)
- WampServer (Windows)
- EasyPHP (Windows)
- MAMP (Mac)
Choose the package that you feel the most comfortable with, launch it, and make sure that everything it has installed does work before going on with this PrestaShop installation tutorial:
- The web server should be up and running. You should be able to access it through your browser, by typing "127.0.0.1" in the address bar. 127.0.0.1 is the "localhost", meaning "your computer": it is a loopback address which directs the browser to any local server. In effect, 127.0.0.1 and localhost are synonymous: you can use one or the other interchangeably.
- The database server should be up and running. MySQL is where all your data is stored. The AMP package should provide you with a clear indicator whether MySQL is running or not.
- The phpMyAdmin tool should be accessible. This is the web application that helps you handle data stored in MySQL. Its location depends on which AMP packaging you chose: it can be found at
http://127.0.0.1/phpmyadmin(XAMPP, WampServer, MAMP),http://127.0.0.1/mysql(EasyPHP), or maybe at another location. Check your package's documentation – it might even provide a phpMyAdmin button of sort that would open the correct URL in your browser.
Once you have checked that the package is correctly installed and that all of its parts are running, you need to find the root folder. That's the local folder where you will place your files, and can be compared to the root folder of your online server, only its content is accessed with 127.0.0.1. The actual local location of the folder depends greatly on the AMP package, and can be customized:
- XAMPP:
C:\xampp\htdocs - WampServer:
C:\wamp\www - EasyPHP:
C:\easyphp\www - MAMP:
/Applications/MAMP/htdocs/
Finally, you need to know the root user name and password for MySQL, in order to install PrestaShop. Most packages use the user name "root" with an empty password. Read your package's documentation.
With all that clear and done, you can follow up on the rest of this Getting Started guide, keeping in mind that files are not to be uploaded via FTP to a server, but simply to be moved in the correct local folder.
Installing PrestaShop
Downloading and unzipping the PrestaShop archive
You can download the latest version of PrestaShop 1.4 at http://www.prestashop.com/en/developers-versions. This page presents you with all the archive for the previous versions of PrestaShop, for historical purpose.
Three sections are presented to you:
- The latest version of PrestaShop (1.5.4.1 as of this writing): a stable version, ready for all websites.
- A link to the Github repository, where you can find the sources of PrestaShop, and participate to the development. The files on the repository are in heavy development, and are only available for testing purposes, NOT for production. Use at your own risk.
- The list of previously released version: from PrestaShop 0.9.7 to the latest version of the 1.5 branch.
| Warning |
|---|
We strongly advise you to stay away from the development Github version if you do not intend to cater for the teething problems inherent to development versions! |
Go to the "Previously released version" section, click the "PrestaShop v1.4" row to open it, and click the "Download" button for the latest version.
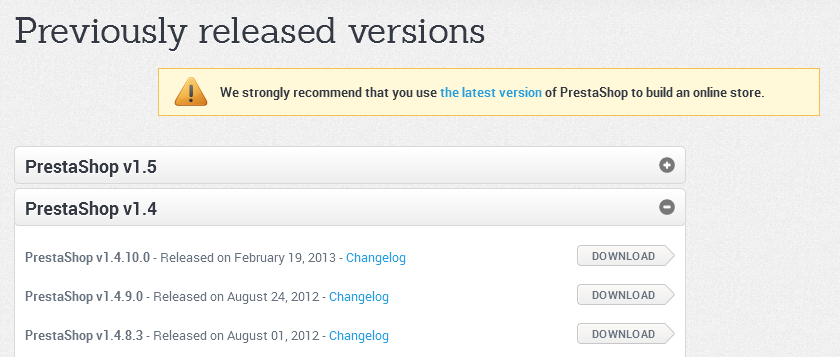
The browser will prompt you to download a file: save the archive on your computer (such as on the desktop). You should get a file named "prestashop_1.4.11.0.zip" (or an equivalent, depending on the version numbers).
| Tip |
|---|
The downloaded file is an archive, meaning one file containing all of PrestaShop's files in compressed form. In order to continue with the process, you must uncompress the archive. If your operating system does not natively support Zip files, you can download and install a free tool, such as 7-zip. |
Extract the content of the archive to a known location on your hard-drive (such as on the desktop again). Do not upload the Zip file to your server.
Uploading PrestaShop
You should now have a hosting space at your disposal, and a folder on your hard-drive with the uncompressed PrestaShop archive. This step makes you upload the PrestaShop files on your hosting space. This is done using a FTP client.
Installing and configuring your FTP client
FTP is short for "File Transfer Protocol". A great and free FTP client is FileZilla. Download it and install it. Note: do not download FileZilla Server, only FileZilla Client!
Once FileZilla is installed, you will need to configure it with your site's log-in parameters, which should have been sent to you by your host. If not, ask for them to your host – or check your spam folder ![]()
Basically, the needed parameters are:
- A hostname or an IP address: the location of your hosting space's FTP server.
- A username: your hosting account identifier, which is unique to you.
- A password: obligatory security measure.
Open FileZilla, and open its Site Manager tool. You can do this in three different ways:
- Press Ctrl-S.
- Click the "Open the Site Manager" icon, at the top left.
- Open the "File" menu, and select the "Site Manager..." option.
A window opens.
To add your hosting space to the Site Manager:
- Click the "New Site" button. A new entry is created in the site list. Give it a recognizable name.
- On the right side, in the "General" tab, enter the parameters your host provided you with: host, user, and password. You should not have to change the other default parameters, unless told so by your host.
- Once all the fields are properly filled, click the "Connect" button. This will both save your site in the list, and log you into your account, so that you can make sure everything works right.
Uploading your files
Now that you are connected to your hosting space, it is time to transfer the PrestaShop files from your computer to your server.
In FileZilla (or any other FTP client), browse your local folders until you find the one that contains the PrestaShop files. Keep it open.
In the "Remote site" section (on the right), browse to the location where you want PrestaShop to be publicly available (root of the domain, sub-folder, sub-domain...). This can change a lot, depending on both your host and your needs:
- Your host:
- Some hosts may require you to place your files in a specific folder, such as
/htdocs,/public_html,/web,/www,/yourdomainname.com, etc. - Other hosts' FTP server will simply log you directly into the proper upload space.
- Some hosts may require you to place your files in a specific folder, such as
- Your needs:
- If you want your shop to be the main website for your domain name (i.e., http://www.exemple.com), upload PrestaShop at the root folder of the upload space (which may depend on the host).
- If you want your shop to be in a sub-folder of your domain name (http://www.exemple.com/shop), you must first create said folder through FileZilla (right-click and choose "Create directory"), then upload PrestaShop in that folder.
- If you want your shop to be in a sub-domain of your domain name (http://shop.exemple.com), you must first create said sub-domain. This depends on your host: you might be able to do it simply by adding a new folder with your FTP client, or you might have to create the sub-domain through your host's administration panel. Read you're hosts support documentation first. Once created, browse to the sub-domain's folder, and upload PrestaShop there.
On FileZilla's left side, you should now have the local folder where you uncompressed the PrestaShop files, and on the right side, the destination location. If you haven't done it yet, uploading is simple: select all files and folders from the local folder (use Ctrl-A), and either drag & drop them to the remote folder, or right-click on the selection and choose "Upload" in the context menu.
After a short while, all of PrestaShop's files and folders should be online. Great!
Creating a database for your shop
Before you can actually install PrestaShop, you need to make sure your MySQL server has a database ready for PrestaShop's data, and if not, create one. This can be done using the free phpMyAdmin tool, which should come pre-installed on your web server most of the time (read you host's documentation). Connect to it using your account credentials, which your host provided you with. It should be accessible through a standard URL, tied to your domain name, or that of your host.
In the left column, you can see the current databases. Some of them should be left alone, because they are either used by phpMyAdmin or by the host: phpmyadmin, mysql, information_schema, performance_schema and others. Read your host's documentation to know if one of these can be used as a default database.
Either way, you can create a brand new database using the central form named "Create new database". Simply enter a unique name, and click "Create". The name of the database will be added to the list on the left. You can now use it to store PrestaShop's data.
| Info |
|---|
Some hosts prefer to have customers use a graphic control panel, such as cPanel, Plesk or a custom-made one. Make sure you read your host's support documentation about handling MySQL databases, and create a database for your shop by following their specific explanations. |
Launching the auto-installer
Now comes the part where it all comes together: installing PrestaShop.
The installation process is quite easy, as it is streamlined by PrestaShop's auto-installer. To launch it, simply browse to PrestaShop's location on your hosting: the script will automatically detect that it is not yet installed, and will take you to the auto-installer. From there on, you just have to read and click.
Step 1: Welcome page
This page is a quick intro into the installation process.

- Select the language in which you wish the installer to be.
- Select whether you wish to install or update PrestaShop (if this is your first time, you can only install).
- Read the PrestaShop license (the Open Software License 3.0), and agree to it.
To access the next step, you must check the "I agree to the above terms and conditions" box, then click "Next". If you do not explicitly agree to the license, you cannot install PrestaShop.
Step 2 & 3: System compatibility & system configuration.
The second page makes a quick check of all the server parameters on your host, and if nothing wrong is found, takes you directly to the third step.
System compatibility
This page checks that everything is OK with your server configuration: PHP settings, permissions on files and folders.
If anything goes wrong, the installer stops you here, enabling you to see the few technical details that need fixing, be it changing the PHP configuration or updating the file permissions.
While changing the PHP configuration can only be done on a case-by-case basis depending on your level of access to your server, and therefore cannot be explained here, updating the file permissions is easier to explain. This will require you to access your remote files, and therefore use your FTP client (such as FileZilla).
Log-in to your server account using your FTP client, browse to the PrestaShop folder, and find the folders that are marked by the installer as in need of a permission change.
| Info | ||
|---|---|---|
| ||
Changing file/folder permission on a Unix/Linux system is called a "CHMOD", after the command of the same name – you can find an explanation of file permissions here). Giving them "write permission" is called "doing a CHMOD 755" or "a CHMOD 775", depending on the host. |
| Warning |
|---|
Some hosts might require you to use CHMOD 777, although it is not recommended for anything more than a one-time need. |
In any case, thanks to FileZilla (and most FTP clients), you can change permissions easily and graphically: once you have found a file or folder that needs such a change, right-click on it from your FTP client, and in the context menu choose "File permissions...". It will open a small window.
Depending on your server configuration (which you don't always have a hand at), you'll need to both "Read" and "Execute" columns of boxes checked, and at least the "Owner" and "Group" rows for the "Write" column. Some host might require you to have the public "Write" box checked, but be careful with that: have anyone be able to edit the content of your folder is rarely a good thing.
For folders that the installer is needing a recursive permission change on, you can check the "Recurse in subdirectories" box.
Regularly check that you have made the correct check by relaunching the installer's compatibility checks: click "Refresh these settings" as often as necessary.
Once all indicators are green, you can click "Next". If you cannot have them all green, at least make sure the installer displays "Your configuration is valid, click next to continue!"
System configuration
This page contains a form that enables you to tell PrestaShop where the database server is, and which database it should use, along with a few other details.
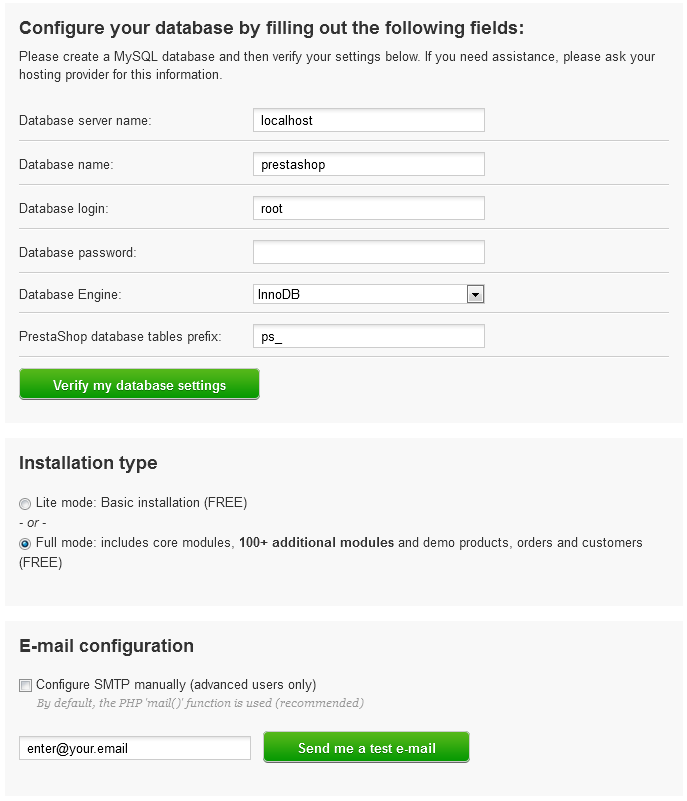
Database configuration
Fill all the fields with the connection information provided by your web-host, along with the name of the database you chose/created for PrestaShop, then click the "Verify my database settings" button in order to check that everything is fine. If so, the installer will display the following message: "Database is connected".
Choose the prefix for your tables. "ps_" is the default, resulting in the PrestaShop SQL table having names such as "ps_cart" or "ps_wishlist"; but if you need to install more than one instances of PrestaShop on the same database, then you must use a unique prefix for each install.
Installation type
Two modes are available:
- Lite mode: a blank and empty PrestaShop will be installed. It will have no modules, no theme, and no demo products/categories: you will have to build it all yourself. This is great if you know what you are doing.
- Full mode: PrestaShop will be installed with a theme, more than a hundred modules, and some demo products and categories. This is great for newcomers, as it helps you learn how to use PrestaShop... and can of course server as a good basis for your own store, after removing the demo products and categories! In effect, it is also highly recommended to install PrestaShop in full mode, as many of its features come from its numerous modules. Without them, PrestaShop is very bare bones.
E-mail delivery set-up
PrestaShop relies heavily on e-mail for notifications, both for the shop owner and its customers. This form enables you to test whether the current server configuration lets you send e-mails using PHP's mail() function. If this is not the case, then check the "Configure SMTP manually" box in order to configure your own mail server. Note that this is reserved to advanced users.
Click "Next", and the installer will start filling the database with tables and data. This might take a few minutes on slower servers.
Step 3: Shop configuration
This is where you can already start customizing your shop: give it a name and a logo, indicate its main activity, and indicate the personal information for the shop owner (which has legal binding in most countries)...
| Warning |
|---|
Do not use a colon in your store's name, as it might prevent some features from working (for instance, e-mail sending might fail). You can replace the colon with a dash if you need to have two sections in the title. For instance, use "MyStore – The best place for items to buy" instead of "MyStore: The best place for items to buy". |
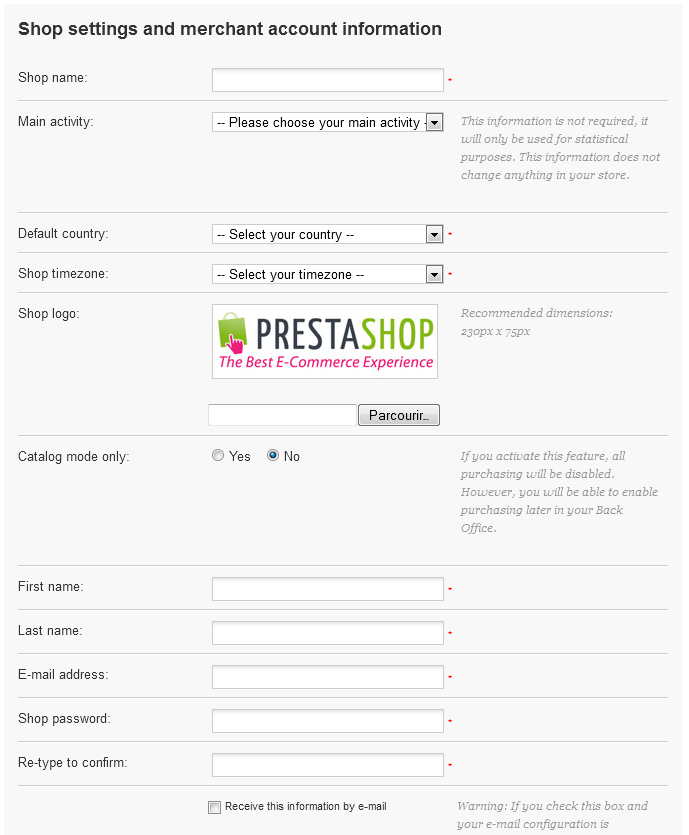
Note that the logo will appear:
- On all of your store's pages.
- In your back-office.
- In all of the e-mails sent to your customers.
- In all of your contractual documents (bills, product return authorizations, etc.)
It is highly recommended to not keep the default PrestaShop logo, for obvious reasons.
Using the "Catalog mode only" option, you can choose to use PrestaShop simply as catalog, even if temporarily. This will disable all purchase and payment features. This is useful when you are setting your shop up for first time, as it insures that no purchase can be made until you are ready to let people shop on your site. You can remove the catalog mode later, in the "Preferences" > "Products" sub-tab.
The page ends with the "Additional benefits" section, which presents modules that are specially promoted in the installer. You can choose to have them installed or not.
Click "Next": your shop is online!
Completing the installation
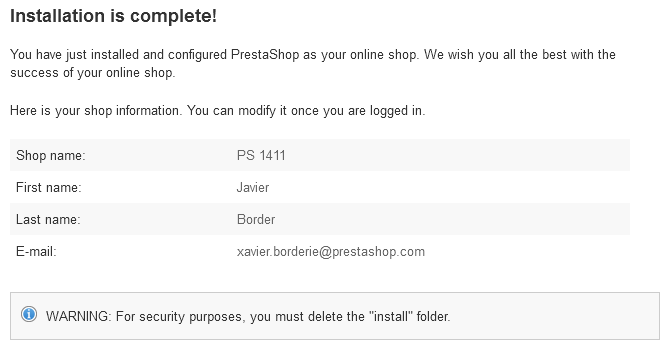
You are almost done!
As you can read on the final page of the installation process, there are a couple of last actions to perform before you can call it a success.
An easy way to improve your installation's security is to delete or rename some key files and folders. This is done using your FTP client, directly on the server.
Items to delete:
- "install" folder.
- "readme_*" files (5 of them).
- "CHANGELOG" file.
Item to rename:
- "admin" folder: you should give it a unique name, so that no attacker can access your admin files. For instance, "admin42", "secretFolder" or "xyz123" – anything unique.
Write down the new name for your admin folder, as you will from now on access it directly.
Congratulations! Installation is now complete. You can now go to the administration login form by entering the new admin folder's name:
Log in to the PrestaShop back-office and start filling out your products catalog and configuring the many settings to suit your tastes and needs.
Finally, in order to close all potential doors, use your FTP client to update the files and folders permissions to 664, or 666 if your host requires it. If it turns out low access rights prevent some modules to work, you should set permissions back to 755.
| Tip |
|---|
You should regularly back up your database, ideally on different computers, in case of problems related to hardware or security. |
Misc. information
Keep a test version at hand!
After you have completed setting up your shop to get it just the way you want it, but before officially opening it to the buying public, we strongly recommend that you install a local test version on your personal computer (using WAMP for Windows, MAMP for Mac, or LAMP for Linux, or XAMPP for any of those platforms), or elsewhere on your hosting server.
This second instance will be useful as a pre-production environment in which you can carry out all future changes to your PrestaShop online store, without affecting the live version. This way, if an error should occur, your live store remains intact and untouched.
| Info |
|---|
This method is for modifying PrestaShop application files only. Do not use a test version of the SQL database. |
After you have confirmed that your test version works as it should, copy the test version over the live version. It is best to do this after peak usage hours, and with your store properly and temporarily disabled from within the PrestaShop back-office.
Checking for the GD library
On a default installation of PHP, the GD Library should be turned on, but if that's not the case for your install, the standard Windows instructions are:
- In the root directory of your PHP folder, open the
php.inifile. - Uncomment the
extension=php_gd2.dllline (about half-way through the file, in the middle of a long list of extensions) by deleting the ";" at the start of the line. - Restart the PHP services.
If you have no access to the php.ini file (which is often the case in shared hosting), contact your host about your hosting needs.
Activating PHP5
Oftentimes, dedicated or shared servers have both PHP 4 and PHP 5 available, but only PHP4 is activated by default.
To install PrestaShop, PHP 5 must be activated. If you attempt to run PrestaShop using PHP 4, you will receive numerous errors, including this very common message:
| Code Block | ||||
|---|---|---|---|---|
| ||||
Parse error: parse error, unexpected T_STATIC, expecting T_OLD_FUNCTION or T_FUNCTION or T_VAR or '}' in [php file] on line X.
|
| Tip |
|---|
Please do not hesitate to post a bug report concerning the tips needed to make PrestaShop run on your hosting service, on PrestaShop's Forge (you will need an account). We will add them to this guide as we receive them. |
| Warning | ||
|---|---|---|
| ||
If the suggested way to activate PHP5 is to add some specific configuration rules to your The only clean way to customize your PrestaShop install's |
The following is a list of procedures of which we are currently aware of:
1&1
Add this line to the "Specific configuration" text-field from the Tools > Generators sub-tab:
| Code Block | ||||
|---|---|---|---|---|
| ||||
AddType x-mapp-php5 .php
|
For URL re-writing, add these lines:
| Code Block | ||||
|---|---|---|---|---|
| ||||
Options +FollowSymLinks
RewriteEngine On
RewriteBase /
|
Free.fr
Add this line to the "Specific configuration" text-field from the Tools > Generators sub-tab:
| Code Block | ||||
|---|---|---|---|---|
| ||||
php 1
|
OVH
Add this line to the "Specific configuration" text-field from the Tools > Generators sub-tab:
| Code Block | ||||
|---|---|---|---|---|
| ||||
SetEnv PHP_VER 5
|
To deactivate global registers:
| Code Block | ||||
|---|---|---|---|---|
| ||||
SetEnv REGISTER_GLOBALS 0
|
GoDaddy
To View Your PHP Version:
- Log in to your Account Manager.
- From the Products section, click Web Hosting.
- Next to the hosting account you want to use, click Launch.
In the Server section, your PHP Version displays.
To Change Your PHP Version:
- From the Content menu, select Programming Languages.
- Select the PHP version you want to use, and then click Continue.
- Click Update.
Changes can take up to 24 hours to complete.
Lunarpages shared hosting
- Enter cPanel. It should be located at http://www.(your_domain).(com/net/org/etc)/cpanel
- Enter your account username and password in the box that appears.
- A new page appears. Go to the bottom row of icons in the page and click the icon titled "Enable/Disable PHP 5"
- A new page appears. Click "Add PHP 5 To Your Account!".
Your language change request is submitted. Please allow up to 24 hours for the change to be processed by the hosting server.
Updating PrestaShop
We have a dedicated guide for that: Updating PrestaShop.
Uninstalling PrestaShop
PrestaShop is very easy to uninstall:
- Delete the
/prestaShopfolder (or the name you gave it after the installation, if you renamed it) from the main directory of your Web server (generally/www). - Delete your PrestaShop database, using phpMyAdmin.
| Warning |
|---|
You will lose all information related to your customers, orders, invoices, products, settings, etc. |