...
- States. When shipping product to a country, knowing which state it is sent to can prove important, as this might have an impact on local customs and taxes. The added states can be viewed and edited in the "States" page under the "Localization" menu.
- Taxes. The real importance of localization is local taxes, and they can be numerous and varied depending on the country or the state. PrestaShop provides you with a basic support for the major taxes and tax rules. The added taxes and tax rules can be viewed and edited in the "Tax" and "Tax rules" pages under the "Localization" menu.
- Currencies. Foreign customers will appreciate to be able to convert the prices on your shop into their own currency. You should at least have US dollars and Euros available along of your country's own currency (if not one of those two). Once added, you must activate a new currency using the "Currencies" page under the "Localization" menu, and make sure the conversion rate is correct. The added currencies can be viewed and edited in that "Currencies" page.
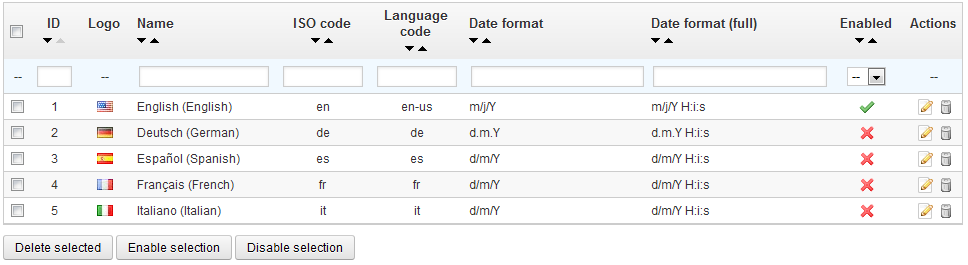
- Languages. All the public fields on your shop can be created in multiple languages, and it is important you do so for your products name and description, at the very least. Note that importing a language also imports its date format (d/m/Y, m/d/Y, d.m.Y, ...), among other things. The added currencies languages can be viewed and edited in that "Languages" page under the "Localization" menu.
- Units. Weight, dimension, volume, distance: as many information that are essential both for describing these units are essential in order to correctly describe a product to your costumerscustomer, and for your own packaging information. These units They can be viewed and edited on this very page, in the "Localization" section.
...
- Default language. This is the main language for your shop. This setting will influence your back-office's language (including the main language for your products), as well as the front-office. Note that depending on the browser's settings, the front-office's languages language might adapt to the setting of the customer's browser.
- Default country. The location of your business. If you have headquarters in many countries, use your main or original country.
- Default currency. The currency in which your product's prices are first set. Currencies are added by importing and activating a country's currency. Note that if you change currency after having already set a few product prices, you will have to manually update all the existing prices. Make sure to set that value once and for all.
- Time Zone. You own time zone. This is useful for daily discount for instance: you know exactly when it starts and ends.
...
The physical units presented in this section (weight, distance, volume, dimension) are used both in your product sheets , and for your own packaging needs – and ultimately, is essential in your relationship with your carrier.
...
- For the language: ISO 639-1 code (http://en.wikipedia.org/wiki/List_of_ISO_639-1_codes).
- For the country: ISO 3166-1 Alpha 2 code (http://en.wikipedia.org/wiki/ISO_3166-1_alpha-2).
...
Adding a new language is simply a question of important importing the localization pack from a country which uses that language (in the "Localization" page). If it turns out this does not work, or that you need something customized, you can add a new language manually, using the form behind the "Add new" button.
...
Creating A New Language
| Warning |
|---|
Creating a new language means you will have to translate all of the text for PrestaShop's front-end, back-end, modules, etc., or risk using the default English strings. Translation is made using the tool in the "Translations" page, under the "Localization" menu. You can also create a new language in order to cater for a language pack that you would have downloaded from the PrestaShop site. |
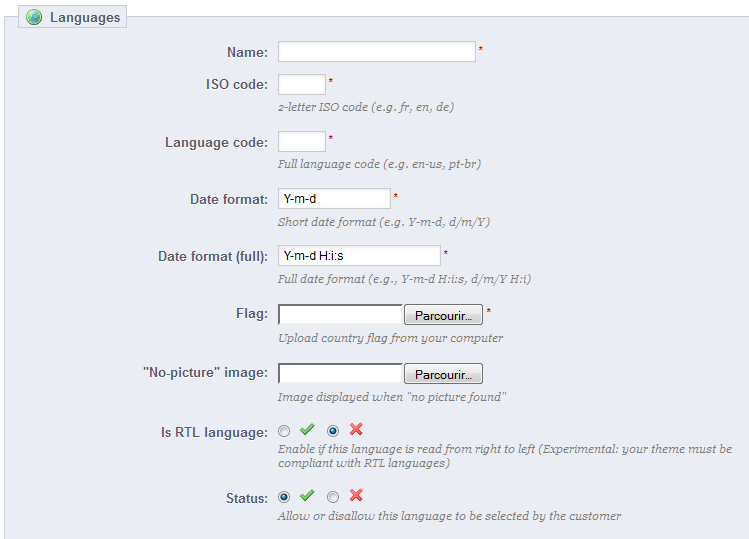
In order to add create a new language, you must fill as many of the form's field as possible:
- Name. The name is public. If you are creating that language for regional purpose, you may indicate that in the name: "French (Quebec)", for instance.
- ISO code. Enter the adequate 2-letter ISO 639-1 code. See http://en.wikipedia.org/wiki/List_of_ISO_639-1_codes for more information.
If you are importing a language pack, this code should exactly match the one for the pack. - Language code. Enter the adequate 4-letter languages code, in the form
xx-yy,xxbeing the language ISO code (same as above), andyythe country ISO code, using ISO 3166-1 alpha-2 (http://en.wikipedia.org/wiki/ISO_3166-1_alpha-2). See http://en.wikipedia.org/wiki/IETF_language_tag for more information. - Date format. Countries do not always share the same date representation (See http://en.wikipedia.org/wiki/Date_format_by_country). Hence, when your shop display 02/08/12, a customer from France will understand "August 2nd, 2012" whereas one from the US will understand "February 8th, 2012" – and a japan customer might even read it as "August 12th, 2002". This is why it is important to indicate the date format tied to your language. The letters used should be that of PHP's
date()function: http://php.net/manual/en/function.date.php. - Date format. Same as the date format above, but including the hour-minute format.
- Flag. Upload an image of the flag of which best matches the language you want to add. It should be 16*11 pixels. You recommend you use the free FamFamFam Flags image set: http://www.famfamfam.com/lab/icons/flags/.
- No-picture" image. Upload an image which will be displayed when a product does not yet have a picture. That image is simply a blank image, with "No image" or "No image available" in this language. The picture should be 250*250 pixels. You can find existing "No-picture" images in the
\/img\/ldirectory of your PrestaShop installation. - Is RTL language. Some languages are written from right to left, most notably those using Arabic script or the Hebrew alphabet (http://en.wikipedia.org/wiki/Right-to-left). When a PrestaShop theme is well coded, it is able to handle RTL languages - provided it is clearly set as such.
- Status. You may disable a new language until you are ready to translate everything.
- Shop association. You can make the language only available to a selection of your shops, for instance shops that target a specific locale.
Once your language is saved and enabled, you can import its language pack. This is done in the "Translations" page, under the "Localization" menu. Use the "Import a language pack manually" tool.
...
All you need is a name and a status, for instance indicating that you do not allow deliveries in Oceania.
When in multistore mode, you can also associate a zone with a selection of stores.
Countries
Your PrestaShop installation must know all existing countries in order for your customers to clearly indicate where in the world they live.
There are roughly 195 countries in the World, but PrestaShop has 244 registered. This is because some countries include overseas regions are part of the country proper.
For instance, the French departments formerly known as DOM (Guadeloupe, Martinique, Mayotte, Reunion, and French Guiana) nowadays have equals status as the French metropolitan region. Likewise, Alaska and Hawaii are US States proper.
Still, sending a package to Guadeloupe does not mean sending it to France, if only for the shipping fees. Therefore, the list of countries in PrestaShop actually separates the country from the mainland.
...
At the bottom of the list, the "Country options" section makes it possible to have countries covered by your carriers on your appear on your to only display on your front-office the countries that your carriers cover. We recommend that you to enable that this setting, as it prevents customers from having to scroll through all the country names to find their own.
...
Normally, PrestaShop comes with all current countries in the database. But in the scenario that case new ones are created, you would need to add a new country.
...
- Country. The official name of the country that you would like to add, in all supported languages. Check the countries country's Wikipedia page if unsure about the name.
- ISO code. The country's ISO-3166 code, which you can find on the official ISO page: http://www.iso.org/iso/country_codes/iso_3166_code_lists/country_names_and_code_elements.htm.
- Call prefix. Its international call code, which you can find on this Wikipedia page: http://en.wikipedia.org/wiki/List_of_country_calling_codes.
- Default currency. You can use your shop's default currency (as set in the "Localization" page, under the "Localization" menu), or one of the other installed currencies. Remember that if needed, you can add a new currency to your shop using the "Currencies" page.
- Zone. The world's subregion to which this country is attached. If necessary, you can add new zones using the "Zones" page, under the "Localization" menu.
- Need zip code. Whether Indicates whether a user living in this country must give a zip code or not when signing up to your shop.
- Zip code format. You may also give more detail on the format of the postal code (or zip code). If you do not put anything, PrestaShop will not verify the validity of the zip code when given a new address for this country.
Use the following codes for the postal code: "L" for a one letter, "N" for a one number and "C" for the country's ISO code (the one which you entered in the ISO field above).
If you do not know the country's postal code format, you can rely on this Wikipedia page http://en.wikipedia.org/wiki/List_of_postal_codes. Make sure you do NOT copy/paste the notation from Wikipedia, but to adapt it! For instance, Wikipedia indicates "AAA 9999*" for Malta, so the notation for PrestaShop becomes "LLL NNNN" (without the final *).
- Zip code format. You may also give more detail on the format of the postal code (or zip code). If you do not put anything, PrestaShop will not verify the validity of the zip code when given a new address for this country.
- Address format. Give details about the address layout, when displaying it to customers. You can click on the various helper links on the side of the text-field in order to add more fields. In live usage, they are automatically replaced by PrestaShop with the data from the customer's account.
Your changes are only saved when you save the whole page. If you have made a mistake, you can make use of one of the four helper buttons at the bottom of the form, depending on your situation. - Status. A disabled country will not be suggested as an option when a visitor wants to register and create a new account.
- Contains states. Whether Indicates whether the country has "states" or not. This adds a new field to the PrestaShop address form. Note that "states" can be regions, provinces, departments... anything that makes sense to that country's postal service.
- Need Tax identification number? and Display tax label (e.g. "Tax incl."). A Tax Identification Number is an identification number used by the country's revenue service in the administration of tax laws. Not every country needs of even has such a number for business. Inquire about this with the country's revenue service.
- Shop association. You can make the country only available to a selection of your shops, for instance shops that target a specific locale.
States
By "States", PrestaShop calls first-level administrative divisions of a country. In the United-States, they are called states; in Italy, it is regioni (singular: regione); in France, it is régions; in the United-Kingdom, it is regions. By default, PrestaShop provides you with a set of states: the 50 US states, the 13 Canadian provinces and territories, 24 Argentinian provincias, and 110 Italian province (singular: provincia).
...
Having states properly defined in your database helps better represent the delivery possibilities of your carriers. They These states can also be essential for tax rates calculation, depending on the country. It is therefore important to enter all of a given country's administrative divisions if they are important to your carriers. You can find a list of such divisions on this Wikipedia page: http://en.wikipedia.org/wiki/Table_of_administrative_divisions_by_country.Note: the
| Note |
|---|
The PrestaShop address form currently only lists states which are available for the customer to choose. Therefore, make sure to use a sensible list when adding content to your states list. That is the reason why, for instance, the list contains Italian province rather than regioni. |
Adding A New State
Let's create a new state. Click the "Add New" button to get to the creation form.
...
- Name. The name of the state, as it should be displayed on invoices and the package. It should therefore be in the language of the state's country.
- ISO code. The state's ISO-3166-2 code:
- Go to this Wikipedia page: http://en.wikipedia.org/wiki/ISO_3166-2,
- Click the state's country two-letter code (in the "Entry" column of the main table),
- On that page, find the state's code (it should be in a list on the page, or in the text for the smallest countries),
- If there is one, remove the country's prefix in order to keep the code under 4 characters. For instance, the full ISO 3166-2 for Devon, in the United Kingdom, is "GB-DEV". Simply use "DEV" as the state's ISO code – it already is attached to the country using PrestaShop's "Country" drop-down
- list (see next step).
- Country. Indicate its country using the drop-down menulist.
- Zone. Indicate its geographical zone using the drop down menulist. Pay attention not to use the wrong zone, as this can mix up PrestaShop's country and zone settings.
- Status. A disabled state will not be suggested as an option when a visitor wants to register and create a new account.
...
PrestaShop can accept a large number of currencies. By default, there are three standard currencies: The Euro, the US Dollar, and the British Poundis only one standard currency: the one for your country. However, you must add and configure new currencies depending on your customers' needs. Indeed, customers will appreciate the ability to display your shop's prices in their country's currency.
...
- Currency. The name of the currency, preferably in English that as many customers as possible can read it.
- ISO code. The currency's three-letter ISO 4217 code. See this Wikipedia page: http://en.wikipedia.org/wiki/ISO_4217.
- Numeric ISO code. Its three-digit code ISO 4217 code. Same Wikipedia page as above.
- Symbol. The currency's symbol, if any. See this Wikipedia page: http://en.wikipedia.org/wiki/Currency_sign.
- Conversion rate. This rate is to be defined according to your shop's default currency. For example, if the default currency is the Euro and this currency is dollars, type "1.2529", since 1€ usually is worth $1.25 29 (at the time of this writing). Use the converter here for help: http://www.xe.com/ucc/.
- Formatting. Set up how you want your price to be displayed. The X corresponds to the currency's symbol. You have four five possibilities. The "Blank" selector also enables you to include a blank between the sign and the price.
- Decimals. You can indicate whether your shop should display decimals. While you may choose to have all your prices be a round number, discounts and other price variations might warrant decimals. You can prevent them with this option.
- Spacing. Once you have chosen the currency's formatting, you can choose whether to have a space character between the symbol and the price itself. Some languages require this. For instance, Spanish people would use "50€" whereas French people would use "50 €". Choose whichever you feel is best.
- Enable. Any currency can be disabled at any time, both from its own edit page, and the currencies table on the "Currencies" page.
- Shop association. You can make the currency only available to a selection of your shops, for instance shops that target a specific locale.
Taxes
| Info |
|---|
Taxes are a complex subject, which should be fully understood as it can have a significant impact on your product prices or your shipping fees. While this user-guide is not meant to teach all the ins-and-outs of taxes, we will try our best give you pointers. Taxes are "compulsory contribution to state revenue, levied by the government on workers' income and business profits or added to the cost of some goods, services, and transactions". In short, every product you sell is subject to sales taxes, which depend on your state's tax laws. In effect, you contribute to your state or government functioning (public goods and services) with a percentage of all your sales, as defined by local tax rates. There are hosts of tax rates in the World, and they vary considerably from one country to another, and even within a single country if it has federal states (USA, Germany, Spain, Russia...). You should therefore make sure to strictly conform to your country's tax laws, and even those of your state or town if they apply to you. Check with your local tax representative as soon as possible in order to get all the official details. |
...
- Enable tax. Whether or not taxes are included in each purchase.
- Display tax in cart. You might prefer the customer not to be aware of the taxes that are applied to the order. In that case, disable this option.
- Base on. The customer can choose to have the product not delivered at the same address as the one the order invoice should be sent to. This can have a great impact on taxes. By default, PrestaShop bases its tax rates on the delivery address, but you can choose to have them based on the billing address.
- Use ecotax. The ecotax refers to "taxes intended to promote ecologically sustainable activities via economic incentives". It is a tax that shop owners pay in order to "feel the social burden of their actions". Learn more about ecotax on this Wikipedia page: http://en.wikipedia.org/wiki/Ecotax.
Once you have enabled the use of ecotax, all your products' back-office page will feature an "Eco-tax (tax incl.)" field in their "Prices" tab. You should fill that field with the exact value of the tax, which depends on your country's tax laws (it is probably based on the product's price).
If you decide to enable the ecotax after having added products, you will have to edit them all in order to set the tax properly for each product.
Note that if you have set ecotaxes for your products already, and that you choose to disable ecotax, then all your products will lose their ecotax settings.
If you decide to enable the ecotax after having added products, you will have to edit them all in order to set the tax properly for each productRe-enabling the ecotaxe will mean having to set all your products' ecotaxes again.
The ecotax will also appear to the customer, on the product's page.
...
Adding a new tax is very easy, because tax rules take out all the burden of having to specify the countries where the tax applies. The tax creation form is therefore very short:
- Name. Be very specific, as this will help you build tax rules faster.
It is a recommended to add reminders within the name, such as the country/group/zone the tax applies to, and its rate. This greatly helps you remember which tax is to be used in a tax rule. - Rate. The exact rate, in the XX.XX format.
- Enable. You can disable and re-enable a tax at any time.

Tax Rules
| Info |
|---|
Tax rules are a way for you to make it so that taxes are only applied to select countries. |
By default in PrestaShop, a tax applies to all countries/states/zones. If In order to apply a specific tax rate for a single country or a set of countries (and not some others), you must create a tax rule. The tax rule is then applied on a per-product basis, during the creation of the product ("Prices" tab).
...
- Create the tax rule:
- Click on the "Add new" button.
- In the form that appears, name the taxrule. Use a telling name: use the tax rule's country code, its name, maybe even its rate, so as to find it again easily. If PrestaShop already has tax rules for the target country, use their name as a templateinspiration so as to have some consistency.
- Select whether the tax rule should be enabled from the get-go or not. You can enable it later if needed.
- Click the "Save and stay" button. The page reloads, with a table header at the bottom.
- Specify the country and behaviors:
- Click on the "Add new tax rule" button.
- A new form appears. Fill in the fields:
- Country. The target country for the tax rule you are creating.
- State. Some countries have federal states registered in PrestaShop (see the "States" page, under the "Localization" menu). In that case, you can make the tax even more specific, or choose to have it applied to the whole country. You can select more than one state by pressing the Ctrl key when clicking on state names.
- Zip Code range. Whether the country has registered states or not, you can further specify the tax application using the customer's zip code. This field enables you to define zip codes in which the tax should be applied: either enter a single zip code, or define a range using the dash. For instance, use "75000-75012" to create a range for all zip codes between these two.
- Behavior. Some customers might have an address that matches more than one of your tax rules. In that case, you can choose how this tax rule should behave:
- This Tax Only. Will apply only this tax, not any of the other matching taxes.
- Combine. Combine taxes. For instance: 100€ + (10% + 5% => 15%) => 115€.
- One After Another. Apply taxes one after another. For instance: 100€ + 10% => 110€ + 5% => 115.5€.
- Tax. The tax to be used for this tax rule. That tax must already be registered in PrestaShop. If not: choose "Not tax", disable the tax rule, save it, go create a tax in the "Taxes" page, then come back to edit the tax rule.
- Description. You may add a short text as a reminder of why this tax rule exists for this country.
- Country. The target country for the tax rule you are creating.
- Click "Save and stay". The country is added to the table below, and you can start adding another country using the new-empty fields.
...
PrestaShop provides you with full translation tool for your shop. This helps you add and edit the current your pages translations. This way, you are the master of your shop, and can handle your translated strings without having to wait for official translators to publish their corrections.
...
- Front Office translations. The text visible to your customers about when browsing your shopstore.
- Back Office translations. The texts accessible text to you and your team from your store's administration panel, visible only to you and your team.
- Error message translations. The error message messages that may appear on the front-office.
- Fields Names translations. The name of the fields in both the front-office and back-office.
- Module translations. The terms used by the installed modules. Note that modules which are available but not installed will not appear in the tool.
- PDF translations. The terms used in the generated PDF files: invoices, delivery slips, etc.
- E-mail template translations. The terms used in the default e-mail templates.
Some categories have a second drop-down menulist, which lists the available themes. PrestaShop themes have their own strings, but can also have their own modules, PDF templates and e-mail templates. These The drop-down menus list therefore enable you to choose which theme you want to work with.
...
| Info |
|---|
PrestaShop 1.5 introduces a new syntax where strings can contain placeholders, such as When you find a string with such placeholder, it means that PrestaShop will replace it with an actual dynamic value before displaying the translated string. Technically, having placeholders prevents strings from being split in parts. Thereby, in previous version of PrestaShop, "Your order on %s is complete." would have been split in two: ""Your order on" and "is complete.". While the literal translation of these worked for some language, it made translation nearly impossible for many other languages, none the less RTL languages such as Arabic or Hebrew. Thanks to the placeholders added in PrestaShop 1.5, such strings are now fully translatable in any language. |
...
Most translation categories present their strings in the same way: the category's strings are split grouped into fieldsets that you can close or expand by clicking on their title. The title indicates the number of expressions it that the fieldset contains, and when needed, the number of missing expressions, in brackets and in red.
...
- Error messages. Strings are not split group into many fieldset, they are all presented together.
- PDF templates. There is only one fieldset, "PDF".
- E-mail templates. Translations Strings are split into fieldsets, but they are not simple text fields anymore. Each e-mail has two templates: and a HTML one, which is styled and colored, and a text one, when is plain and simple. While the plain text one can be edited directly in the textfield, the HTML one can only be edited by clicking on the "Edit this e-mail template" button at the bottom of the preview. That click turns the preview into a WYSIWYG textfield (what you see is what you get), with a complete editor at the top (based on TinyMCE: http://www.tinymce.com/). In addition to editing the text, you can change the design as you see fit, for instance you can change the colors in order to adhere to your shop's design.
Note that the e-mail templates feature placeholders, such as {lastname} or {shop_name}, which PrestaShop replaces with the actual values when sending the e-mail. Make sure to keep them in both your translation.
...
In the case where you do not want to use an official PrestaShop translation pack, but rather a custom one (either provided by someone you know, or one that you exported from another PrestaShop installinstallation), then this tool is for you.
...
Choose the source language and theme, then the destination language and theme, then click the "Copy" button. In most case, the language should remain the same in both drop-down menuslists.
| Warning |
|---|
If there is already a language folder for this language in the destination theme, it will be replaced by the files from the language and theme you are copying. You might prefer to first create a new language for the destination theme before copying the source language to it. |