...
| Info |
|---|
When installed for the first time with sample data, PrestaShop has a default user, named John DOE. You can use this fake user to test some of your shop's features, and generally browse your shop and see it the way a regular user would. To log in to your shop using this public account, use these credentials:
Once your tests are doneBefore you open your shop to the public, make sure to delete this public default user, or at least change its credentials! If not, malicious visitors could use it to make fake purchases and more. |
...
Your customers
The first page under the "Customers" menu gives you a list of all the registered users on your shop.
...
This gives you a bird's eye view of your customers, with some details thrown in which you can use to sort and search accounts:
- GenderTitle. Customers can declare their social title, which are matched with a genre and can help you better customize your customers' experience. There are four three default social titles (Mr., Ms., and Miss and Unknown), but you can create more in the "Titles" page under the "Customers" menu.
- Age. Knowing the age of you customers can also help you better target your demographics, and choose to sell products that appeal more to them.
- Enabled. Indicates whether the account customer is active or not. You can disable an account by clicking on the green checkmark.
- News.. Indicates whether the account customer is subscribed to your shop's newsletter or not. You can unsubscribe it clicking on the green checkmark.
- Opt.. Indicates whether the account has accepted to receive e-mails from your partners or not. You can unsubscribe it clicking on the green checkmark. Do not subscribe a user to these e-mails without their consent, as this is considered spam.
- Registration date and last visit can always be useful when sorting user accounts.
- Actions. You can edit the user's account, simply view it in full (with its messages, orders, addresses, vouchers, etc.), or trash it forever.
...
Fill out the customer's information:
- Gender. In effect, a social titleTitle. Choose between the ones available, or create another one in the "Titles" page under the "Customers" menu.
- First name, Last name, E-mail address. Those are essential: the names are used in the confirmation e-mails that PrestaShop sends, and the e-mail address is used for log-in.
- Password. Choose a password, at least 5 characters long.
- Accounting number. This may be useful for your own accounting.
- Birthday. This information can be used for birthday e-mails and temporary discounts.
- Status. You may wish to create an account, but not have it yet active.
- Newsletter. Can be used by the "Newsletter" module, for sending regular information to those customers who requested it.
- Opt-in. Can be used by modules for sending regular partner promotions to those customers who requested it. Do not subscribe a user to these e-mails without their consent, as this is considered spam.
- Group access. Having customer groups enables you to create group discounts. Many other PrestaShop feature can also be group-restricted. You will learn more about group in the "Groups" section of this chapter of the PrestaShop user guide.
- Default customer group. No matter how many groups that customer belongs to, s/he should always have one main group.
...
- Customer information, first and last name, e-mail address, ID, sign-up date, date of last visit, rank.
- Information regarding the subscription to the store's newsletter and subscription to ads from partnering companies, the age, date of last update, and whether or not the account is active.
- Private notes from the store's employees (i.e. you or your team).
- Messages sent by the customer to the shop's team (through customer service).
- The group groups to which the customer belongs.
- Summary of the customer's past purchases. Amount spent, type of payment, order status. For more information about each order, click on the icon in the "Actions" column.
- Summary of the products that were orders ordered by a customer. Among other things, this enables you to know when a customer is very fond of a product, and maybe create a special discount for the 10th purchase. Clicking on a product directs to the order to which that product is tied.
- Registered addresses.
- Available vouchers / cart rules.
- Carts that the customers has created (but not necessarily validated) since sign-up. When your customer is currently on your shop, you can see what is being added to the cart in real time.
- Previous connection to the shop.
...
The first method is to enter the information you have into the PrestaShop search bar, which is found in the top center of your back-office. By selecting "everywhere", "by name" or "by ip address", you can perform a search based on:
- ID: the . The numbers that is assigned to the customer in the database).
- First or last name. Note that you cannot search for both: choose either "john" or "doe", as "john doe" won't work.
- E-mail address.
- IP address: you . You can search using the IP of the latest connection to your shop.
...
The results, if any, are then presented: the list presents you with the users' ID, social title, e-mail, birthday, registration date, number amount of orders and whether or not the user's account is active. From there on, you can view the whole user's page, or edit its details.
...
The second method consists of going to the customers page, and listing all of your customers.
From thereOn this page, you can complete the fields at the top of the list, in order to filter it according to the following criteria: ID, social title, first name, last name, e-mail address, age, account status (enabled or disabled), subscription to the newsletter, subscription to partnering ads, registration date, and last connection date. Enter your criteria and click the "Filter" button in the top right-hand corner of the table. You can then sort the list for some of the columns.
...
Below the addresses table is the "Set required fields for this section" button. It gives you access to opens a form where you can indicate if a database field is necessary or not by checking the appropriate boxes: this way, you can make it so fields such as "company" or "phone number" are mandatory when a customer is registering a new address on your shop.
...
- Visitor. All persons without a customer account or unauthenticated.
- Guest. Customer who placed an order with the Guest Checkout – that option needs to be enabled.
- Customer. All persons who created an account on your shop, and are authenticated.
| Tip |
|---|
These three groups replace the "Default" group from PrestaShop 1.4, which applied to all users. They cannot be deleted. |
...
- Name. Use a short and descriptive name.
- Discount (%). The discount that you set for members of this group applies to all products on your shop.
You may prefer to not set any discount value, and create cart rules. You can learn more about cart rules in the next chapter of this guide, "Creating Price Rules and Vouchers". - Price display method. PrestaShop is frequently used in the Business to Business (B2B) sector. You can create a group of customers who can buy products without paying the tax. The drop-down menu list gives you a choice between "tax included" and "tax excluded".
- Show prices. By default, all users of your shop can view the prices. You may prefer some to not have access to your product prices. For instance, you could make it so users can only view prices if they have an account: from the groups list, click on the green checkmark in the "Show prices" column for the "Visitors" group to turn it into a red cross.
...
In that second case, the form will reload with to two more options:
- Category discount. Click on the "Add a category discount" to bring up a new window, which contains a list of all your categories. You can pick one, and apply a specific discount which will apply for that group of customers only, and to that category only.
Note that:- This category discount will replace any other discount that members of this group would otherwise enjoy on this category.
- You can add as many category discounts for this customer group as you need – thereby enabling to entirely give this group a whole set of different discounts if you feel the need.
- Modules restrictions. This section enables you to block members of this group to access and use some of your shop's modules. For instance, you might prefer some customers to not be able to see your top-sellers or to your specials. You can move modules from the left panel ("Authorized panel") to the right one ("Unauthorized panel") by either drag-and-dropping them with your mouse cursor, or by select many modules at a time and clicking on the "Unauthorize" button at the bottom.
...
PrestaShop contains some very powerful marketing features that enable you to see the products that customers are adding to their carts in real time. There are two ways to achieve this.
...
:
- Go to the "Clients" page in the "Clients" menu, find the customer you are looking for, and view his or her customer profile. In that profile, scroll down to the "Shopping carts" section, where you can see all the carts created by this customer.
- Go to the "Shipping CartsShopping carts" page , under in the "CustomersClients" menu. You will see all of the shopping carts that have items in them.
You can filter your results by the date that they were added. You can see the profile of the customers who check your site out, and, if you wish, The carts are sorted by ID. Find the customer you are looking for.
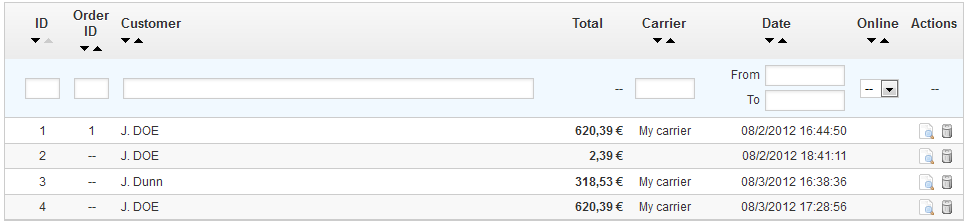
In both cases, you can click the "View" icon to see the content of your client's cart, and use this information to improve your commercial performance.
In both cases, you can consult the details of a customer's shopping cart: click the Click the "View" icon on the right to get the cart's details.
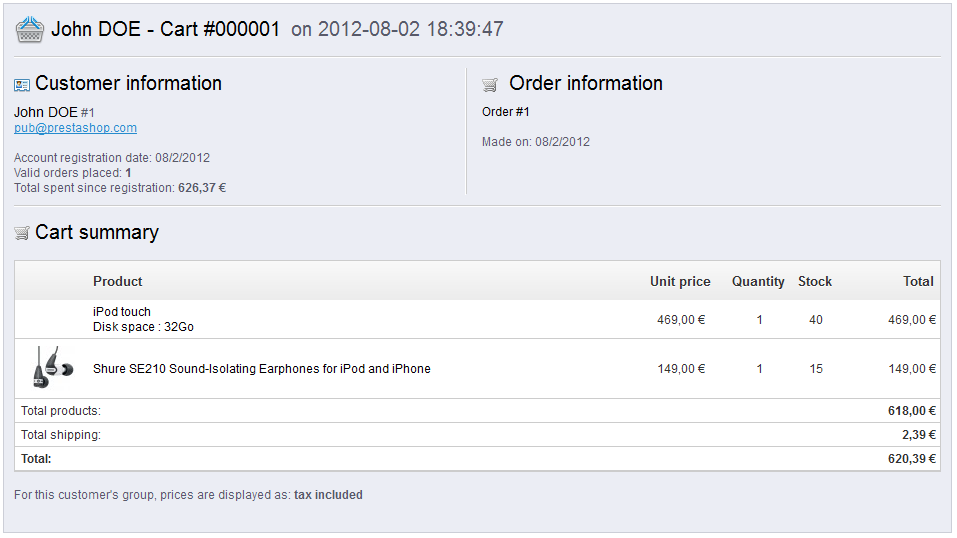
In the cart's page, the most important information is in the "Cart Summary" section, where you can see what products the customer chose to purchase, the price of each item, the quantity they put in their cart, and the total value of their cart.
...
On this page, each contact has its own box, where you can quickly see if a there are new messages (meaning, those that have not yet been read). By default there are two: "Webmaster" and "Customer service". Adding , and adding more contacts will move the "Meaning of status" and "Customer service: statistics" boxes further to the left and down.
These two last boxes are handy when you daily needed need to handle new mailmessages daily:
- Meaning of status. A simple reminder of the color codes that your team can apply to a discussion thread.
- Customer service: statistics. An overview of the global activity of your customer service since the beginning.
...
- Allow file upload. Whether the customer can attach a file to the message. This can be useful in case of bugs visual issues on the front-page, as the customer can send you screen captures.
- Pre-defined message. The default template for your employees' answer. Keep it simple, so that it can adapt to many situations, even if it needs a little editing for each case.
...
Handling Customer Service Messages
Each discussion thread conversation with a customer can be entirely handled through PrestaShop's complete interface, with without having to use an e-mail client such as Outlook or Thunderbird.
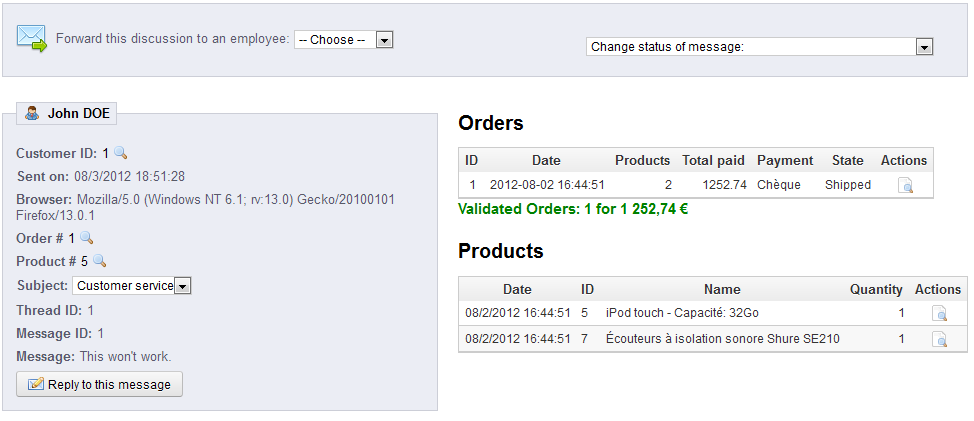
Click In the conversation list, click on a row to view to view the discussionconversation's details:
- Forward this discussion to an employee. From the moment an employee has started replying to a customer message, he becomes in charge of the customer's request. If during the discussion it turns out another employee should handle it instead, you can use that drop-down menu to attribute it. That other employee will receive a notification about it.
- Change status of message. A You can apply a handful of color-coded status to a discussion, in order to quickly sort them and thus handle them quicker. There are 4 available statuses:
- Open. The issue is still going, or has not yet been answered.
- Closed. The issue is been resolved.
- Pending 1 and Pending 2. The These two statuses are internal: their meaning is up to your team. You may even choose to not them, and only rely to "Open" and "Closed".
- Essential details are available:
- Customer name (used as section title) and ID.
- Sent on. Date of the latest message in the discussion.
- Browser used. This can be very useful when having to debug an error on your front-office.
- Subject. The default subject for a new discussion thread is the one chosen by the customer when choosing a contact. If it turns out it was not the right choice, you can change it using this drop-down menu. For instance, the customer chose to write about "customer Customer service", whereas the discussion is mostly about "webmasterWebmaster" issues.
- Thread ID and Message ID. These help you count the number of exchanges needed exchanges to reach a conclusion for the customer's issue.
- Message. Finally, the message itself.
Clicking "Reply to this message" will display a form with your default message. The default message is set in the "Contacts" page as set in the "Contacts" page).
Customer Service Options
This section basically enables you to precisely configure PrestaShop's access to your e-mail server through its IMAP interface. You should make sure all fields are filled in order for the customer service tool to work properly. Most of this information should be provided by you your webhost.
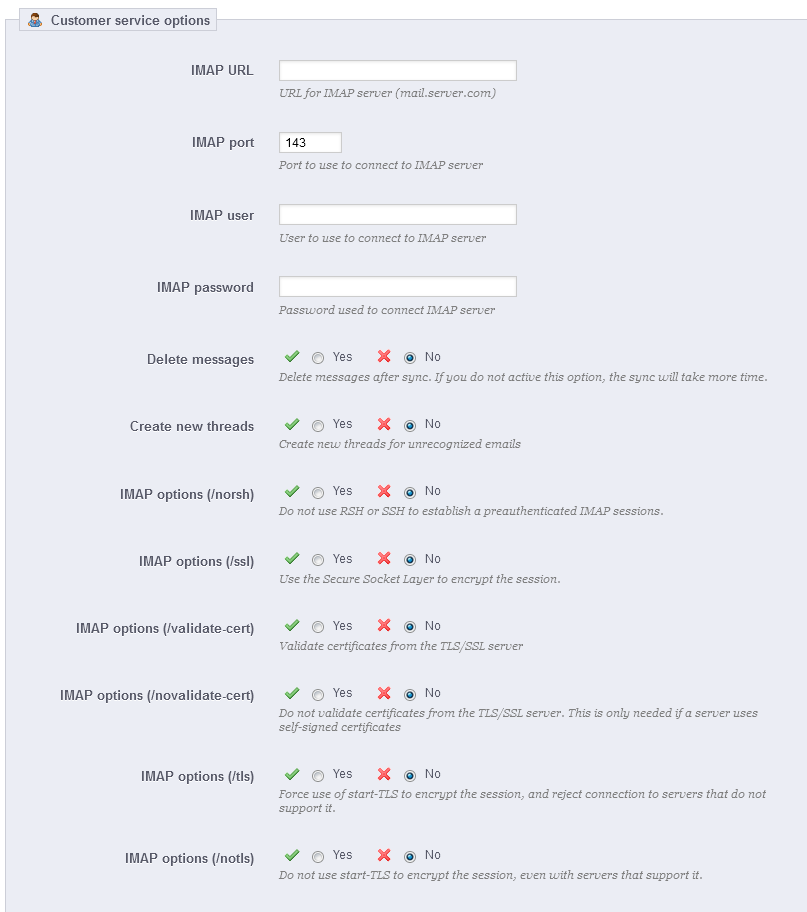
- IMAP URL, IMAP port, IMAP user and IMAP password. Essential details to access the e-mail server using the IMAP protocol.
- Delete message. If enabled, messages on the server will be deleted as soon as PrestaShop has retrieved them. Use with caution: this would make them your messages unavailable to other e-mail clients.
- /norsh. If enabled, the connection to your e-mail server will not pre-authenticated. Not recommended.
- /ssl. If enabled, the connection to your e-mail server will not be encrypted. Not recommended.
- /validate-cert. If enabled, PrestaShop will force the validation of the server's TLS/SSL certificate.
- /novalidate-cert. If enabled, PrestaShop will never try to validate the server's TLS/SSL certificate. Essential for servers with self-signed certificates.
- /tls. If enabled, PrestaShop will force use of start-TLS StartTLS to encrypt the connection. Servers that do not support start-TLS StartTLS will be rejected.
- /notls. If enabled, PrestaShop will not use start-TLS StartTLS to encrypt the session, even with servers that support it
...
Previous versions of PrestaShop had hard-coded customer genders: a customer could only choose between "Mr.", "Ms." and "Miss".

This The social title tool helps you better define your customers: in the customers list, you can choose to only display one customers having a given social title. Modules may also rely on social titles for certain features.
...
- Name. You can choose anything, from the very common ("Sir", "Lady", "Gentleman", etc.) to the very unusual ("Jedi", "Magnificent One", "Money carrier"...). The important thing when departing from the commonly accepted titles is to reflect your shop's true identity.
- Type. Some names may apply to both male and female customers. Be sure to set that option to "Neutral" then.
- Image. A 16*16 image file representing the title. Classic gender symbol are the Mars and Venus one (♂ and ♀), but there are many other possibilities. PrestaShop enables you to characterize your creation with a unique image.
- Image width and Image height. PrestaShop works best with 16*16 image, and will resize your image if it bigger than that. You Nevertheless, you might feel necessary to use bigger images, and these two options enable you to set the exact size required by your image. If you enter "0", PrestaShop will simply use the image's original size.