...
The more general settings of you shop's shipping configuration are found in the "Shipping" page, under the "Shipping" menu.
The three sections of this page provide global settings:
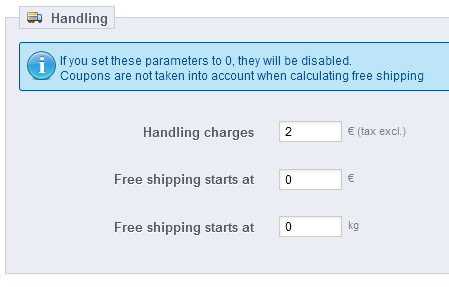
- Handling.
- Handling charges. Enter the per-order handling expenses, which will be added to the final purchase price. This is separate from your shipping costs: it is really the cost of you or your employee having to fetch the products, package them and have them shipped. If there is no such cost, leave it at 0.
- Free shipping starts at. Enter the price or weight after which your customers will receive free shipping. For instance, you might choose to offer free shipping when the order exceeds $250. If you do not want to offer free shipping, leave these values at 0.
A message will appear to your customers indicating how much more money they need to spend in order to receive free shipping. If you do not want this message to appear, type 0 into the fields.
- Billing. Choose whether you are calculating the shipping costs by total price or total weight. This is the default settings, which can be superseded by each carrier setting.
- Fees. View and edit the shipping fee for each of the carriers added to your store. See below.
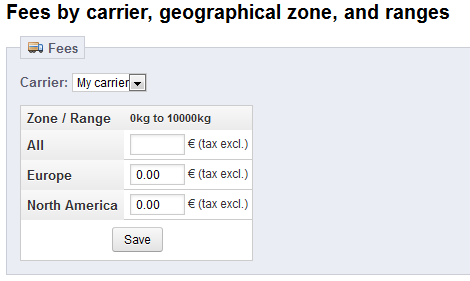
That last section is extremely important, as this is where all your shipping settings come to meet, and where you enter the actual shipping fees. After you have created carriers, price ranges and weight ranges, this seemingly harmless section will be the tool to use to make them all work in conjunction with an actual price.
...
You must have carriers added to your PrestaShop installation – that is, a clear indicator of who will deliver your products. It might be just yourself or your shop (for instance if you are selling downloadable products, or only work locally), but as soon as you are actually sending packages using stamps and a 3rd-party delivery such as your local postal service, or FedEx, UPS and such, then you must have their details added to your shop's database. This will enable you and your customers to better choose which carrier to use, based on their delivery ranges, fees and dates.

The "Carrier" page presents you with a list of all your current carriers. From there, you can directly change their status, indicate whether they are included in your "free shipping" discounts, and change their position when presented to customers.
...
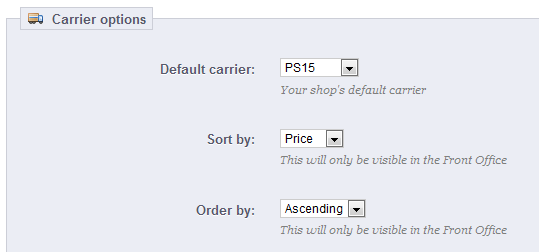
- Default carrier. If you have more than one carrier in your system, you might want to promote one to your customers.
- Sort by. When customers are presented with a choice of carriers, you can choose to either sort the list by shipping fee or by their position, as set with the list above.
- Order by. This enables to set the order in which the carrier are sorted:
- If sorted by shipping fee and with an ascending order, then carriers will be displayed from the cheapest to the most expensive.
- If sorted by position and with a descending order, then carriers will be displayed from the top position of the list, to the bottom position.
Creating a New Carrier
In this section, we are going to create a complete carrier, from A to Z. You can create as many carriers as you wish.
If one carrier has different shipping services, you should create as many carriers in PrestaShop, and differentiate them with their names.
Note: Many of the details asked by PrestaShop's forms should be provided by your carriers once you have set up an account or are under contract with them directly. Check with them in order to make sure everything is configured correctly.

Let's examine all of the information you need to enter:
- Company. The name is public, so use the official name. You could also add a description of the service. For instance, you could fill in "PrestaPost – 500 lbs and over". If you have create one PrestaShop carrier per shipping services from a single carrier, the name will help you differentiate them.
- Logo. Having a logo helps customers more easily choose between different carriers. PrestaShop will resize your image in order to fit in the order form.
- Transit time. This is displayed to customers during checkout. It will help them select their carrier according to the amount of time they are willing to wait to receive their shipment. Customers can often accept to pay more for a faster carrier.
- Speed grade. The "Transit time" field can contain any text, and thus cannot be used to compare the carriers' transit times. The "Speed grade" setting enables you to give the carrier a grade, from 0 (very slow) to 9 (very fast). This is then used to sort carriers by their speed grade, and help customers choose the one they prefer.
- URL. This field must be filled with the tracking URL provided by your carrier. For example, France's postal service (La Poste) offers this URL: http://www.colissimo.fr/portail_colissimo/suivreResultat.do?parcelnumber=@. When customers select their carrier, they will be sent the URL that you enter into this field, with the "@" replaced by the tracking number provided by the carrier.
- Zone. Note all carriers can deliver worldwide. Indicate the geographical zones in which this carrier is available (the zones where the carrier can make deliveries).
- Group Access. You might want only some user groups to be able to use a carrier. This option serves this purpose.
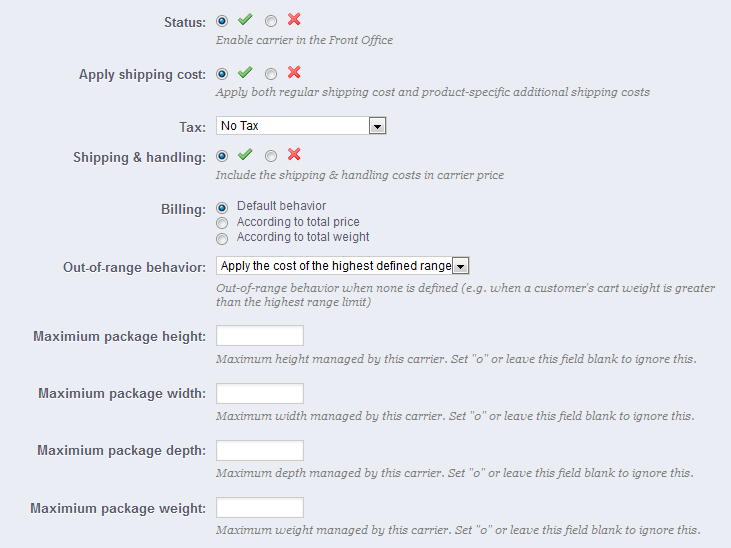
- Status. Include or exclude this carrier in your shop's list of carriers.
- Apply shipping cost. If enabled, the final order price will include both the carrier's regular shipping fee, along with specific per-product fees, if there are any. If disabled, the final order price will only include the regular shipping fee.
- Tax. Indicate if this carrier requires a local tax in order to deliver to a certain zone.
- Shipping & Handling. Include or exclude shipping & handling costs in this carrier's price.
- Billing. When billing a customer for the shipping service, PrestaShop can apply one of two behaviors. The default behavior is set in the "Shipping" page, under the "Shipping" menu, but you can change that setting on a per-carrier basis thanks to this option.
- According to total price. The shipping bill depends on the total order price.
- According to total weight. The shipping bill depends on the total order weight.
- Out-of-range behavior. In case the chosen carrier has not shipping cost set for the required distance or weight, you can indicate how PrestaShop should react. You have two options:
- Apply the cost of the highest defined range. PrestaShop will take the most costly range and apply its conditions.
- Disable carrier. PrestaShop will not suggest this carrier, since it probably cannot deliver this order.
- Package settings. New to PrestaShop 1.5, you can now indicate the minimum and maximum package height and weight, which are an essential part of choosing a package carrier.
...
Carriers can be set to accept orders within a given price range. For example, if you want orders between $1 and $15 to be sent by the US Post Office, create a price range from 1 to 15, and set it to "US Postal Service". Ranges should fill the entire prices spectrum, up to your most expensive possible order.

Creating A Price Range
The form that opens when click on the "Add new" button is very simple:
- Carrier. Choose which carrier you are creating a range for.
- From. The lowest value of the range.
- To. The highest value of the range.
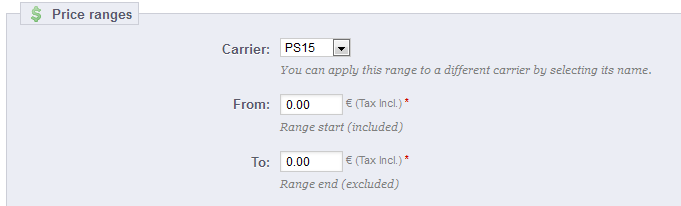
Remember that you can create as many ranges per carrier as needed, so if a carrier can handle more than one, but each in a different way, you should create the complete set of ranges.
...
A carrier should have at least one range. In that case, as you cannot set an infinite maximum weight, set it to an abnormal number, such as 10,000.00 kg.

Creating A Weight Range
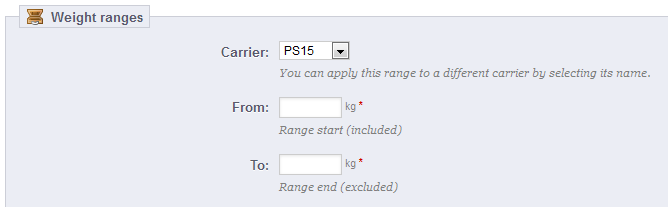
The form that opens when click on the "Add new" button is very simple:
...