CSV
...
-bestanden importeren
De pagina "CSV-import" maakt het gemakkelijk voor u om uw productcatalogus te vullen als u veel producten hebt of als u gegevens wilt importeren die u hebt geëxporteerd vanuit een ander e-commercepakket.
| Info |
|---|
CSV is an acronym of een afkorting van "Comma-separated values". It Het is a popular een populair plain-text format when there is a need to import, export or simply store data in a non-proprietary format. Almost all data handling tool support CSV format, in various incarnations. You can read more about the CSV format on -formaat wanneer er iets geïmporteerd, geëxporteerd of bewaard moet worden in een open formaat. Bijna alle tools die data verwerken ondersteunen het CSV-formaat, in verschillende gradaties. U kunt meer te weten komen over het CSV-formaat op Wikipedia: http://en.wikipedia.org/wiki/Comma-separated_values. |
The import process requires preparation, and starts with a form made of primary settings:
- What kind of entity would you like to import?. Entities are the types of data that you can import. The "Available fields" on the right updates when you choose an entity, so that you know the kind of data that your CSV file should contain.
PrestaShop enables you to import the following types of data:- Categories,
- Products,
- Combinations,
- Customers,
- Addresses,
- Manufacturers,
- Suppliers,
- Aliases,
- Supply orders (if Advanced Stock Management is enabled),
- Supply order details (if Advanced Stock Management is enabled).
Select a CSV file to import. You can import more than one file at a time, but make sure that they all contain the same type of data.
Tip You can download sample files for each type of data from the "Download sample CSV files" section on the right. This helps you compare these sample files with your own files, so that you can make sure that the files you are about to import are indeed ready to be imported to PrestaShop. These files are actually stored in the
/docs/csv_importfolder of your installation of PrestaShop.Language of the file. Data can only be imported for a single language at a time. If your data exists in more than one language, you should split it into as many files.
- ISO-8859-1 encoded file?. By default, the import files should use UTF-8 encoding. But if your files use ISO-8859-1 and you would rather not convert them, you can check this box.
- Field separator. Not all CSV file use commas to separate their values: some use tabulations, others semicolons, etc. You can indicate what your files use in this field.
- Multiple value separator. When an attribute can support more than one value, these values need to be separated with a specific separator. After reviewing your files, indicate your separator here.
- Delete all ___ before import. This option will erase all previously existing entries of the type of data you are importing. Thus you will start with a clean slate.
- Use product reference as key. Product import only. You can choose to have the product key be determined by PrestaShop, or instead use the product's reference as the ID. In this case, make sure the file does contain references for all your importer products.
- Skip thumbnails regeneration. Category and product import only. You can choose to have PrestaShop regenerate the thumbnails that are linked from your CSV file (in the "Image URL" or "Image URLs" fields).
- Force all ID numbers. You can either keep the imported IDs, or let the importer auto-increment them.
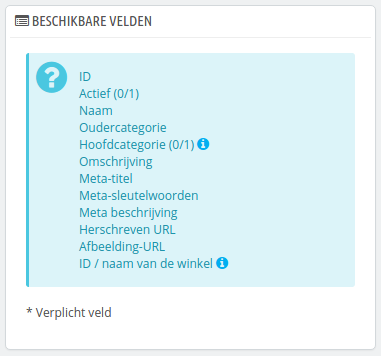
When changing the Entity setting, the section on the right, titled "Available fields", changes to present the expected data fields. Although the importing tool helps you by taking care of matching your file's fields with PrestaShop's, you should strive to make your data more import-friendly by following the naming scheme and order of the presented fields. If not, the import will be more tedious, but not impossible.
Some fields have a little information popup available (represented by a "i" logo), which you can display by hovering the mouse cursor over it. They mostly pertain to PrestaShop's multistore or advanced stock management features. Make sure to read them all in order to better build/edit your data files.
Data format
Imported data file must be in text-file, using a CSV-based format and the accompanying .csv file extension. We recommend using a semicolon ";" as a field separator. If you textual data (product description and such) contains semicolons, you should either remove them, or choose another separator in the "Field separator" option.
You can create a CSV file using any text editor (we recommend 
Het importeerproces vereist enige voorbereiding en bestaat uit een formulier met de primaire instellingen:
- Welk bestand wilt u graag importeren?. Entiteiten zijn de type data die u kunt importeren. Het blok "Beschikbare velden" aan de rechterkant, verandert zodra u een entiteit kiest, zodat u weet welke gegevens uw CSV-bestand zou moeten bevatten.
PrestaShop maakt het mogelijk om de volgende type gegevens te importeren:- Categorieën,
- Producten,
- Combinaties,
- Klanten,
- Adressen,
- Fabrikanten,
- Leveranciers,
- Aliassen,
- Leveranciersbestellingen (als Geavanceerd Voorraadbeheer is ingeschakeld),
- Details van leveranciersbestellingen (als Geavanceerd Voorraadbeheer is ingeschakeld).
Selecteer een CSV bestand om te importeren. U kunt meer dan één bestand tegelijkertijd importeren, maar zorg ervoor dat ze dezelfde type gegevens bevatten.
Tip U kunt voorbeeldbestanden downloaden van elke type data in de sectie "Download voorbeeld CSV-bestanden" aan de rechterkant. Dit helpt u met het vergelijken van uw eigen bestanden met de voorbeelden, zodat u zeker weet dat de bestanden die u gebruikt gereed zijn om te importeren in PrestaShop. Deze bestanden worden bewaard in de map
/docs/csv_importvan uw PrestaShop-installatie.Taal van het bestand. Gegevens kunnen alleen geïmporteerd worden per taal. Als u gegevens hebt in meerdere talen, dan moet u deze opsplitsen in bestanden met elk hun eigen taal.
- ISO-8859-1 gecodeerd bestand?. Standaard hebben de geïmporteerde bestanden de UTF-8 codering. Maar als uw bestanden ISO-8859-1 gebruiken en u ze liever niet converteert, dan kunt u deze checkbox gebruiken.
- Veldscheidingsteken. Niet alle CSV-bestanden gebruiken een komma om de gegevens te scheiden: sommige gebruiken tabs, andere punt-komma's, etc. U kunt aangeven wat gebruikt wordt.
- Scheidingsteken voor meerdere waarden. Als een attribuut meer dan één waarde ondersteunt, dan moeten deze waarden worden gescheiden met een teken. Nadat u uw bestanden hebt bekeken, kunt u hier aangeven welk teken dat is.
- Verwijder alle ___ voor import. Deze optie verwijdert de vorige items van hetzelfde type gegevens dat u importeert. Hierdoor begint het importeren met een opgeschoonde staat.
- Gebruik productreferentie als sleutel. Alleen zichtbaar als u producten importeert. U kunt ervoor kiezen om de ID te laten genereren door PrestaShop of in plaats daarvan de productreferentie te gebruiken als ID. In het laatste geval, zorg ervoor dat het bestand ook daadwerkelijk referenties bevat.
- Sla miniaturen regeneratie over. Alleen zichtbaar als u categorieën en producten importeert. U kunt ervoor kiezen om de miniaturen opnieuw te laten genereren door PrestaShop aan de hand van de links in uw CSV-bestand (het veld "Afbeelding URL's").
- Forceer alle ID nummer. U kunt de geïmporteerde IDs behouden of de importeertool automatisch ID-nummers laten aanmaken.
Zodra u de het type wijzigt, wordt de sectie aan de rechterkant, getiteld "Beschikbare velden" bijgewerkt om de juiste datavelden te tonen. Alhoewel de importeertool helpt bij het koppelen van de velden aan die van PrestaShop, moet u ernaar streven om uw data importeervriendelijker te maken door hetzelfde naamschema aan te houden van de velden die worden getoond. Als dit niet gebeurt, wordt het importeren moeilijker, maar niet onmogelijk.
Sommige velden hebben een een kleine popup (te herkennen aan het "i"-icoon), welke meer informatie toont als u er met uw muis over beweegt. Ze zijn meestal bedoeld voor PrestaShop's multistore-mogelijkheid of voor Geavanceerd Voorraadbeheer. Zorg ervoor dat u de uitleg goed leest om uw data in een beter formaat te kunnen krijgen.
Dataformaat
Geïmporteerde data moet in een tekstbestand worden aangeleverd, door gebruik te maken van een op CSV gebaseerd bestand, dat de bijbehorende extensie .csv heeft. We raden aan om een puntkomma te gebruiken als scheidingsteken ";". Als uw tekstuele data (productbeschrijving en dergelijke) ook puntkomma's bevat, dan moet u deze verwijderen of een ander scheidingsteken kiezen.
U kunt een CSV-bestand aanmaken met een tekstbewerker (wij adviseren Notepad++: http://notepad-plus-plus.org/), but we do advise you to use a spreadsheet program, then save your work in the CSV format. Using a spreadsheet program enables you to have an easier and more visual grasp of your data, in comparison to the plain text file. You can use the commercial Microsoft Excel maar u kunt beter een spreadsheet-programma gebruiken en uw werk opslaan in het CSV-formaat. Door gebruik te maken van een spreadsheet-programma kunt u gemakkelijker de gegevens aanpassen, dan een gewone tekstverwerker. U kunt gebruikmaken van de commerciële software Microsoft Excel (http://office.microsoft.com/en-us/excel/ or the free OpenOffice.org ) of het gratis LibreOffice (http://www.openoffice.org/) Calc.
Here is a sample import file, with a list of productsHier is een voorbeeld van een import-bestand, met een aantal producten:
| Code Block | ||||
|---|---|---|---|---|
| ||||
"Enabled";"Name";"Categories";"Price";"Tax rule ID";"Buying price";"On sale";"Reference";"Weight";"Quantity";"Short desc.";"Long desc";"Images URL" 1;"Test";"1,2,3";130;1;75;0;"PROD-TEST";"0.500";10;"'Tis a short desc.";"This is a long description.";"http://www.myprestashop/images/product1.gif" 0;"Test 02";"1,5";110;1;65;0;"PROD-TEST2";"0.500";10;"'Tis also a short desc.";"This is a long description too.";"http://www.myprestashop/images/product2.gif" 1;"Test 03";"4,5";150;1;85;0;"PROD-TEST3";"0.500";10;"'Tis a short desc. again";"This is also a long description.";"http://www.myprestashop/images/product3.gif" |
Note that this is only a regular sample files built for this demonstration; it is purposefully not optimized for PrestaShop importation. If you need a sample file you can learn from, use the ones you can download from the "Upload" button's form.
The first row should be a descriptive name for the data column (you will be able to skip it during the import process). There must be the same number of columns on each row.
You should remember that:
...
Dit is slechts een voorbeeldbestand, gemaakt voor het voorbeeld hier; het is met opzet niet geoptimaliseerd om te importeren in PrestaShop. Als u een voorbeeldbestand nodig hebt om mee te vergelijken gebruik dan de versies die gedownload kunnen worden op de pagina "CSV-import".
De eerste rij moet de naam bevatten voor de kolom (u kunt deze overslaan tijdens het importeren). Er moet een gelijk aantal kolommen zijn op elke rij.
U moet onthouden dat:
- De prijskolom gebruik maakt van de standaardvaluta in uw winkel.
- Categorieën zijn gekoppeld aan hun huidige IDs (dus die moet u eerst importeren), en (standaard) gescheiden met een komma.
- De URL van de afbeelding moet een absolute link zijn. In andere woorden: het moet de link zijn die gebruikt wordt door een webbrowser om bij de afbeelding te komen. Bijvoorbeeld: http://www.myprestashop/images/productXXX.gif.
- The file's character encoding should be De karaktercodering van het bestand zou UTF-8 . If not, use moeten zijn. Als dat niet het geval is, gebruikt u ISO-8859-1 and check the en vinkt u de optie "ISO-8859-1 encoded filegecodeerd bestand?" optionaan.
- Dates use the Datums gebruiken het ISO 8601 format, without a time zone designator (the time zone is the one for your storeformaat, zonder dat daar een tijdzone aan verbonden is (de tijdzone is gelijk aan die van uw winkel):
2013-06-21 15:07:27.
Uploading the file
Once you have all your data in CSV format, you can upload them to your store's database using the form in this page.
You have two ways to register files to import:
- Using your browser: click the "Add file" button, find your file then validate. Do this as many times as necessary to list all your import files.
- Using your FTP client: upload the files in the
/admin-dev/importfolder of your PrestaShop installation. Reload the import page: the "Choose from history/FTP" button should now indicate a number. Click the button to display the list of available files (including the ones you previously uploaded using the browser), then click the "Use" button for the file you wish to import.
Once your files are all listed in the "Select your CSV file" section, you can proceed with the rest of the form:
- Select the type of data contained in your file, using the drop-down list named "What kind of Entity would you like to import?". Once you have selected the type of data, the list of the available fields appears on the right, which helps you refine your CSV file – at least for the order of the columns, which will soon prove handy.
- Select the language of the imported content. If the target language is not available, you must install it first, in the "Languages" page under the "Localization" menu.
- Select the file encoding. Simply indicate if the file uses ISO-8859-1 or not. If not, then it is assumed the files use UTF-8.
- Select the field separators. We suggest that you leave the default values ("field separator" with a semicolon "
;", "multiple value separators" with a comma ","). But obviously, if your CSV file is built differently, you should change these values accordingly. - If you want to remove all the products in your catalog before importing, select the appropriate option.
- Once all your choices have been made, click "Next step".
| Note |
|---|
All import files are uploaded directly in the admin folder's |
When clicking the "Next step" button, the page reloads with the data mapping tool. This interface helps you map you file's data columns with the ones required by PrestaShop.
Presented in this table are the rows from your CSV file, placed under arbitrary columns matched to PrestaShop's database needs. It is up to you to make sure that all the columns from your CSV file are matched with the correct column header, using each header's drop-down selector, so as to import your content correctly.
For instance, with our sample file:
- First column. We marked it as "Enabled", PrestaShop presents "ID" as a header. Click on the header's drop-down menu, and select "Active (0/1)".
- Second column. Marked "Name", header indicates "Active (0/1)". Let's change the header for "Name *".
- Third column. You get the idea...
The screen cannot contain more than 6 columns, so click the ">" and "<" buttons to see the other columns, and make sure to match them all correctly.
In our example, we used the first row as for column names. Since we do not want these imported, enter "1" in the "Lines to skip" text-field.
Once you are done matching your columns, click the "Import .CSV data" button (bottom right-hand corner of the screen), and PrestaShop will start the importing process. When the process is done, you are sent to the main screen, which should either confirm that everything has indeed been imported, or give you a notice of all the encountered problems. In this second case, you should review your CVS file and make sure to correct everything.
Mapping configurations
The mapping process can be a tedious task if you cannot customize your CSV files columns order according to that used by the PrestaShop importer, and even more so if you have to do that repeatedly or frequently. That is why PrestaShop includes a small tool to save the current mapping order that you have set up using all the headers drop-down selectors.
The tool is a simple field at the top of the matching tool. You can do the three basic actions (only one if there is no mapping configuration saved yet):
...
Het bestand uploaden
Zodra u alle gegevens in het CSV-formaat hebt, kunt u beginnen met deze te uploaden naar de database van uw winkel met behulp van dit formulier.
Er zijn twee manieren om bestanden te uploaden voor import:
- Door gebruik te maken van uw browser: klik op de knop "Upload een bestand" en bevestig. Herhaal dit zo vaak als nodig is om alle bestanden te uploaden.
- Door gebruik te maken van uw FTP-client: upload de bestanden naar de map
/admin/importvan uw PrestaShop-installatie. Herlaad de importpagina: de knop "Kies uit historiek/FTP" moet nu een getal aangeven. Klik op de knop om de beschikbare bestanden te tonen (inclusief de bestanden die u voorheen hebt geüpload met de browser), klik daarna op de knop "Gebruik" om het bestand te selecteren.
Zodra uw bestanden allemaal getoond worden in de sectie "Selecteer een CSV bestand om te importeren" dan kunt u verder gaan met de rest van het formulier:
- Selecteer het type gegevens in uw bestand, door gebruik te maken van de dropdown-lijst met het label "Welke bestand wilt u graag importeren?". Zodra u het type gegevens hebt geselecteerd verschijnt de lijst met beschikbare velden aan de rechterkant, welke u helpen bij het opstellen van CSV-bestand.
- Selecteer de taal van het bestand. Als de doeltaal nog niet beschikbaar is, moet u deze eerst installeren. Ga naar de pagina "Talen" onder het menu "Lokalisatie".
- Selecteer de karaktercodering. Geef aan dat of het bestand gebruikmaakt van ISO-8859-1 of niet. Als dat niet het geval is dan gaat PrestaShop er vanuit dat het UTF-8 is.
- Kies het veldscheidingsteken. We raden aan dat u de standaardwaarden gebruikt ("Veldscheidingsteken" met een puntkomma "
;", "Scheidingsteken voor meerdere waarden" met een komma ","). Maar als uw CSV-bestand dit formaat niet aanhoudt, dan raden we aan dat u andere instellingen gebruikt. - Als u eerst alle producten wilt verwijderen uit uw catalogus, voordat u importeert, kiest u de bijbehorende optie.
- Zodra alle opties zijn ingesteld, klit u op "Volgende stap".
| Note |
|---|
Alle geïmporteerde bestanden worden gelijk geüpload naar de map |
Zodra u op de knop "Volgende stap" klikt, wordt de pagina opnieuw geladen met het gereedschap waarmee u kunt importeren. De interface helpt u bij het selecteren van de kolommen die nodig zijn voor PrestaShop.
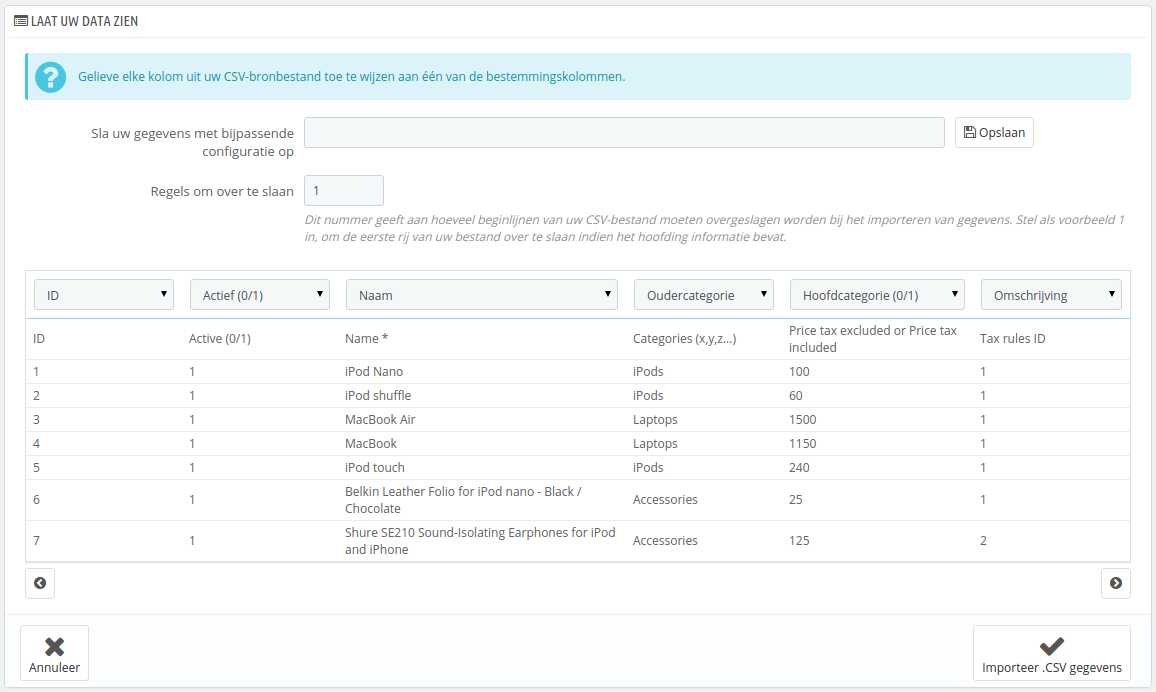
In deze tabel worden de rijen van uw CSV-bestand getoond, geplaatst onder de bijbehorende kolommen. Het is aan u om ervoor te zorgen dat de kolommen van uw CSV-bestand gelijk zijn aan de juiste kolom, door gebruik te maken van de dropdown-selector boven elke kolom
Bijvoorbeeld, voor het voorbeeldbestand is het volgende nodig:
- Eerste kolom. Deze data zo laten, omdat het veld "ID" overeenkomt met de gegevens.
- Tweede kolom. De tweede kolom staat ook goed, want er komen slechts "1"-en voor. Volgens de beschrijving van de kolom zouden de producten actief zijn.
- Derde kolom. U krijgt waarschijnlijk al een idee van de werking...
Dit scherm kan niet meer dan 6 kolommen tegelijkertijd tonen, dus maak vooral gebruik van de knoppen ">" en "<" om te navigeren en alle kolommen goed in te stellen.
In ons voorbeeld hebben we de eerste rij gebruikt voor de kolomnamen. Omdat we de eerste rij niet willen importeren kiezen we "1" bij de optie "Regels om over te slaan".
Zodra u helemaal klaar bent met de kolommen instellen klikt u op de knop "Importeer .CSV gegevens" (rechtsonder), en PrestaShop zal beginnen met het importeerproces. Zodra dit proces is voltooid, wordt u weer teruggebracht naar het hoofdscherm, deze zou moeten bevestigen dat alles is geïmporteerd of geeft u een waarschuwing als er problemen optreden. In het tweede geval moet u uw CSV-bestand nogmaals controleren. Krijg u alleen een wit scherm? Dan probeert u hoogstwaarschijnlijk teveel items tegelijkertijd te importeren. Probeer het nogmaals met een kleiner CSV-bestand. Als het nu nog niet lukt, moet u mogelijk contact opnemen met uw hostingprovider of een steviger hostingpakket aanschaffen.
Configuraties beheren
Het telkens koppelen van kolommen kan een tijdrovende taak worden. Om deze reden kunnen configuraties bewaard worden en later weer hersteld door middel van de dropdown-selector.

Dit gereedschap is een simpel veld aan de bovenkant van de importeertool. U kunt drie basisacties uitvoeren (slechts één als er nog geen configuratie is bewaard):
- Opslaan. Geef een goede naam op en klik op "Opslaan". De interface wordt bijgewerkt met de nieuwe informatie.
- Laden. Kies een configuratie uit de lijst en klik op "Laden".
- Verwijder. Kies een configuratie om te verwijderen uit de lijst en klik op "Verwijder".