...
- If you find an issue but do not know how to write code for it, please report it on the PrestaShop Forge, our bug-tracking system: read the "How to use the Forge to contribute to PrestaShop" chapter to learn more.
- If you are a software developer, you can help the development of PrestaShop by fixing problems that have been reported by you or another person in the Forge.
- If you want to help fix a bug by writing a patch, there are a few steps to follow. In short, your submission should be made as a pull request on GitHub. See below.
- If you have never used Git or GithubGitHub, either read the instructions at the bottom of the about these two by clicking on the links in the "Understanding Git" section of this page, or learn how to edit a single file within GitHub by reading the "Making changes directly in GitHub" section of this page.
| Info |
|---|
As a contributor, you retain the copyright to your code. However, by submitting it to PrestaShop's repository, you are releasing it under either of these licenses:
|
Most of the instructions on this page will require you to create your own Github GitHub account.
Working using Git
...
In order to make changes to PrestaShop's code, you first need to create a local fork of PrestaShop, or at least have your own Github GitHub repository. When your changes are done, you must send your work to the PrestaShop developers for approval. This means installing a tool to retrieve the PrestaShop code from GithubGitHub, edit editing it at will on your machine, and send sending your changes back to PrestaShop's Github GitHub repository.
If all this sounds like a foreign language, you should learn about Git and Github GitHub first. Go to the "Understand Understanding Git" section of this page.
...
In the process presented herein, we will work on Windows and use the TortoiseGit tool. Be sure to install it before you start. You can download it here: http://code.google.com/p/tortoisegit/wiki/Download?tm=2.
There are many more available GUI tools for Git on both Windows and OS X: http://git-scm.com/downloads/guis. Windows users should also install the Git for Windows extension: http://msysgit.GitHub.io/ (with the "Git bash here" option enabled).
If you are using a Unix system, we figure you should be happier with Git's own command line tool ![]() . Read all about it here: http://git-scm.com/book.
. Read all about it here: http://git-scm.com/book.
| Info |
|---|
Since March 20th, 2014, all of PrestaShop's default modules have been moved into their own Github GitHub repositories (or "submodules"). This implies a few changes on your side:
|
1. Creating a local clone of the PrestaShop repository
Connect to your Github GitHub account, and then:
- Go to the PrestaShop Github GitHub repository.
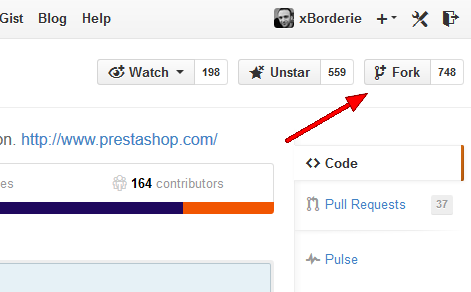
- Fork the project by clicking on the "Fork" button. The fork will appear as a "PrestaShop" repository in your own account, with all the original branches.
You've successfully forked the PrestaShop repository, but so far it only exists on your Github GitHub account. To be able to properly work on the project, you will need to clone it to your local machine. - On your local machine:
- Clone your fork:
- Create a new folder on your local machine. We'll name it "PS-MyChanges", but you can use whatever name you want.
- Get the HTTPS clone URL from your Github GitHub PrestaShop repository. It should resemble this: https://github.com/xBorderieyour-username/PrestaShop.git
- Right-click on your PS-MyChanges folder, and in the Git section of the menu that appears, choose "Git Clone..."
- In the "Git clone" window that opens, paste the clone URL in the "URL" field and remove the final "\PrestaShop" mention in the "Directory" field, so that the files are downloaded at the root of the folder.
Finally, do not forget to check the "Recursive" box so that you will also get all the default modules!
- If you want TortoiseGit to remember your Github GitHub username instead of asking it every time you push content to your online repository, you can add that username to your clone remote URL. For instance, in my case, that's if your username is your-username: https://xBorderie@githubyour-username@github.com/xBorderieyour-username/PrestaShop.git.
Note that TortoiseGit will still ask for your password . You can store that too in the clone each time you push changes to your GitHub account. Therefore, you can also store your password in the remote URL, but it is not recommended, for obvious reasons. Here is how: https://xBorderie:MyPaSsWoRd@githubyour-username:MyPaSsWoRd@github.com/xBorderieyour-username/PrestaShop.git.
- If you want TortoiseGit to remember your Github GitHub username instead of asking it every time you push content to your online repository, you can add that username to your clone remote URL. For instance, in my case, that's if your username is your-username: https://xBorderie@githubyour-username@github.com/xBorderieyour-username/PrestaShop.git.
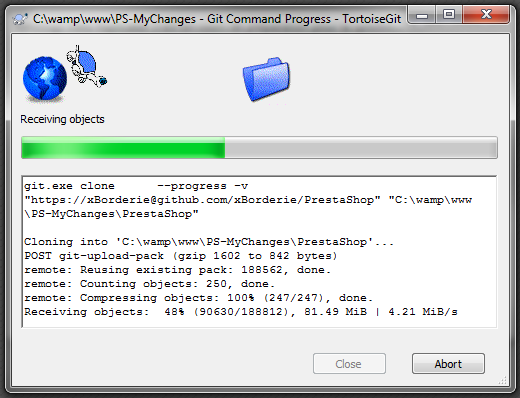
- Click OK: TortoiseGit will download the files and folders from your Github GitHub repo.
- (optional) Add the "upstream" remote: When a repository is cloned, it has a default remote repository called "origin" that points should point to your fork on GithubGitHub, not to the original PrestaShop repository from which it was forked from. To keep track of the changes in the original repository and keep your local clone updated, you need to add another remote URL named "upstream":
- Right-click on the PrestaShop folder in the PS-MyChanges folder (it should have a green mark if no change has been made yet), and at the bottom of the TortoiseGit submenu, choose "Settings". This opens the Settings panel.."
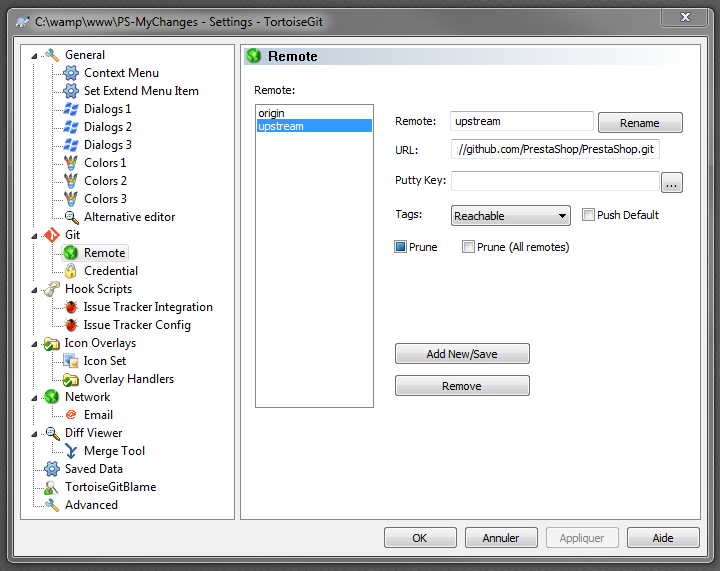
- Open the Git /> Remote section of the option Settings panel.
- Remote field: Type "upstream" in the "Remote field".From PrestaShop's Github repository, copy the HTTPS clone URL and paste it in TortoiseGit's "URL" field. It should .
- URL field: put the HTTPS clone URL from the official PrestaShop GitHub repository: https://github.com/PrestaShop/PrestaShop.git .
- Click the "Add new/Save" button. TortoiseGit asks you if you want to disable tag fetching for this remote: choose "No", since this remote IS an official remote.
- TortoiseGit asks you if you want to fetch remote branches from the newly added remote: choose "Yes".
- TortoiseGit displays a summary windowthe Fetch window for PS-MyChanges: click "OK". A window will open showing that Git is fetching data. Close it once it is done, and close the still-open Settings window (which should by now list "upstream" below "origin" in the list of remote URLs).
- Clone your fork:
2. Making your changes and pushing them to your
...
GitHub repository
Edit the files that you want to change. As soon as you save an edited file, Windows will change the file's icon from green to red to indicate that it has been changed since the last update.
...
- Reach the root of your local repository (the folder above PS-MyChanges). Right-click on the PS-MyChanges and choose "Git Commit -> 1.6...", with "1.6" being your current local branch. This will open an interface the Commit window. The files you have changed should appear in the "Changes made" section.
- Make sure to only
stage - commit the files that you meant to change for this
commit- feature/bugfix, but not any other changed files! For instance, PrestaShop and its modules might change some configuration files: do not ever
stage then - commit them!
If there are files that you did not change yourself or do not want to commit at this time, simply deselect them before clicking "OK".
- commit them!
- Write a commit message for your changes. Be sure to follow the commit message norm.!
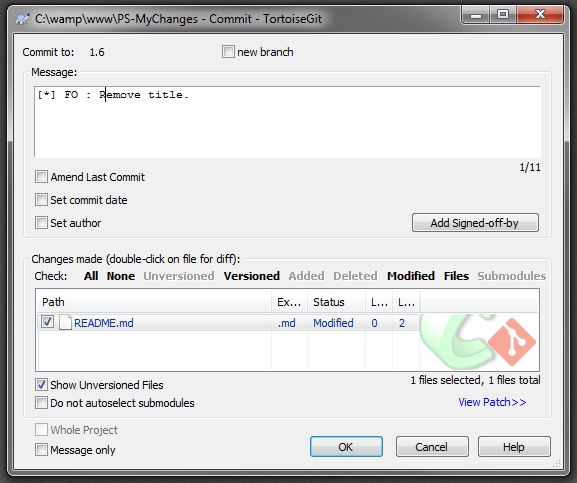
- Click the "OK" button: your changes are now committed to your local Git repository. Click "Close".
- Right-click on the PS-MyChanges folder and choose "Git Sync...": a the Git Synchronization window opens, asking you to which local branch the local commit should be pushed to which remote branch – usually it should be "1.6" in both cases, unless you have created a specific local branch your set of changes. Leave "origin" as the remote URL since you can only push your changes to your own repository on GitHub (and not the "upstream" official repository for PrestaShop), and click "Push".
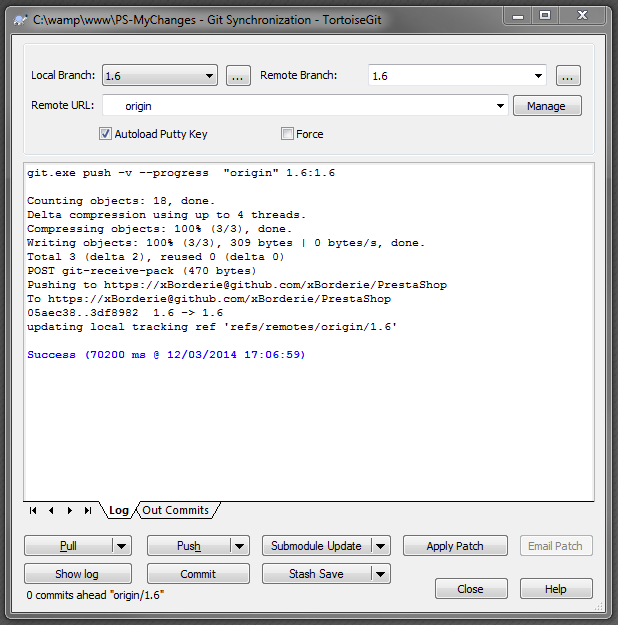
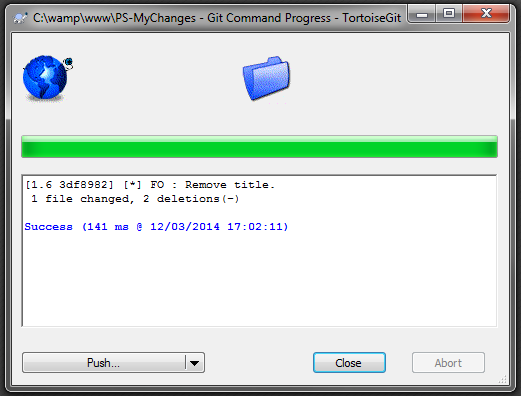
- TortoiseGit updates the window with the current status, and might also open an OpenSSH window asking you for your Github GitHub username, then your Github GitHub password. Give them both and validate: the status window should push your changes to your Github GitHub repository (see above).
- Success! You can close the TortoiseGit windows: the rest of the process will happen on GithubGitHub.
3. Submitting your changes to the PrestaShop developers
Now that your changes are stored on Githubyour GitHub fork, you need to let them be known to the PrestaShop developers. This is done by creating a "pull request" (or PR), which can be seen as making a code suggestion using all the files you have committed. Github GitHub has an excellent help page about creating pull requests, but here is a summary:
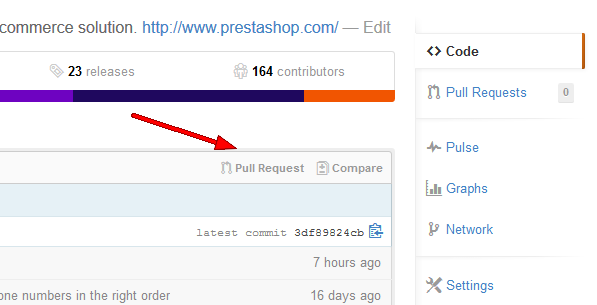
- Go to your own PrestaShop repository on GithubGitHub.
- Either click on the "Pull Request" button or the "Compare" button. Both will open the same screen, comparing your latest commit to the original code.
- The top of the screen indicates what is being compared. It should be PrestaShop's 1.6 branch with your own 1.6 branch. You should not have anything to change here, : just make sure that the base fork is the PrestaShop repository at branch 1.6, and that the head fork is your own repository is the head fork.
at the branch you pushed your changes to.
If GitHub says "There isn't anything to compare", you might have forgotten a step in this tutorial.
- Click on the "Create a pull request" button. A new screen should appear, in which you can review your changes and give your pull request a title (it should already use the commit message you used from your local clone).
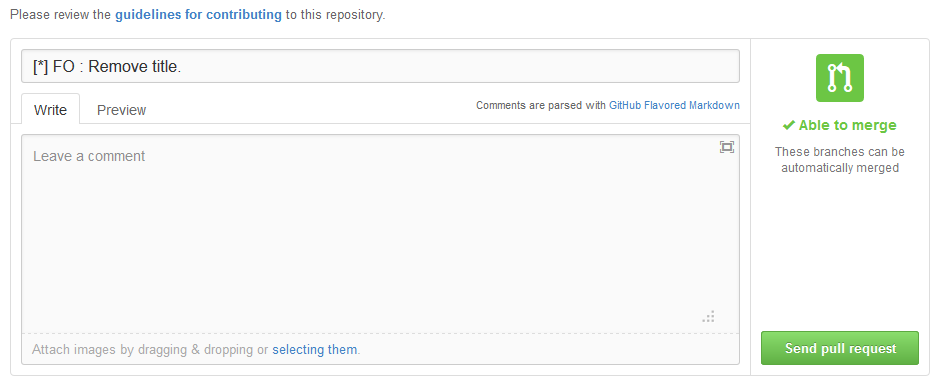
- This title is only for internal use at GithubGitHub: it helps the developerPrestaShop developers, but only your local commit message is kept in the project's Git history. In any case, most of the time you won't need to it edit the title: keep the commit message.
- Click on the "Send pull request" button: Github open GitHub opens a screen where you can start a conversation about your pull request, right in PrestaShop's Github GitHub repository.
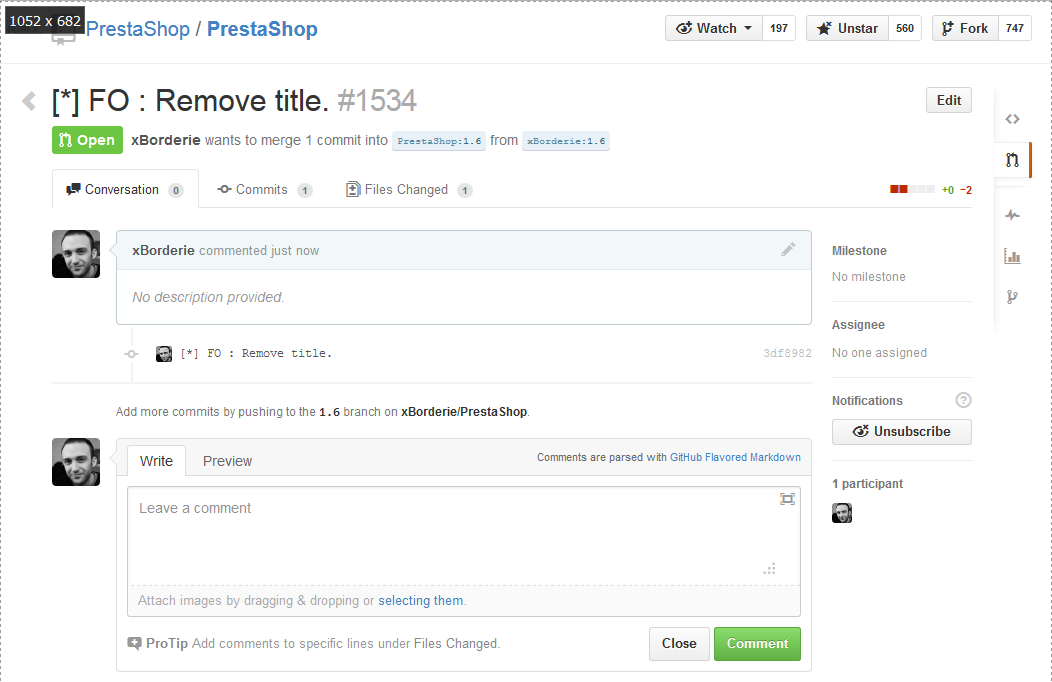
- Congratulation, your changes are now ready to add to the PrestaShop codebase!
...
Here is how to set up the local upstream remote if you haven't already:
- Right-click on the PrestaShop folder in the PS-MyChanges folder (it should have a green mark if no change has been made yet), and in at the bottom of the TortoiseGit submenu, choose "Settings". This opens the Settings panel.."
- Open the Git /> Remote section of the option Settings panel.
- Remote field: Type "upstream" in the "Remote field".From PrestaShop Github repository, copy the HTTPS clone URL and paste it in TortoiseGit's "URL" field..
- URL field: put the HTTPS clone URL from the official PrestaShop GitHub repository: https://github.com/PrestaShop/PrestaShop.git .
- Click the "Add new/Save" button. TortoiseGit asks you if you want to disable tag fetching for this remote: choose "No", since this remote IS an official remote.
- TortoiseGit asks you if you want to fetch remote branches from the newly added remote: choose "Yes".
- TortoiseGit displays a summary windowthe Fetch window for PS-MyChanges: click "OK". A window will open showing that Git is fetching data. Close it once it is done, and close the still-open Settings window (which should by now list "upstream" below "origin" in the list of remote URLs).
Now you can update the local clone:
- Right-click on the PrestaShop folder in the PS-MyChanges folder, and choose "Git sync..."
- In the Git Synchronization window that appears, choose "upstream" as the remote URL, and click on "Pull".
- TortoiseGit displays status information, downloads the latest data from your upstream remote URL (which should be https://github.com/PrestaShop/PrestaShop.git), and finally displays the latest changes from upstream, which have now been merged to your local repository.
Your local clone is now up to date, but you might want your fork on Github GitHub to also be on par with the upstream repository. You cannot do this from one Github GitHub repo to another, but TortoiseGit can do the trick for you, right after you have updated your local clone:
- Open the Git Sync Synchronization window if it is not yet open: right-click on the PrestaShop folder in the PS-MyChanges folder, and choose "Git sync...".
- Choose "origin" as the remote URL, and click on "Push".
- TortoiseGit displays status information, uploads the latest data from your origin remote URL, and finally displays the "Success" messageupdates the window with the current status, and might also open an OpenSSH window asking you for your GitHub username, then your GitHub password. Give them both and validate: the status window should push your changes to your GitHub repository.
You're done!
Making further pull requests for PrestaShop
You can continue editing your local copy of PrestaShop and submit your changes to the PrestaShop developers with the process we explained earlier. Here it is again, in a complete form:
- On your local machine:
- Always pull the latest changes from the upstream repository. This will prevent bad surprises, where you cannot push your changes until you have merged the ones that were made by other developers!
- Make your changes:
- Edit all the necessary files. As soon as you save and edited file, Windows will change its icon from green to red to indicate that it has been changed since the last update.
- Submit your changes to your Github GitHub repository:
- Once you are done editing the local files, reach the root of your local repository (the folder above PS-MyChanges).
- Right-click on the PS-MyChanges and choose "Git Commit -> 1.6", with "1.6" being your current branch. This will open an interface window. The files you have changed should appear in the "Changes made" section.
- Write a commit message for your changes. Be sure to follow the commit message norm.
- Click the "OK" button: your changes are now committed to your local Git repository. Click "Close".
- Right-click on the PS-MyChanges and choose "Git Sync...": a window opens, asking you to which branch the local commit should be pushed – usually it should be "1.6". Leave "origin" as the remote URL, and click "Push".
- TortoiseGit updates the window with the current status, and might also open an OpenSSH window asking you for your Github GitHub username, then your Github GitHub password. Give them both and validate: the status window should push your changes to your Github GitHub repository (see above).
- Success! You can close the TortoiseGit windows: the rest will happen on GithubGitHub.
- Submit your changes to the PrestaShop repository:
- Go to your own PrestaShop repository on GithubGitHub.
- Either click on the "Pull Request" or the "Compare" button. Both will open the same screen, comparing your latest commit to the original code.
- The top of the screen indicates what is being compared. It should be PrestaShop's 1.6 branch with your own 1.6 branch. You should not have anything to change here, just make sure that the base fork is the PrestaShop repository, and that your own repository is the head fork.
- Click on the "Create a pull request" button. A new screen should appear, in which you can review your changes and edit your commit message (it should already use the commit message you used from your local clone).
- Click on the "Send pull request" button: Github GitHub open a screen where you can start a conversation about your pull request, right in PrestaShop's Github GitHub repository. Congratulation, your changes are now ready to add to the PrestaShop codebase!
- Wait for one of the core developers either to include your change in the codebase, or to comment on possible improvements you should make to your code.
Welcome to the fabulous world of Git collaboration!
Understanding Git
...
Making a pull request for one of PrestaShop's modules
PrestaShop's default modules are stored in separate repositories from the main repository: each has its own repository on PrestaShop's GitHub account. For instance:
- 1-Click Upgrade: https://github.com/PrestaShop/autoupgrade
- Homeslider: https://github.com/PrestaShop/homeslider
- Theme Configurator: https://github.com/PrestaShop/themeconfigurator
- etc.
You can see the various repositories here: https://github.com/PrestaShop
They are separated on the main repository, but since you made a recursive clone of PrestaShop, they were all downloaded by Git as if they were part of PrestaShop. You MUST do another step in order to have a proper setup:
- Right-click on the your clone folder (in this example, PS-MyChanges) and choose the "Git bash here" option. If you do not have it, install Git for Windows (http://msysgit.github.io/) with "Git bash here" option enabled.
- In the bash window that opens, type this command: "
git submodule update --init" (without the quotes).
This will pull the modules and detach them. They won't have any branch: this is meant to avoid breaking your project when a third-party submodule is updated.
Having modules separated from the main PrestaShop repository means that you cannot push edited module files into the main repository; you have to follow a process similar to the one that you used for PrestaShop:
- (optional) Fork the module's repository to your own GitHub account. For instance, fork https://github.com/PrestaShop/gridhtml to your own https://github.com/your-username/gridhtml.
- Add your fork as an 'origin' remote on the module's local folder:
- Go to your local modules directory (for instance,
/PS-MyChange/modules). - Open TortoiseGit's "Settings" window for the module's folder (for instance, /gridhtml's folder).
- Go to the Git > Remote section. You should already one registered remote URLs: "origin", pointing to the original repository for the module (for instance, https://github.com/PrestaShop/gridhtml.git).
- Crate an "upstream" remote, while keeping the URL as-is. Validate, and retrieve the branches.
- Create a new "origin" URL for your fork's URL. For instance, with gridhtml, that would be https://github.com/your-username/gridhtml.git.
- Validate.
- Go to your local modules directory (for instance,
You are now ready to edit your files, but please understand this: you should make your changes (or at least push them) to the "dev" branch of the module, NOT the "master" branch. The PrestaShop developers will not accept changes sent to the "master" branch! Here is how to switch branch with TortoiseGit:
- Right-click on the module's folder, and in the TortoiseGit submenu, choose "Switch/Checkout...".
- In the window that opens, choose the "remotes/origin/dev" branch and click "OK".
There, you can make your changes!
Now, when pushing your changes:
- Rick-click on the module's folder, and choose "Git sync...".
- Make sure you are pushing the local dev branch to the remote dev branch, and that the remote URL is "origin".
- Click "Push".
Your changes are now on your GitHub account, in the repository for this module (for instance, https://github.com/your-username/gridhtml). All you have to do now is create a Pull Request for these changes, just as you would do for PrestaShop.
Thank you for your contribution!
Understanding Git
The GitHub website has more information on how to fork a repo, how to use pull requests and many more articles on Github GitHub collaboration, but the best way to go is to learn more about Git and GithubGitHub:
- The Git book: http://git-scm.com/book
- git ready: http://gitready.com/
- Git Immersion: http://gitimmersion.com/
- Think Like (a) Git: http://think-like-a-git.net/
- Git cheatsheetCheat Sheet: http://byte.kde.org/~zrusin/git/git-cheat-sheet-medium.png
- Try GithubGitHub: http://try.githubGitHub.io/
- Github GitHub help: https://help.github.com/
- Rich Jones: How to GitHub: Fork, Branch, Track, Squash and Pull Request
Making changes directly in
...
GitHub
This is not the recommended way to contribute code, and should only be seen as alternative if you don't feel comfortable forking the project or using Git altogether. One of the issues of this method is that it might bring hundreds of untested pull requests to the PrestaShop developers, who are already trying hard to focus on their own assigned projects...
Github GitHub makes it possible to edit files directly online. Here is how:
- Browse to the target file on PrestaShop's repository. Make sure you are on the "1.6" branch!
- Click the "Edit" button: Github GitHub will open a web-based editor, indicated indicating that they are taking care of forking the project for you.
- Make your changes in the editor. Be sure to follow the PrestaShop coding standard!
- Then Once done, click on "Propose File Changefile change".
Github GitHub will then automatically create a new fork and with a "1.6" branch on your own Github GitHub account, then suggest to create a pull request to PrestaShop: just write a commit message (follow the PrestaShop commit message norm!), and validate. Once the pull request is submitted, you just have to wait for a core developer to answer youact on it.
You can also easily create a new file directly on GithubGitHub:
- From your fork of PrestaShop, click the "+" button next to the project's name (usually, next to "PrestaShop").
- Once the online editor is open, type your code in the screen. Try not to forget to add the notice of license and the disclaimer in a comment section at the top of the file, just like every other files in PrestaShop do.
- Save your file. Do not forget to give it a name, along with a commit summary and, if needed, an extended description of what your file brings to PrestaShop. This is essential as the PrestaShop developer will use it to get the context of your file, and therefore to decide whether it should be added to PrestaShop or not.
| Note |
|---|
Make sure that you are always making changes to the latest version of the original repository. This means that the "Branch" button above the list of file should read "branch: development1.6", and not "branch: master":
|