CMS
...
PrestaShop enables you create content pages as easily as you would create product pages, using its CMS tool. The pages will appear to customers in the "Information" block on your homepage and in the site menu. You can add CMS pages in the top menu using the "Top horizontal menu" module (which you can configure from the "Modules" page).
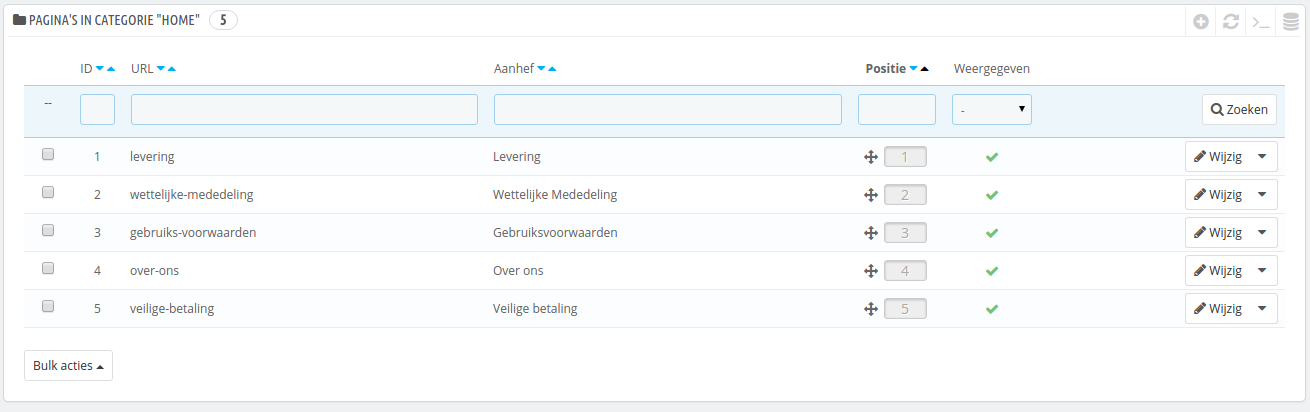
The "CMS" page presents you all the content pages that were previously created on your shop, for the currently selected category (by default, the home page is the only category).
| Tip |
|---|
Do not forget to create one version of each page for each of your supported languages! As usual, click on the language selector for each field in order to change language. |
Creating a New CMS Category
Click the "Add new" button to create a CMS category – actually, a sub-category of the root category, "Home". You can create as many categories as needed.

The form is quite basic:
- Name. Make sure to use a short and straightforward word.
- Displayed. Whether the category and its pages are available to the public, or hidden.
- Parent CMS category. The category under which this category is placed. By default, "Home". You can have an unlimited number of levels of sub-categories.
- Description. Do fill this field in all languages, as some theme can display that information to customers.
- Meta title. The name of the category, as displayed in the browser.
- Meta description. Used to describe the content of this category for search engines.
- Meta keywords. Used by search engines to understand what type of information the category is composed of.
- Friendly URL. Makes it easier for search engines to index your content, and for visitors to understand what they will find in the category. This field is automatically filled as you enter the category name, but you can still edit it manually.
When you save the category, PrestaShop takes you back to the tables, this time using the newly created category as its base. Therefore, you will not see any sub-category or sub-pages in here unless you create some.
In order to go back to the root category, click on "Home" in the "Current category" section at the top. You can then edit each pages from the root category and move them into your newly created category if you feel like it.
| Tip |
|---|
In order to create sub-categories, simply change the "Parent CMS Category" option from "Home" to the wanted parent category for the category you are creating. |
Creating a New CMS Page
Click the "Add New" button to reach the content creation form:
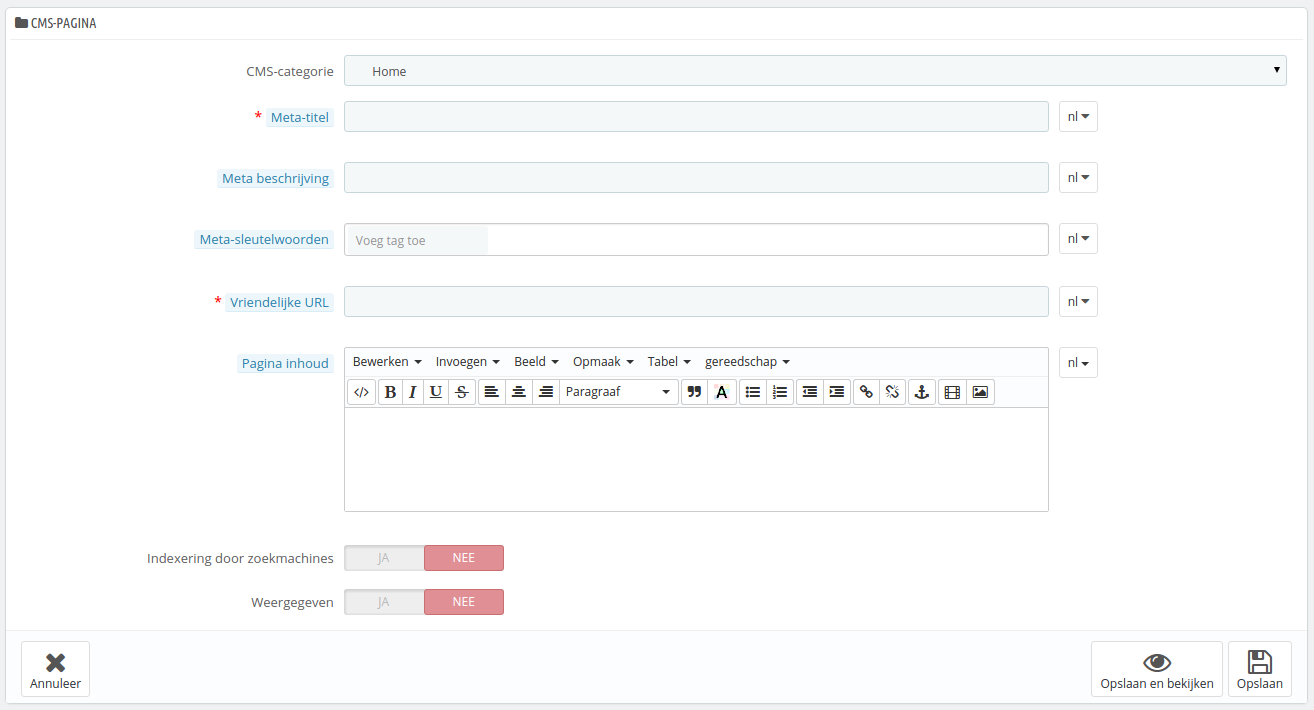
- CMS Category. The default category is the home-page of your shop. If you want to have this page in another category, you must first have created.
- Meta title. The name of the page, as displayed in the browser.
- Meta description. Used to describe the content of this page for search engines.
- Meta Keywords. Used by search engines to understand what types of information the page is composed of.
- Friendly URL. Makes it easier for search engines to index your content, and for visitors to understand what they will find in the category. This field is automatically filled as you enter the category name, but you can still edit it manually.
- Page content. This is the main content of your page. In this WYSIWYG editor, you can put as much text as necessary, even images or videos using the "Insert Image" or "Insert Embedded Media".
- Indexation by search engine. Indicates whether search engines should register this page or not.
- Displayed. You can choose to have you page public only once you are done proofreading it, and keep it as a draft for the moment. A draft is invisible to the public.
...
instellen - statische content beheren
PrestaShop maakt het toevoegen van CMS-pagina's net zo gemakkelijk als het toevoegen van productpagina's, door middel van het CMS-gereedschap. Deze pagina verschijnt voor klanten in het "Informatie"-blok op de homepage en het website-menu. U kunt CMS-pagina's toevoegen aan het topmenu door de module "Horizontaal top menu" te gebruiken (deze kan geconfigureerd worden vanaf de pagina "Module en Services" onder het menu "Modules en Services").
De configuratiepagina "CMS" toont een aantal pagina's die zijn aangemaakt in uw winkel, voor de huidig categorie (standaard is de homepage de enige categorie).
| Tip |
|---|
Vergeet niet om voor elke taal in uw winkel een eigen versie aan te maken! Zoals gebruikelijk klikt u op de taalselector naast elk veld om de taal te veranderen. |
Een nieuwe CMS-categorie aanmaken
Klik op de knop "Voeg een nieuwe CMS categorie toe" om een CMS-categorie aan te maken – in feite een subcategorie van de hoofdcategorie "Home". U kunt zoveel categorieën aanmaken als nodig is.
Het formulier is vrij eenvoudig:
- Naam. Zorg ervoor dat u een korte, maar krachtige naam gebruikt.
- Weergegeven. Of de categorieën openbaar zijn of verborgen.
- Hoofd CMS-categorie. De categorie waar deze categorie onder geplaatst gaat worden. Standaard staat deze optie op "Home". U kunt een ongelimiteerd aantal niveaus van subcategorieën aanmaken.
- Omschrijving. Vul dit veld in, in alle talen, omdat sommige thema's deze informatie kunnen tonen aan klanten.
- Meta-titel. De naam van de categorie, zoals deze opgepikt wordt door browsers en zoekmachines.
- Meta beschrijving. Wordt gebruikt om de inhoud van deze categorie te beschrijven. Wordt getoond in zoekmachines.
- Meta-sleutelwoorden. Wordt gebruikt door zoekmachines (behalve Google) om te begrijpen welk type informatie te vinden is op deze pagina.
- Vriendelijke URL. Maakt het gemakkelijker voor zoekmachines om uw inhoud te indexeren en voor bezoekers om te begrijpen wat ze in de categorie kunnen vinden. Dit veld wordt automatisch ingevuld als u de categorienaam hebt bepaald, maar u kunt het alsnog handmatig bijwerken.
Wanneer u de categorie bewaard, dan brengt PrestaShop u terug naar de tabellen, maar deze keer wordt de nieuwe categorie getoond als basis. Daarom ziet u nog niet meteen de subcategoriën of subpagina's, tenzij u deze aanmaakt.
Om terug te gaan naar de hoofdcategorie, klikt u op "Home" in de sectie met de naam "Huidige categorie" aan de bovenkant van de pagina. U kunt daarna pagina's inde hoofdcategorie aanpassen en deze zelfs verplaatsen naar uw nieuwe categorie.
| Tip |
|---|
On nieuwe subcategoriën aan te maken, verandert u de optie "Hoofd CMS-categorie" van "Home" naar de gewenste hoofdcategorie. |
Een nieuwe CMS-pagina aanmaken
Klik op de knop "Voeg een nieuwe CMS pagina toe" om het volgende aanmaakformulier te bereiken:
- CMS-categorie. De standaardcategorie is de homepage van uw winkel. Als u wilt dat deze pagina beschikbaar is in een andere categorie, dan moet u deze eerst aanmaken.
- Meta-titel. De naam van de pagina, zoals getoond in de browser.
- Meta beschrijving. Wordt gebruikt om de inhoud van deze pagina te beschrijven. Wordt getoond in zoekmachines.
- Meta-sleutelwoorden. Wordt gebruikt door zoekmachines (behalve Google) om te begrijpen welk type informatie te vinden is op deze pagina.
- Vriendelijke URL. Maakt het gemakkelijker voor zoekmachines om uw inhoud te indexeren en voor bezoekers om te begrijpen wat ze op deze pagina kunnen vinden. Dit veld wordt automatisch ingevuld als u de naam hebt bepaald, maar u kunt het alsnog handmatig bijwerken.
- Pagina inhoud. Dit is de inhoud van uw pagina. In deze WYSIWYG-bewerker kunt u zoveel tekst toevoegen als nodig is, zelf afbeeldingen of video's door gebruik te maken van de opties "Afbeelding invoegen/bewerken" en "Video invoegen/bewerken".
- Indexering door zoekmachines. Geeft aan of zoekmachines deze pagina mogen indexeren of niet.
- Weergegeven. U kunt ervoor kiezen om uw pagina openbaar te maken, zodra u klaar bent met proeflezen.
Zodra alle velden zijn ingevuld, klikt u op "Opslaan", als de pagina actief is kunt u het resultaat gelijk bekijken in uw winkel.